The Properties panel of the Inspection Editor is used to change settings for an inspection and any sub-inspections and sub-inspection tests the inspection contains. The Properties panel displays any time the editor is open.
|
Contents [Hide] |
To change a setting for any inspection item (a sub-inspection, test, or the inspection itself), it must be the active component in the Properties panel. When you first open the Inspection Editor, the Properties panel displays properties specific to the inspection level, but you can easily display properties for other inspection items you have added using one of the following three methods:
![]() The drop-down list on the Properties
panel normally displays all the names of each sub-inspection you have
added to the inspection, plus the name of the inspection. This helps you
to keep track of which properties belong to which item you have added.
You can click an item in this list to display properties specific to that
item.
The drop-down list on the Properties
panel normally displays all the names of each sub-inspection you have
added to the inspection, plus the name of the inspection. This helps you
to keep track of which properties belong to which item you have added.
You can click an item in this list to display properties specific to that
item.
![]() Another method for displaying properties
for an inspection item is to click the labeled button for that item. If
you click a button for a sub-inspection that contains tests, the test
names will also display in the properties list. In the following diagram,
the Fluid check sub-inspection
is selected and the test properties added to that sub-inspection display
in the properties list and in the Design panel.
Another method for displaying properties
for an inspection item is to click the labeled button for that item. If
you click a button for a sub-inspection that contains tests, the test
names will also display in the properties list. In the following diagram,
the Fluid check sub-inspection
is selected and the test properties added to that sub-inspection display
in the properties list and in the Design panel.
![]() You can also click a test button or
its name in the Properties panel drop-down list to display properties
specific to it.
You can also click a test button or
its name in the Properties panel drop-down list to display properties
specific to it.

The properties grid is divided into two columns. The left column contains properties (and any subproperties) that are specific to any inspection item. The right column contains setting options for the properties listed adjacent to each.
Click the property name if it is visible or click the value cell adjacent to it in the right column
-or-
Click the ![]() symbol
preceding a category (categories are in bold font) to expand it so
it displays all of its properties. Then, click on the target property
symbol
preceding a category (categories are in bold font) to expand it so
it displays all of its properties. Then, click on the target property
-or-
Click the ![]() symbol
preceding a property to expand it to display its subproperties. Then,
click on the target subproperty.
symbol
preceding a property to expand it to display its subproperties. Then,
click on the target subproperty.
 Click
the
Click
the ![]() symbol preceding a category or property
to collapse it so that none of its properties or subproperties show.
symbol preceding a category or property
to collapse it so that none of its properties or subproperties show.
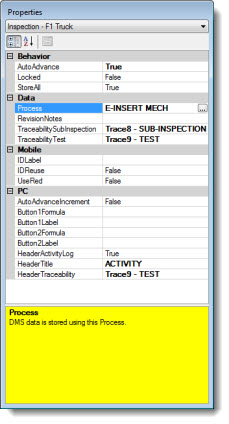
When you select a property by clicking in a cell on the left column of the properties grid, a description for that property's function opens in the yellow region at the bottom of the Properties panel. In the following example, the Response property for a Checkbox sub-inspection test has been selected (as indicated by the highlighted Response property). The description for that property displays.

The value cells for each property adjacent to it may differ on editing methods. It will allow you to either:
Enter alphanumeric characters
Select options from a drop-down window. (When you click in the value cell, a drop-down menu button appears.)
Make selections from or enter alphanumeric
characters in a dialog box. When you click in the value cell, an ellipsis
button ![]() displays. When you click the
button, a dialog opens.
displays. When you click the
button, a dialog opens.
Choose values from a list of subproperties that appears when you click in the window
Change the value of a subproperty
The Properties panel toolbar located just above the grid has two buttons for sorting properties within the property grid. Switch between these two buttons to help locate specific properties using different methods.
Button |
Name |
Function |
|
Categorized |
Sorts properties alphabetically within their respective categories |
|
Alphabetical |
Sorts properties alphabetically—independent of their respective categories |
| The
button on the far right on the toolbar is intentionally disabled
since it is not needed with GainSeeker Suite. |
||