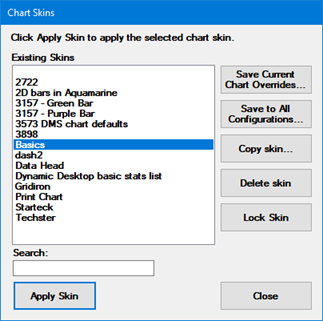
The Chart Skins dialog (Fig. 3) is used to save new chart skins you create and to apply existing skins to a chart. It is also used to perform other tasks for chart skins. The dialog opens from the Settings tab or Settings dialog for DMS and SPC charts.
|
Contents [Hide] |
You can add your company name and specify multiple other settings to a chart skin you create. You can also save your company logo or another background image as a chart skin.
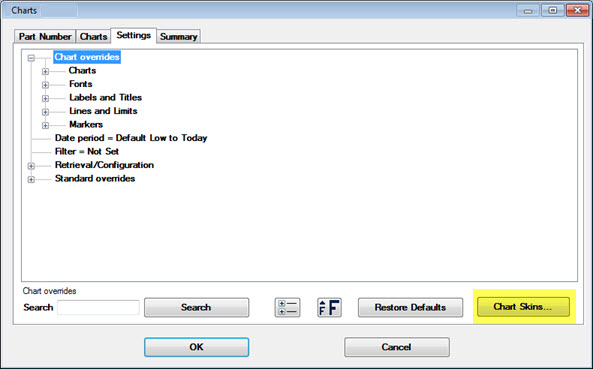
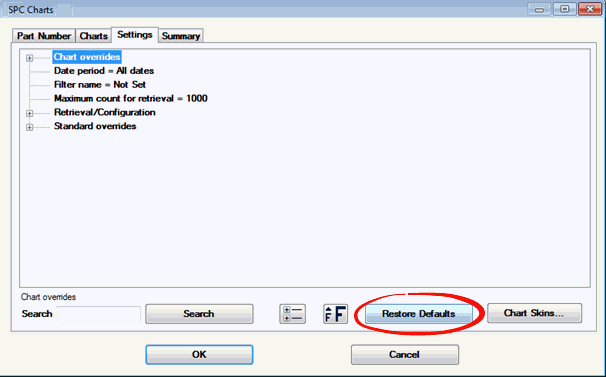
To open the Chart Skins dialog (Fig. 3), click the Chart Skins... button (Fig. 2) on the Settings tab:
Use the Apply Skin button on the Chart Skins dialog (Fig. 3) to apply a chart skin in the Existing Skins list to the current open chart.
To apply a skin:
Click the name of the chart skin in the Existing Skins list that you want to apply to the current chart. Then click Apply Skin.
Click OK on the Settings tab to draw the chart with the skin you applied.
For information about removing chart skins and tips for printing, see:
Your GainSeeker software also includes ready-to-apply chart skins that display in the list along with any other available charts skins you can apply.
Use the Save Current Chart Overrides... button on the Chart Skins dialog to:
Save and name a new chart skin. This saves all Chart overrides settings on the current open chart as a chart skin. How to access Chart overrides settings
Overwrite a chart skin in the Existing Skins list on the dialog with all the Chart overrides settings for the current chart. Note: Another option is to use the Copy... button to copy the settings of an existing skin to a new chart skin, which maintains the settings for the original skin.
To save and name a new chart skin:
Click Save Current Chart Overrides... on the Chart Skins dialog (Fig. 3).
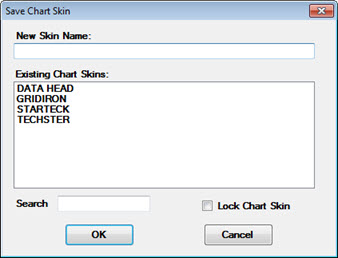
The Save Charts Skin dialog (Fig. 4) opens.
Enter a name for the new chart skin in the New Skin Name text box. Then, click OK. You can also opt to lock the chart skin by selecting the checkbox preceding Lock Chart Skin. Then, click OK.
To overwrite an existing chart skin with all the Chart overrides settings of the current open chart:
Click Save Current Chart Overrides... on the Chart Skins dialog (Fig. 3). The Save Charts Skin dialog (Fig. 4) opens.
Click a chart skin name in the list on the Save Charts Skin dialog that you want to overwrite. The skin name will display in the New Skin Name text box.
Click OK. A confirmation dialog displays asking if you want to replace the existing version of the selected chart skin with all the current Chart overrides settings.
This works the same as the Save Current Chart Overrides... button except that it saves the chart skin to this GainSeeker configuration and to all other GainSeeker configurations. Any existing chart skin (of the same type - SPC or DMS) with that same name will be overwritten - even if it exists in another GainSeeker configuration.
Use the Copy... button on the Chart Skins dialog to:
To copy a chart skin:
On the Save Chart Skin dialog (Fig. 3), click the name of the chart skin in the list you want to copy. Then, click Copy... .
Enter a new name for the copy in the New Chart Skin Name text box that displays. Then, click OK.
Use the Delete button on the Chart Skins dialog to:
To delete a chart skin:
 When
a chart skin is locked, the only users who can change, delete, or overwrite
that skin are those that have been given rights in the GainSeeker System Administration module to
edit locked items. If you do not have this right, the Lock/Unlock
button is unavailable and you cannot lock or unlock charts skins. Click
a skin in the Existing Skins list
on the Chart Skins dialog to determine
if that skin is locked. When it is locked, the button on the Charts
Skins dialog displays this label: Unlock
Skin. The button label displays Lock
Skin if that skin is unlocked.
When
a chart skin is locked, the only users who can change, delete, or overwrite
that skin are those that have been given rights in the GainSeeker System Administration module to
edit locked items. If you do not have this right, the Lock/Unlock
button is unavailable and you cannot lock or unlock charts skins. Click
a skin in the Existing Skins list
on the Chart Skins dialog to determine
if that skin is locked. When it is locked, the button on the Charts
Skins dialog displays this label: Unlock
Skin. The button label displays Lock
Skin if that skin is unlocked.
A chart skin can be locked when it is created or any time after it is created.
To lock a new chart skin:
To lock an existing skin:
Click a chart skin name in the Existing Skins list on the Chart Skins dialog. Then, click Lock Skin. The button label changes to Unlock Skin.
To unlock a skin (if you have rights):
There are two easy methods for redrawing a chart without the chart skin you have applied. The methods described in the following table can be especially useful when you want to print a chart that has a chart skin applied that would require a lot of printing ink.
To |
Action |
Result | Duration |
|
|
|
(Temporary changes, including applying a Chart Skin, can still be made to new charts after they are drawn using the Chart Settings dialog available from the right-click menu for a chart.) |
|
|
|
|
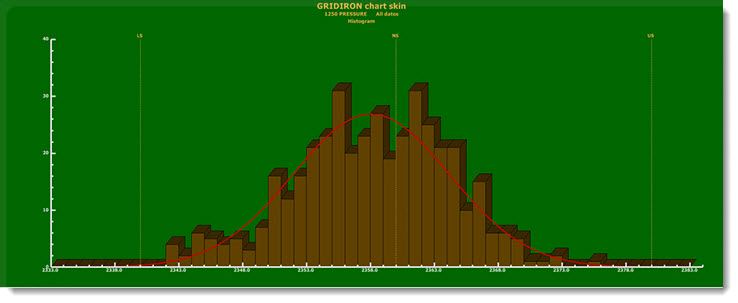
Example of the chart skin "Gridiron," one of the ready-to-apply chart skins included with GainSeeker Suite: