Installing GS Analyze version
9.4
GS Analyze provides a browser-based portal
for GainSeeker data analysis. This makes it easy for you to give colleagues
and customers access to the data they require.
You must install the GainSeeker client
on the web server or intranet server, before installing GS Analyze.
Install GS Analyze on your web server or
intranet server, using the following instructions.
A. Install GainSeeker version 8 or later on other computers
Before installing GS Analyze, you should first install GainSeeker version
8.0 or later on one or more computers on your network. For instructions,
see Installing or Upgrading
GainSeeker.
B. Set up a GainSeeker User with Module Access to GS Analyze
At one of the GainSeeker workstations, configure one or more GainSeeker
Users with a Role
that has Module Access for GS
Analyze.
C. Copy the CD to the local
drive (recommended)
If Windows needs to perform a Change
(repair) for the GainSeeker client or for GS Analyze, it may need to access
the GainSeeker installation CD to complete the repair. It will try to
access the CD in the same location that was used to install the GainSeeker
client or GS Analyze on this server.
To avoid the need to insert your GainSeeker installation CD
in the CD-ROM drive each time
a Change (repair) is needed on
this server, Hertzler Systems recommends the following strategy:
Copy the GainSeeker client installation to a folder on the local
drive –
either the entire CD or only the .\SPC\DISK1\
folder.
Copy the GS Analyze installation to a folder on the local drive
– either the
entire CD or only the .\GSAnalyze
folder (and subfolders).
Use this local copy of the CD when installing the GainSeeker
client and GS Analyze on this server.
D. Meet System Requirements
Make sure your system meets the Workstation
Requirements for installing the GainSeeker client and the Web
Server Requirements for installing GS Analyze.
E. Add and configure Server Role for Web Server (IIS)
Installation details are provided for Windows Server 2012 R2 Standard.
If your web server or intranet server uses a different version of Windows
server, you should determine the equivalent for your server.
In the Server Manager
utility, launch the Add Roles and
Features Wizard.
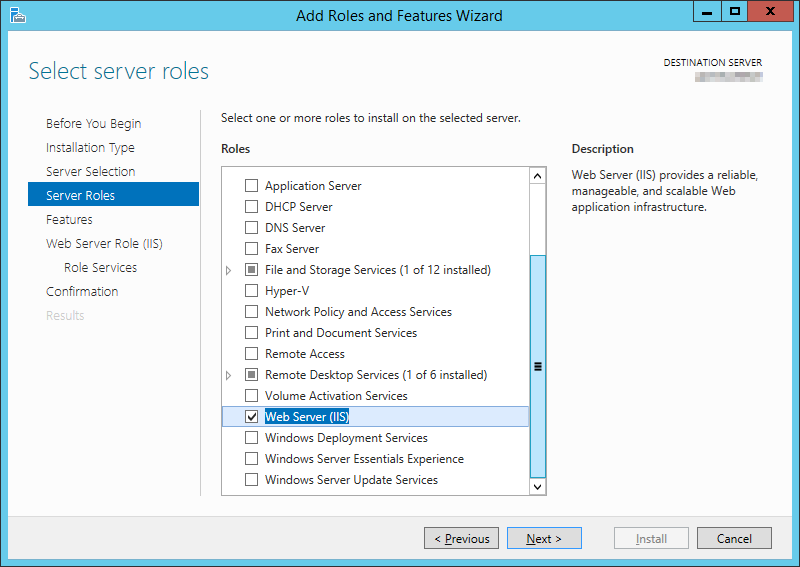
On the Select
server roles page, chose Web
Server (IIS) and then click Next.
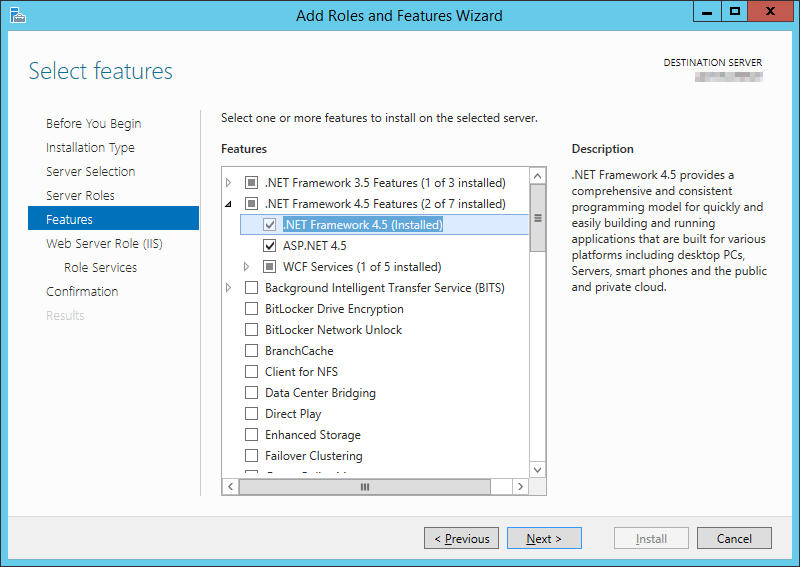
On the Select features
page, expand .NET Framework 4.5 Features.
Then check both .NET Framework 4.5
and ASP.NET 4.5 and click
Next.
On the Web Server role (IIS)
page, click Next.
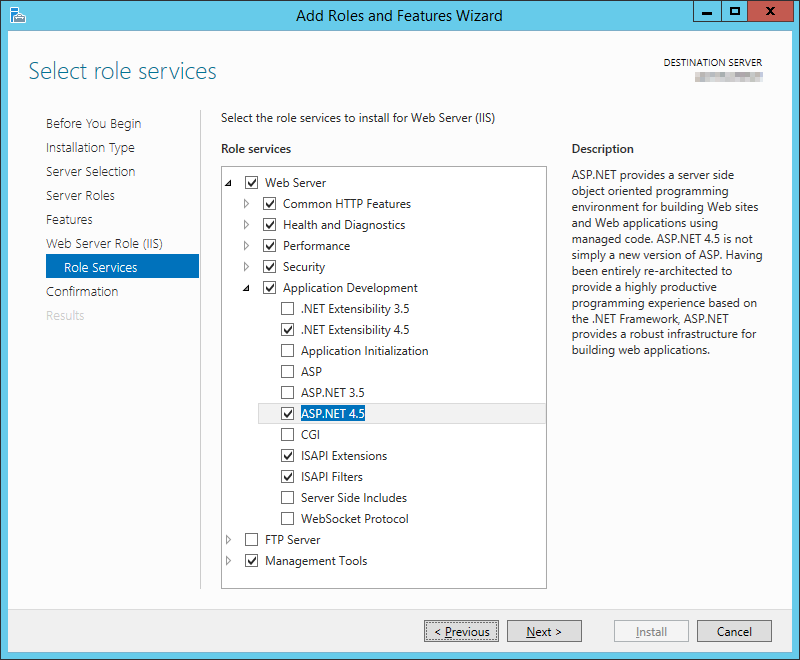
On the Select role services
page, expand Web Server and
Application Development. Then
check ASP.NET 4.5 and click
Next.
On the Confirm installation
selections page, check Restart
the destination server automatically if required and
then click Install.
F. Install the GainSeeker client on the IIS server
Use the same instructions for Installing the
GainSeeker client that were used to install GainSeeker on other computers.
G. Install GS Analyze on the IIS server
Use one of these methods to begin the installation:
If you copied
the installation CD (or a portion) to the local drive, browse
to the .\GSAnalyze\Disk1 folder in
this location and run the SETUP program.
Otherwise,
insert the GainSeeker installation CD
and install GS Analyze from the automatic menu (or manually start
the menu by browsing to the CD-ROM drive and running the SETUP program).
H. Change all drive letter file paths to UNC paths or relative paths
GS Analyze is designed to access your GainSeeker data even when no domain
users are logged on to the web server or intranet server.
Because drive letters are only mapped when a domain user is logged on
to the server, it is important to set up GS Analyze with file paths that
do not contain drive letters so that it can access GainSeeker files on
your network even when no domain users are logged on to the web server
or intranet server.
in Cms.ini
Use Windows to search for all instances of the file named Cms.ini
on this computer, and in each file change the config_path=
setting to use a UNC path instead of a drive letter path.
After making this change, verify that GainSeeker still runs correctly
by launching a GainSeeker module and logging in. Then close the GainSeeker
module.
in Redirect.hsi
Use Windows to search for all instances of the file named Redirect.hsi
on this computer, and in each file change the redirect=
setting to use a UNC path instead of a drive letter path.
After making this change, verify that GainSeeker still runs correctly
by launching a GainSeeker module and logging in. Then close the GainSeeker
module.
in the Administration module
Log in to the Administration module and change
all file paths for all configurations to use UNC paths or relative
paths (e.g., .\foldername\ ) instead of
fixed drive letter paths.
I. Identify a GainSeeker login to test GS Analyze access
Log in to the GainSeeker System Administration module at any GainSeeker
workstation and identify the User
(and password) that you will use to test your access to log in to GS Analyze.
You can either choose an existing user or create a new user.
The User you choose should be assigned to a Role
with module access to GS Analyze. This User should also be assigned to
a Configuration that contains some standards and data.
J. Create a domain user for GS Analyze
Create a new domain user (or choose an existing domain user) that GS
Analyze and Windows Internet Information Services (IIS) can use to access
GainSeeker data on the network.
You must configure this domain user with:
a password that does not expire
the same access as your other GainSeeker users to the folder
referenced by the config_path=
setting (above) and its subfolders
the same access as your other GainSeeker users to the GainSeeker
database
After you have configured this domain user with the necessary access
to the config_path= folder and the
GainSeeker database, the remaining steps will configure Windows Internet
Information Services (IIS) and GS Analyze to use this domain user when
accessing GainSeeker data.
K. Add the domain user to the "Power Users" group
Add the domain user to the "Power Users" group on the web
server or intranet server.
L. Log in as the domain user
Now log in to the web server or intranet server as the domain user.
This will set up the necessary windows user profile, folders, registry
settings, and other items for this user.
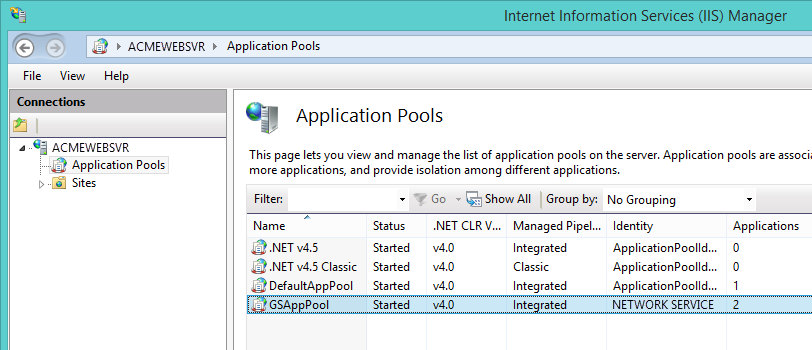
M. Configure the App Pool to access GainSeeker as the domain user
In IIS Manager, navigate to Application
Pools. Right-click GSAppPool
and choose Advanced Properties.
In the Advanced Settings,
edit the Identity property.
Change the Identity
property to Custom Account,
then choose the domain user you created for GS Analyze.
N. Test GS Analyze at the IIS server
Before you try to run
GS Analyze at another computer, you should first test it at the IIS server.
Launch a browser at
the server and go to http://localhost/gsanalyze
.
This should take you
to the GS Analyze login page and allow you to type the GainSeeker user
name and password that you identified in step B
(above).
O. Test GS Analyze from any device on the network (intranet server
only)
At any device on your local area network, launch a web browser and go
to http://<server_name>/gsanalyze .
This should take you to the GS Analyze login page and allow you to type
the GainSeeker user name and password that you identified in step B (above).
For a company intranet, this is the address that you should make available
to employees who need to use GS Analyze. You also need to provide a GainSeeker
user name and password for them to log in to GS Analyze.
P. Test GS Analyze from any device outside your network (web server
only)
At any device that is not connected to your local area network, launch
a web browser and go to http://<URL>/gsanalyze
.
This should take you to the GS Analyze login page and allow you to type
the GainSeeker user name and password that you identified in step B (above).
For a website that is available to computers across the internet, this
is the address that you should make available to people who need to use
GS Analyze. You also need to provide a GainSeeker user name and password
for them to log in to GS Analyze.
Upgrading GS Analyze
from a previous version
If you are upgrading GS Analyze from version 9.2.1 or earlier, you must
manually update the web.config file on the web server after installing
the new versions of the GainSeeker client and GS Analyze.
Use Windows NotePad to open the file <local drive letter>:\inetpub\wwwroot\gsanalyze\web.config .
In this file, find the following line:
<bindingRedirect oldVersion="0.0.0.0-7.0.0.0"
newVersion="7.0.0.0" />
Replace that line with this one:
<bindingRedirect oldVersion="0.0.0.0-11.0.0.0"
newVersion="11.0.0.0" />
Save your changes to web.config.
More information
Using
GS Analyze