You can build a template that allows you to enter data via the keyboard for several standards at a time.
Click New. Type a name for the new template, such as “Keyboard entry” and then click OK.
Set the Number of rows in template to the number of characteristics for which you would like to enter data.
For example, if each part number that you measure has three characteristics to measure (such as length, protrusion length, and out-of-round), then you should set the number of rows in your template to 3.
Under Step through template by, select Row.
This will allow you to measure one characteristic on all of the pieces in one subgroup before you measure the next characteristic on those same pieces.
Click Next.
Under Save data when?, select At the end of each row.
Click Next, and then click Next again.
If the subgroup size for any of your standards is greater than 5, click Insert three times to add Data 6, Data 7 and Data 8 to the display of selected columns.
Click Next, and then click Next again.
Click the Data Table tab.
To add instructions to your template, select Instructions from the Tab Type list, and then click Insert Tab.
Type any instructions you want to provide for your data entry operators about how to use this template.
To add statistics to your template, select Statistics from the Tab Type list, and then click Insert Tab.
Select an existing statistics list format from the Select the statistics list to display list, or click New to create a new list of statistics to display during data entry.
Click Finish to save your completed template.
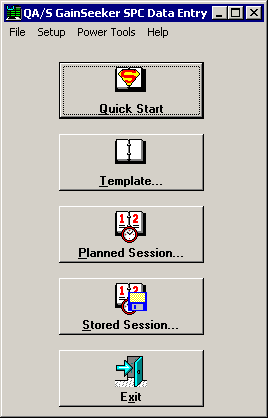
Log in to Data Entry
Launch the SPC Data Entry module and log in.
Start a Data Entry session
To start entering data with your new template, click Template.
Then select your new template, Keyboard entry, from the Templates list.
Selecting the part and characteristic
Select the first part number and characteristic you will measure.

To select the part number and characteristic from the Part Number list,
Begin typing the name of your part number and characteristic.
OR
Click the drop-down arrow ![]() .
.
OR
Press F4.
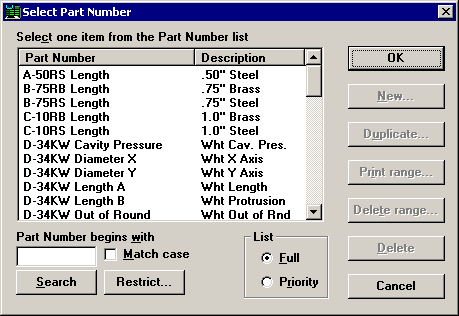
Click OK after you have selected the first part and characteristic for which you want to enter data.
Entering traceability information
For each traceability field, you may either type the traceability value or select a value from the pre-defined list.
To type a traceability value, simply type the value and then press Enter to continue.
To select the traceability value from the pre-defined list,
Click the drop-down arrow ![]() .
.
OR
Press F4.
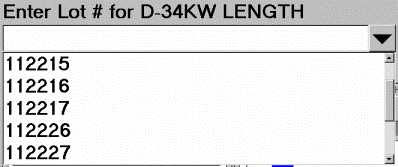
Click one of the traceability values to select it from the list.
To view the traceability information for the characteristic on which you are entering data, click the Traceability tab. You may not edit the traceability values on this tab.
Entering data values

To enter data via the keyboard, type the data value, and then press Enter to proceed to the next measurement.
Another way to enter a data value is to click the keypad button ![]() , or press F4, to display the keypad screen.
, or press F4, to display the keypad screen.
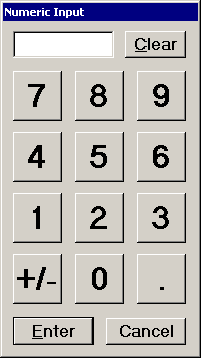
Then you may use your mouse or a touch screen (if available) to click the numbers for the data value.
Click Enter to proceed to the next measurement.
Real-time failures and notes
If you set up the standard for this part number and characteristic to perform real-time checks, then the Data Entry module will check your data as you are entering it.
If the data you enter violates one or more of the real-time checks you turned on, the Note and Corrective Action screen will automatically display information on which real-time checks were violated, and it will give you the chance to enter notes and corrective action information.

The Note and Corrective Action screen.
If the Note and Corrective Action screen is displayed during data entry, enter the appropriate Operator notes and corrective action information (Event, Cause, and Action Taken), and then click OK.
If the screen is displayed because you mistyped a data point, you will be able to correct your mistake before saving the data.
Editing and saving your data
After you enter the data for the first characteristic of all of the pieces in your subgroup, you will be prompted to review the data before saving it.
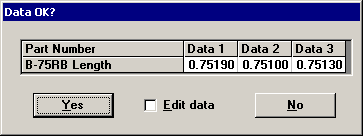
Review the data you just entered for errors.
If the data is entered correctly, click Yes. This will save the data for this characteristic and allow you to start entering data for the next characteristic.
If one or more data values are incorrect, click No. You will be returned to the prompt to enter this part number and characteristic.
Press Enter to move through all of the values that are correct, such as part number and characteristic, traceability values, and correct data values.
For incorrect data values, press Backspace or Delete to remove the incorrect part of the value and re-type to correct the value.
When you review the corrected data, click Yes to save the corrected data for this characteristic and start entering data for the next characteristic.