The template can display a chart on the data entry screen for each characteristic you are measuring.
Select the type of chart to be displayed for all of the rows in the template. Options are:
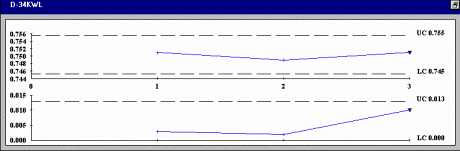
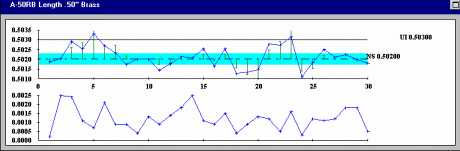
Control chart
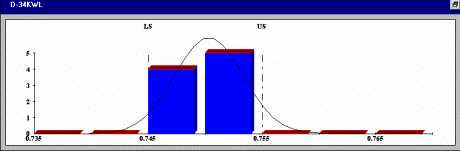
Histogram
Combo chart

CuSum/Control chart
Click None if you do not want to display any charts for the rows in the template.
If you want to specify different types of charts for different rows of the template, select the Use advanced settings check box.
|
|
The data you enter cannot be used for charts or reports until it is saved in the database.
Choose from three options for saving the data:
At the end of the last row – This automatically saves the all of the data entered in the entire template when the operator finishes the last cell of the last row.
At the end of each row – This automatically saves the data entered in one row of the template when the operator finishes the last cell of that row.
No automatic save – If you select No automatic save, you must enter your own save commands ( SAVEROW or SAVEALL) in the advanced settings on step 5 of the Template Wizard. Do not select this option unless you are very familiar with using commands and formulas in the advanced settings on step 5. Unlike earlier versions of SPC, you cannot configure the data entry screen to display Save row or Save all buttons; data can only be saved by selecting one of the automatic save options on this step or by entering SAVEROW or SAVEALL commands in step 5 of the Template Wizard.
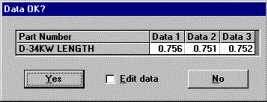
Another option for saving is to have your operator review all of the data they just entered before the data is saved. This is a good chance for the operator to correct any errors before the data is stored. If you select the Have your operator review the data before saving check box, the program will display the Data OK? window before saving the data.
The Data OK? window for template
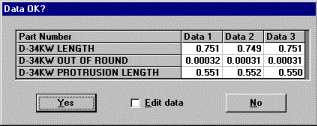
The Data OK? window for row
Select the Use advanced settings check box to access further options for the rows of the template.
![]() Note: If you clear this check box, clicking Finish will ignore your advanced settings on this step and will store your settings from the simple screen for this step.
Note: If you clear this check box, clicking Finish will ignore your advanced settings on this step and will store your settings from the simple screen for this step.
Chart type (advanced settings)
Select the chart type for each row of the template. If you want, you may specify different types of charts for specific rows.
Options are:
Control chart
Histogram
Combo chart
CuSum/Control chart
Click None if you do not want to display any charts for the rows in the template.
There are at least two reasons why you may want to enter row labels:
1. As a reminder for the intended use of each row, particularly as you design complex templates.
2. To be used in the default prompt message for your data entry operators, in step 1.
You may enter up to 30 characters for each row label.
Insert and Delete rows (advanced settings)
If you want to change the number of rows in the template, you may use the Insert at row n and Delete row n buttons to do so, instead of returning to step 1.
To insert a row, click anywhere in the row where you want to insert a new row. Then click Insert at row n. The row you clicked in will be duplicated and the new duplicate row will be inserted just above it.
To delete a row, click anywhere in the row you want to delete, and then click Delete row n.
Save data when? (advanced settings)
The data you enter cannot be used for charts or reports until it is saved in the database.
To automatically save the data entered in the entire template when the operator finishes the last cell of the last row, select the Save all check box.
To automatically save the data entered in one row of the template when the operator finishes the last cell of that row, clear the Save all check box. This will automatically select the Save row check box for each row in the template. Clear the Save row check box for any row that you do not want to be automatically saved.
![]() Note: If you clear the Save all check box and if you clear the Save row check box on one or more rows, you must enter your own save commands ( SAVEROW or SAVEALL) in the advanced settings on step 5 of the Template Wizard. Do not select this option unless you are very familiar with using commands and formulas in the advanced settings on step 5. Unlike earlier versions of SPC, you cannot configure the data entry screen to display Save row or Save all buttons; data can only be saved by selecting one of the automatic save options on this step or by entering SAVEROW or SAVEALL commands in step 5 of the Template Wizard.
Note: If you clear the Save all check box and if you clear the Save row check box on one or more rows, you must enter your own save commands ( SAVEROW or SAVEALL) in the advanced settings on step 5 of the Template Wizard. Do not select this option unless you are very familiar with using commands and formulas in the advanced settings on step 5. Unlike earlier versions of SPC, you cannot configure the data entry screen to display Save row or Save all buttons; data can only be saved by selecting one of the automatic save options on this step or by entering SAVEROW or SAVEALL commands in step 5 of the Template Wizard.
Review data (advanced settings)
You may prompt the data entry operator to review the data they just entered before saving the data. This is a good opportunity to correct any errors before the data is stored.
There are two ways to turn on the review option:
If you selected the Save all check box, select the Review all check box. This will display a Data OK? window at the end of the template.
If you cleared the Save all check box, select the Review row check box on any row where the Save row check box is selected. This will display a Data OK? window at the end of each row.
Chart captions
By default, the title bar of each chart will contain the name of the standard (part number and characteristic). However, you may add values such as control limits or Cpk to the chart title bars. Additional values you select will be displayed on the title bars of all charts for all the rows in the template.
To add values to the chart title bars, click Chart Captions.
Then use the following dialog to select additional values:
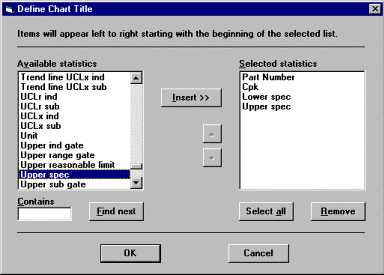
To add a value to the chart title bar, select a value from Available statistics, and then click Insert.
To remove a value from the chart title bar, select a value from Selected statistics, and then click Remove.
To change the order of the selected statistics, select one statistic and then use the arrow buttons and to move that statistic to the desired location.
Click OK to save your changes or Cancel to quit without saving the changes.