The Defect tab is common to all chart builders.
You may select some or all defects with the Defect tab.
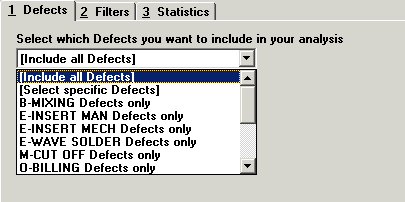
If you want to select specific defects to analyze, click the down arrow beside Include all Defects. You will see these choices from the drop-down menu:
Select specific Defects. This choice allows you to select individual defects from a list.
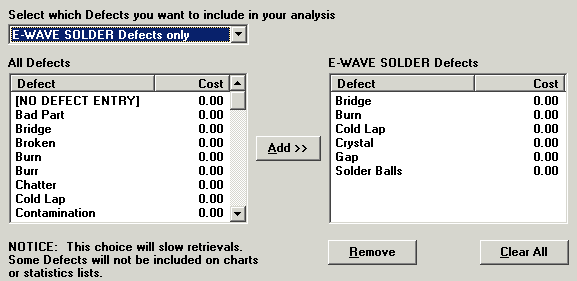
<Process> Defects only where Process is a particular process in your database. This choice allows you to select all defects associated with a certain process.
The Defect-tab dialog showing options in the drop-down list.
If you choose Select specific Defects, you will see the following screen.
Clicking on the Defect or Cost bar at the top of the window will sort the lists in ascending or descending order.
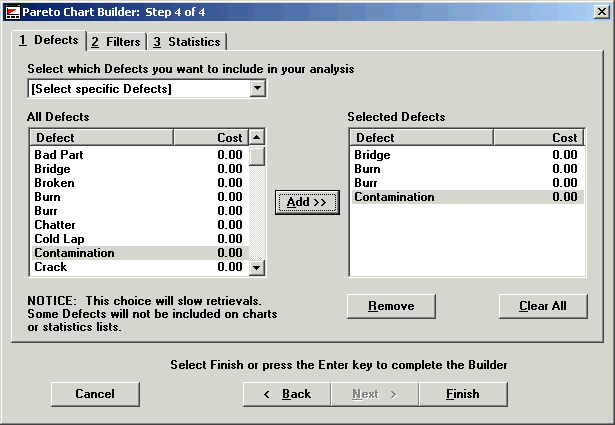
The window on the left contains all the defects in your database.
Selecting specific defects is slower than Include all defects or select defects for a process. Include all defects is the fastest option in terms of retrieval speed.
Some defects will not be included on charts or statistics lists. Data may exist for certain defects, but because they have not been specifically selected, they won’ t appear on charts or statistics lists. So, just because a certain defect doesn’ t show up doesn’ t mean there are none. It may mean the user chose not to report them.
Selecting defects is a two-step process.
First, select the defect from the left window. There are three ways to select defects.
To select just one defect, click on that defect with your mouse.
To select defects listed in sequence, use one of these methods:
Select the first defect you want. Hold down the left mouse key and scroll the mouse up or down the list.
Hold down the SHIFT key and click on the first part in the series. Then scroll to the last part and click on it. All parts in between your first and last parts will also be selected.
Hold down the SHIFT key, click on the first part in the series, then scroll up or down with the cursor key.
To select defects listed out of sequence, hold down the CTRL key and click the part numbers with your mouse.
Second, after you have selected the defects, click the Add button. The defects you have chosen will appear in the right-hand window.
To change your selection in the right-hand window:
Highlight the defect and click the Remove button.
Click Clear all to remove all the defects from the right-hand window.
The third way to select defects is to select those associated with a particular process, e.g., inserting. The program will select all the qualifying defects from the list on the left and move them to the window on the right automatically.
When you select a group of defects using "<process> Defects only," there is no need to press Add to move them to the right window.
After you have moved the defects that you want to chart to the right-hand window, you may continue to narrow your search by selecting the Filter tab or Statistics tab.
If you do not want to filter your database further, click Finish. You will see the chart and tables you have created.