The Timer lets you refresh charts automatically at a specific interval. This option is useful if you want to monitor the performance of a remote location. Simply leave charts open on your computer screen, knowing that the data you view is never more than a few minutes old.
Any chart you create is a snapshot of your production process at a particular time. As time passes, your production conditions could change drastically. You could create a new chart periodically each day to monitor changes, or you can have the program refresh the data automatically on the chart you have already created.
The Timer allows you to set an interval time in hours, minutes or seconds and then alert you to newly displayed data through a sound.
You can access the time option in two ways:
Right click while the mouse cursor is on a chart.
–or–
Select Timer from the Options menu.
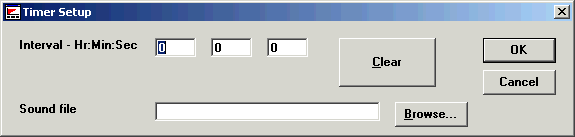
The following screen will appear.
Enter how frequently you want the program to refresh the chart's data in hours, minutes or seconds. (Ten seconds is the smallest valid entry.)
Click OK. The timer will start.
Stop the timer by clicking Clear.
On some versions of Windows, when the DMS Charts and Reports module displays or refreshes a chart window, it will become the active program in Windows – even if you were currently working in a different program. To prevent the DMS Charts and Reports module from becoming the active program each time a chart is displayed or refreshed, add nofocus=1 to the Convert.db file. This setting will also be applied to the SPC Charts and Reports module and the Enterprise Dashboard module.
Note: When Convert.db contains nofocus=1, the SPC Charts and Reports module and the Enterprise Dashboard module will display the Stop panel on the status bar instead of the Retrieving Data screen – regardless of the stop_form= setting.
Click Browse.
Choose a WAV file (. wav) with the sound you want.
Click OK.
Click OK again to close the dialog.