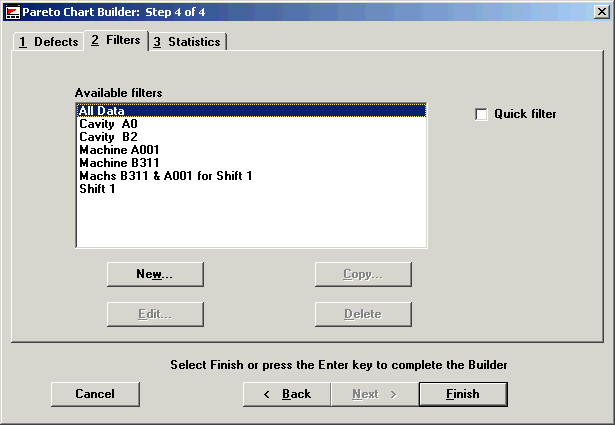
The Filter tab is another way to select data.
The default setting is All data. In other words, no filters are applied to your selection of data with the default setting.
The default setting, All Data is the same as saying there is no filter with this setting.
However, you can create additional filters that reflect your interests.

New permits you to create custom filters. You can then save your filters for later use.
Edit permits you to modify filters you have created and saved.
Copy permits you to duplicate a filter you have already saved. This option is useful for creating a filter similar to one you created earlier.
Delete eliminates a filter you created.
Quick filter allows you to quickly filter your data for a specific traceability value without having to build and save a new filter.
Click on New. You will see a Traceability Filter dialog.
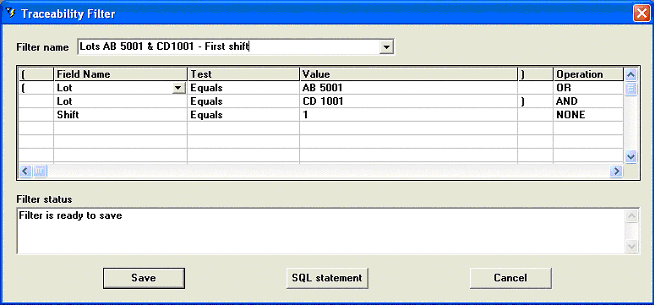
It is a good idea to give the filter a name reflecting its purpose (see picture below). The filter name can be up to 40 characters.

The program automatically names new filters -- New Filter. To give the filter a different name, enter a name in the Filter name box. Use names that describe what the filter does. Such names will be especially useful if you include the filter name on the report.
![]() Note: Do not use “Quick Filter” as the name of your filter. Creating a filter with this name may produce unintended results.
Note: Do not use “Quick Filter” as the name of your filter. Creating a filter with this name may produce unintended results.
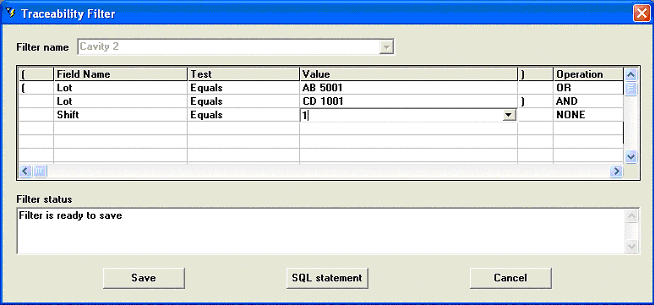
To choose a Field name, click on Field Name.
Click on the down arrow in the text box right below it. You will see a drop-down list of possible field names. Highlight your choice.
Follow steps 3 and 4 again to choose names for Test, Value and Operation. See an explanation of these categories below in "How to use the filter categories".
How to use the filter categories
Creating a filter is like writing a sentence. It begins with a subject (Field Name), followed by a verb (Test) and ending with an object (Value).
Field Name has all the trace fields in your database. Select the fields you want to qualify in some way in your retrieval.
Test tells the program how to handle the trace fields in Field Name. The options are Equal, Doesn't Equal, Greater, Greater or Equal, Less, Less or Equal, Contains, Doesn't contain and Sort. Generally, you will want to use Equals or Contains in the Test field. Using Contains is preferable.
Value categories will vary depending on the Field Name you choose. For some Field Names, you will be able to choose strings off drop-down lists. For others, a keyboarded number or string will also be accepted. For example, if you choose Sample Size as your Field, and Greater Than as your Test, you might put 1000 in the Value field.
Operation choices are OR, AND and NONE. They determine how statements with a filter interact with each other.
Select NONE for a simple filter (one line). For a complex filter (two or more lines), choose AND or OR. In a two-line filter, use OR when you want to display values for data that pass either of the conditions. Use AND when you want to display values for data that pass both of the conditions. You can use OR or AND for as many conditions as you want.
Parenthesis choices allows you to include them as you build the filter criteria. They are especially helpful when you write filters that may use a combination of AND & OR operations. For example, if you want to retrieve data from Lot numbers AB 5001 and CD 1001 but only from first shift you would build the filter as illustrated below.

By pressing the SQL statement button, the filter status window will display the filter commands as a query statement. For the above filter the statement would be
((UDL1 = 'AB 5001' OR UDL1 = 'CD 1001') AND UDL2 = '1')
Right Click Functions are available within the filter fields. If select a row then right click the following menu appears:
Show list will display a drop down list of available options for the selected field
Delete Row allows you to delete the contents of an entire row.
Cut Row allows you to delete the contents of an entire row and move it to the clipboard for pasting in another location.
Paste row will paste a cut or copied row to where you place your cursor. Note: If you paste the row into a row that already has text (i.e., another filter), it will overwrite that filter.
![]() Note: If you paste the row into a row that already has text (i.e., another filter), it will overwrite that filter.
Note: If you paste the row into a row that already has text (i.e., another filter), it will overwrite that filter.
Insert row will duplicate the cut or copied row in the row above where you place your cursor. It will not overwrite the row.
Copy row copies the row where you have your cursor. Then use Paste row or Insert row to duplicate the row in another location.
To finish your filter session:
Click Save to save it.
-- or--
Click Cancel to leave without saving your filter.