
Circumstances under which you might want to add a Data Grid to a sub-inspection:
You want the inspector to have the option of viewing the data for a sub-inspection in a table format on the mobile device. The inspector can also print the data grid from the device.
Example: You want the inspector to view the data and delete data and make corrections when needed. (The default setting prevents the operator from deleting data.) For example, the wrong serial number is used for an inspection. This would allow the inspector to delete the data for the incorrect serial number and re-enter the data under the correct serial number.
|
Contents [Hide] |
You can display and print a data grid when you are running a GS Collect inspection.
Follow the preferred steps below to print the data grid and remain in the GS Collect application. (Leaving the application closes the current session, requiring you to log in when you return to the application.)
Press the Print button located in the upper-right side of the device screen. This will display the data grid in "Print Preview" mode.
Touch the "Print Preview" grid to display a menu at the top of the screen.
Touch the Share button at the top of the screen, and then touch Print.
On the printer options screen that displays, select the printer you want to use and any print options you want, and then press Print.
After printing is completed, press Done to return to the GS Collect App.
Click the Data Grid
test toolbar button  to add this test to the sub-inspection.
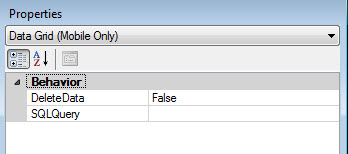
Set any properties for this test on the Properties panel that displays after the test is added.
For information about using the Properties panel, see Changing property settings

Property |
Default setting or default display |
Allows |
BEHAVIOR |
||
DeleteData [Mobile only] |
False. Does not allow the operator to delete the data at the server that is displayed on the grid. |
True allows the operator to delete the data and toggles the Submit data button label to Delete data. This is useful if the operator enters incorrect data and needs to re-enter it. If the inspector clicks delete, all of the data displayed on the grid is deleted. Note: Deletions are not tracked in the Audit Trail. |
SQLQuery [Mobile only] |
[blank] |
Write a SQL statement to query the GainSeeker database and populate the data grid. See Using the SQL Builder for Data Grid below in this topic. You can double-click on the Data Grid test to edit this property. |
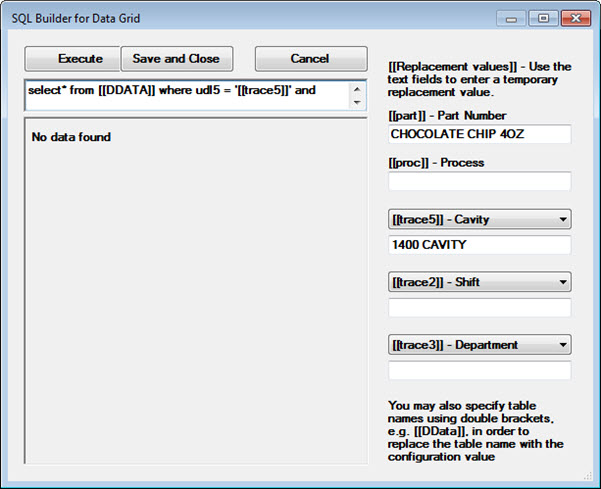
The SQL Builder for Data Grid opens when the ellipsis button is clicked for the SQLQuery property for a Data Grid test. It is used to build and test SQL queries that you write to determine what values display on a running Data Grid during an inspection.
Use the text fields on the right side of the dialog to test your SQL statements. To test, select a traceability from the drop-down menu and enter alphanumeric text for that traceability in the field. Then click Execute to test your SQL statement. Click Save and Close when done.
You must have the Traceability test you are calling positioned before the Data Grid test in the inspection.
The first column of the Data Grid is sorted in ascending order. Thus, the first column in the SELECT query is sorted. Using ORDER BY in the query does not affect the grid order. Click in the column headers to re-sort the columns.
The Data Grid can display up to ~30,000 cells (number of columns specified in your SELECT query, multiplied by the number of rows retrieved) on the table. Cells beyond this maximum number will be summarized in a final table row that displays ellipses (...). Limiting the number of columns returned by your query will ensure that more rows can be displayed.
To delete data for an SPC query, PARTNO and DATETIME columns must be included in the grid. For DMS queries, you must also include the PROCESS column. These columns can be aliased if used in a query on an AUX table (Select PARTNOAUX as PARTNO from ...).
Example:
The SQL statement in the image below would replace the traceability 5 field [[trace5]] ) value with the actual value the inspector enters during the running inspection. The replacement value [[DDATA]] would also replace the current table name with the name of the current configuration.
