
Note: Not all of the sub-inspection test toolbar buttons are technically "tests." For simplicity, that term is used to describe all of the sub-inspection test toolbar buttons.
The Defect List test can be used to record multiple defects on an item. If you are only testing for a single defect on an item, you may want to instead use a Pass/Fail/NA test.
Circumstances under which you might want to add a Defect List test to a sub-inspection:
You want the operator to record the number of specific defects found on the test item.
For example, the text "Enter defect counts for these tests:" instructs the operator to record the total number of each of the following defects found on the product if any are present, for example: Bad welds, Dirty welds, and Leaks.
|
Contents [Hide] |
Click the Defect List
test toolbar button  to add this test
to the sub-inspection.
When prompted, select which defects to display and which process to use for storing this data:
Use Inspection Process:
Use the Inspection property Process
to store the data for this test.
If using a Planned Inspection
that specifies a different Process, use that Process for storing
data.
Display the list of defects configured for the process used to store data.
This will ensure that the updated list of defects gets pushed to your mobile devices. |
Use Process
Use the process you select to store the data for this test.
If you want to ensure that data is stored for a standard that exists, make sure that all the part numbers with DMS standards for the Inspection process (or Planned Inspection process) also have standards for the process you select here. This step is required for GS Collect mobile app Inspections because the GS Collect mobile app cannot store data for a DMS standard that does not exist. If the PC Collect module stores data with a combination of part number + process for which a DMS standard has not been created, you can still analyze this data by Process. |
Display the list of defects configured for the process you select.
Use Inspection Process and custom Defect list
Use the Inspection property Process
to store the data for this test.
If using a Planned Inspection that specifies a different Process,
use that Process for storing data.
Display only the defects you select here - regardless of the list of defects configured for that process.
When prompted, enter a label to display for this test.
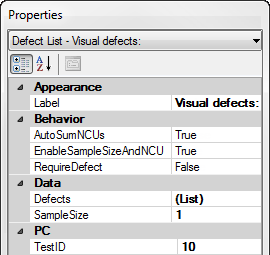
Set any properties for this test on the Properties panel that displays after the test is added.
For information about using the Properties panel, see Changing property settings

Property |
Default setting or default display |
Allows |
APPEARANCE |
||
[displays the label the inspection designer provides for this test] |
Enter text to change display label. |
|
BEHAVIOR |
||
True. The nonconforming units (NCUs) are automatically calculated based on the defect count. |
False. The NCUs are not calculated based on the defect count. |
|
True. Allows the inspector to change the sample size and NCU during data entry. |
False. Does not allow the inspector to change the sample size and NCU during data entry. |
|
False. Does not require the inspector to enter at least one defect for this defect list. |
True. Requires the inspector to enter at least one defect for this defect list. |
|
DATA |
||
Use Inspection Process |
This setting lets you choose different options for the Process and Defects used to collect and store data for this test. You can double-click on the Defect List test to edit this property. |
|
[blank] - The Sample Size for the data record will be 0. |
Enter a different sample size for the data record. [PC]: To automatically apply the sample size from the DMS standard, leave this property blank and set the DMS standard in a previous sub-inspection. Note: The EnableSampleSizeAndNCU property determines whether the inspector can change the sample size during data entry. |
|
PC |
||
|
[PC only] |
Count. The inspector can select multiple defects and can assign a count to each defect. |
SingleSelect. The inspector can only select one defect, and the count for that defect is 1. MultiSelect. The inspector can select multiple defects, but the count for each selected defect is 1. Note: A Python script can set multiple defects and counts, regardless of this setting. |
|
[PC only] |
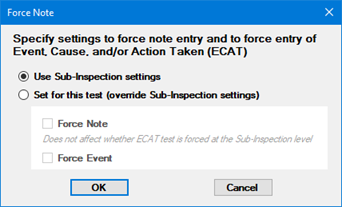
Use Sub-Inspection Settings. Apply the settings from the sub-inspection ForceNote property to this test. |
Click the ForceNote
property and then click the |
|
[PC only] |
A unique TestID number is automatically assigned to each test in the inspection, but you can change this number to a more meaningful name. The TestID property is only used in Python scripts for PC Collect inspections. For more information, see About the TestID property |
Enter a name for the TestID. |
|
[PC only] |
[blank] |
You can specify one or more traceability values that will be applied only to this Defect List test on this sub-inspection. These values will not be displayed to the inspector during data entry. If you want to store this test's TestID property as a traceability value, enter [testid] . Any traceability values you set here will override values set by Traceability tests, Inspection properties, Planned Inspection traceability values, etc. |

Use Sub-Inspection Settings
Apply the settings from the sub-inspection ForceNote property to this test.
Set for this test (override Sub-Inspection settings)
Force Note
If this setting is checked:
The inspector is required to enter a note when this test has a defect. Required notes can be entered from either the Sub-inspection Note (bottom of the page) or the test's Individual Note (next to the test).
When the sub-inspection properties NoteVisible and ShowIndividualNote are set to False, the inspector is prompted to enter a note when the Submit (sub-inspection data) button is pressed.
If this setting is cleared:
The presence of a defect does not require the inspector to enter a note.
 The
sub-inspection
ForceNote property and the presence of a Traceability
test for DMS Event
determine whether the presence of a defect will require the inspector
to enter a value for this test.
Force Event
If this setting is checked, the presence of a defect requires the inspector to use the test's Individual Note (next to the test) to enter a DMS Event. Or, if the sub-inspection properties ShowIndividualNote and NoteVisible are both set to False, then the inspector is prompted to enter the Event after the Submit (sub-inspection data) button is pressed.
 If this setting
is checked, the sub-inspection properties NoteVisible
and ShowIndividualNote
must obey the following:
If NoteVisible is True, then ShowIndividualNote must also be True.
If ShowIndividualNote is False, then NoteVisible must also be False.
You can optionally choose to execute a formula for a Defect List test when certain conditions are met during a running inspection.
For PC Collect inspections, they are added to inspections using the PythonScript property for the Formula test in the Inspection Editor
For GS Collect inspections, they are added using the FormulaMobile property for the Formula test in the Inspection Editor
See the OnChange topic for specifics about conditions that trigger the execution when a Defect List test is used in a sub-inspection with a formula.