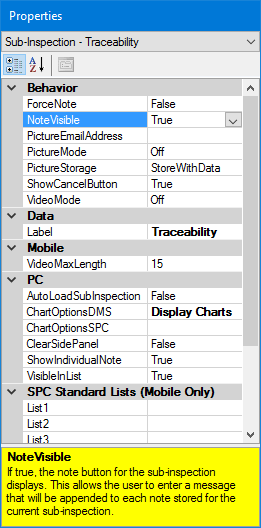
This topic covers specific properties you can set for each sub-inspection you add to an inspection using the Inspection Editor.
|
Contents [Hide] |
To change sub-inspection properties:
Click a sub-inspection button in the Inspection panel of the Inspection Editor to select it for edit and to display its property settings on the Properties panel.
For information about using the Properties panel, see Changing property settings

Property |
Default setting or default display |
Allows |
|
Behavior |
|||
None. The inspector is not required* to enter a note, Event, Cause, or Action Taken when defects or real-time failures are present in any of this sub-inspection’s tests.
* [PC only] This can be overridden for any Numeric Input, Pass/Fail, Rating, or Defect List test by setting that test's ForceNote property to a value other than "Use Sub-Inspection Settings". |
Click the ForceNote
property and then click the |
||
True. Allows the inspector to enter sub-inspection note using the Note button. |
False. Prevents the inspector from entering a sub-inspection note. |
||
[blank] |
Enter the email address where an image for a sub-inspection will be sent. Note: This property only applies when the PictureStorage sub-inspection property is set to Email or Both. |
||
Off disables the use of a camera or webcam to take pictures and disables attaching images to sub-inspection data. |
Alllow an image file to be attached
at one of these resolutions: Higher resolutions increase the image quality but create larger image files. These four options allow the inspector to take a picture using an integrated or external camera or webcam. On PC, the inspection also has the option to select an existing file and attach it to the data. Uses the PictureStorage property to determine how the pictures are used and stored. |
||
StoreWithData The image file is stored in a sub-folder of the User Documents 1 folder. (This sub-folder name is based on the year and month when the data was submitted.) The sub-inspection Note for this data contains a reference to this image file. |
Email sends the image to the email address recipient noted in the PictureEmailAddress sub-inspection property. Both performs both the Email and StoreWithData functions. |
||
True. Allows the inspector to cancel the sub-inspection without submitting its data. |
False. Cancel button is not displayed on the Inspection viewer. The inspector must submit data. |
||
Off. [Mobile] Video recording is disabled. [PC] Attaching videos to sub-inspection data is disabled. |
Selecting Low or Medium resolution allows sub-inspection to include video capture. [Mobile] Low 640x480px or Medium 960x540px (recommended) resolution enables video recording at this resolution. The video file is stored in the User Doc 1 folder and a reference to it is added to the data in the Note field for that sub-inspection. [PC] The attached videos are always stored at their original resolution. Uses the PictureStorage property to determine how the videos are used and stored. |
||
Data |
|||
Displays label for this sub-inspection |
Enter new text to change the label for this sub-inspection |
||
Mobile |
|||
VideoMaxLength |
15 (seconds) |
Enter a number for the maximum length of a video with seconds as the time increment. |
|
PC |
|||
AutoLoadSubInspection |
False. The sub-inspection retains its completion status. |
True. Automatically takes the inspector to this sub-inspection each time the inspection is loaded. The sub-inspection completion status is set to incomplete. |
|
SubInspectionList. When the inspector clicks the Cancel button, the list of sub-inspections will be displayed. |
This property determines what GainSeeker will do when the inspector clicks the Cancel button:
|
||
[blank] The Cancel button displays its default label ("Cancel"). When the inspector clicks this button, the PC Collect module displays a warning message that any unsaved data on this sub-inspection will be lost. |
Enter a different label for the Cancel button. When the inspector clicks this button, GainSeeker will not display the warning message about unsaved data being lost. |
||
DMS Chart Info |
Set DMS charts to display for the sub-inspection during runtime. See Setting charts to display for more information. |
||
SPC Chart Info |
Set SPC charts to display for the sub-inspection during runtime. See Setting charts to display for more information. |
||
False. When the sub-inspection loads, any existing charts, images, or web pages are not cleared from the side panel. |
True. When a sub-inspection loads, any existing charts, images, or web pages are cleared from the side panel. |
||
[blank] Feature not enabled for this sub-inspection. |
Enter an email address to send an email notification for all Numeric Input test on this Sub-Inspection that were submitted with real-time failures. Multiple addresses should be separated by commas. (A semicolon used to separate e-mail addresses will be automatically corrected to a comma.) If used:
|
||
[blank] Feature not enabled for this sub-inspection. |
For any Numeric Input tests on this sub-inspection, you can display the latest values on an image in the side panel. Click the DataCanvas
property and then click the See Setting the DataCanvas property for more details. |
||
True. Displays a Note button adjacent to each applicable test in this sub-inspection.
|
False. Does not display a Note button adjacent to each applicable test in this sub-inspection. |
||
True. Sub-inspection is visible on the list of sub-inspections. |
False. Sub-inspection is hidden from the list of sub-inspections. The only way to launch this sub-inspection is by setting the AutoAdvance property of the Inspection, the AutoLoadSubInspection property of this sub-inspection, or a Python script. |
||
List1 . . . List9 |
The selected standards for this list. |
Change the standards used for this sub-inspection. This is used with the Numeric Input test to choose a standard at run-time. |
|

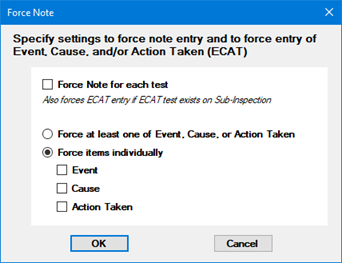
Force Note for each test
If this setting is checked:
The inspector is required* to enter a note when a defect is present in any Pass/Fail, Rating, or Defect list test or when a real-time failure is present in any Numeric Input test in the sub-inspection. Required notes can be entered from either the Sub-inspection Note (bottom of the page) or the test's Individual Note ([PC only] - next to the test).
If the sub-inspection displays a Traceability
test for DMS Event
and a defect is present, the inspector is required to enter
a value for that DMS Event test.
If the sub-inspection displays a Traceability test for SPC Event, Cause,
or Action Taken and
a real-time failure is present, the inspector is required
to enter a value for that DMS SPC Event, Cause, or Action
Taken test.
 The
ForceNote property
of any Numeric
Input, Pass/Fail,
Rating, or Defect
List test cannot override this requirement.
[PC only] When the sub-inspection properties NoteVisible and ShowIndividualNote are set to False, the inspector is prompted to enter a note when the Submit (sub-inspection data) button is pressed.
[Mobile only] When the sub-inspection property NoteVisible is set to False, the inspector is prompted to enter a note when the Submit (sub-inspection data) button is pressed.
If this setting is cleared:
The presence of a defect or real-time failure does not require* the inspector to enter a note.
The presence of a defect or real-time failure does not require the inspector to enter a value for a DMS Event test, SPC Event test, Cause test, or Action Taken test on the sub-inspection.
Force at least one of Event, Cause, or Action Taken
[PC only] If selected, the presence of a defect or real-time failure requires* the inspector to use the test's Individual Note (next to the test) to enter either an Event, Cause, or Action Taken. Or, if the sub-inspection properties ShowIndividualNote and NoteVisible are both set to False, then the inspector is prompted to enter corrective action information after the Submit (sub-inspection data) button is pressed.
 If selected,
the sub-inspection properties NoteVisible
and ShowIndividualNote must
obey the following:
If NoteVisible is True, then ShowIndividualNote must also be True.
If ShowIndividualNote is False, then NoteVisible must also be False.
Force items individually
[PC only] If selected, you can customize which corrective actions (if any) are required* when a defect or real-time failure is present. Any required corrective actions must be entered from the test's Individual Note (next to the test). Or, if the sub-inspection properties ShowIndividualNote and NoteVisible are both set to False, then the inspector is prompted to enter corrective action information after the Submit (sub-inspection data) button is pressed.
 If requiring one or more corrective actions,
the sub-inspection properties NoteVisible
and ShowIndividualNote must
obey the following:
If NoteVisible is True, then ShowIndividualNote must also be True.
If ShowIndividualNote is False, then NoteVisible must also be False.
* [PC only] This can be overridden for any Numeric Input, Pass/Fail, Rating, or Defect List test by setting that test's ForceNote property to a value other than "Use Sub-Inspection Settings".
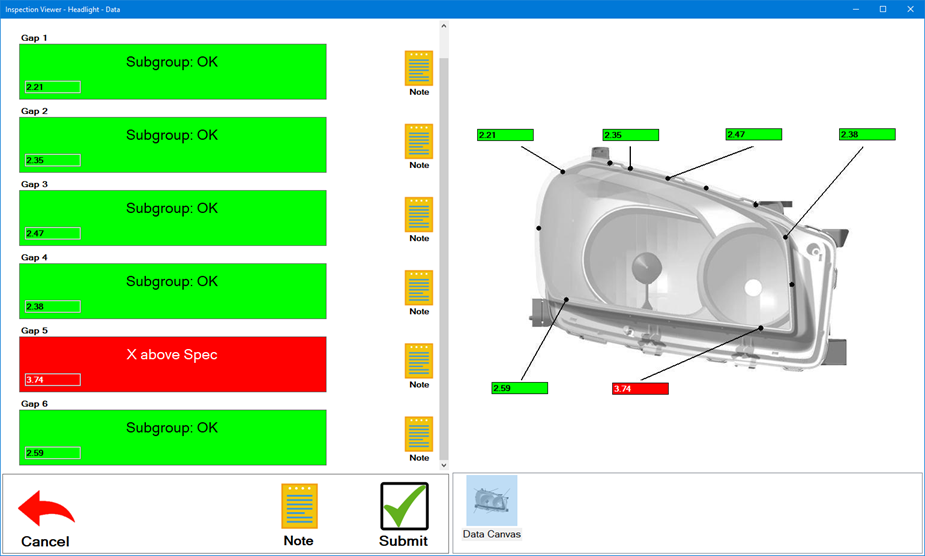
A sub-inspection with Numeric Input tests for measurement data can display those tests on the side panel in a Data Canvas. As the inspector – or a connected device – enters data for these Numeric Input tests, those values are also displayed at the corresponding locations on the Data Canvas.
For a sub-inspection with many Numeric Inputs, this helps the inspector to quickly understand which measurement is generating real-time alarms and immediately take appropriate steps.

When you edit the DataCanvas property, the initial window looks something like this:

The list on the left contains the Label control (which can be placed on the canvas multiple times) and a control for each Numeric Input test on this sub-inspection.
The right-hand side is the empty data canvas where you can display an optional image and work with controls for Labels and Numeric Input tests.
This window is sized so that the canvas area matches the last-used PC Collect side panel area on your workstation. If you need to resize this window, use PC Collect (or GainSeeker Inspections) to run an inspection with a side panel object and drag that sub-inspection window to the desired size. Keep in mind that data entry PCs may have smaller or lower-resolution monitors and thus may be limited to a smaller area. (You may need to experiment to find a window size that will work correctly on data entry PCs.)
To set a background image (optional), click Choose Image and select an image to display. Please note:
GainSeeker will not auto-fit or resize the image so that it fits nicely on the side panel. You may need to make a copy of your image and then use an editing tool such as Microsoft Paint to resize that image.
GainSeeker will store the name and location of the image file, so you should choose an image from a network location that all data entry PCs can read.
To place a Numeric Input or Label control on the canvas, select that item from the list on the left and then click the approximate position on the canvas where you want to place that item. You cannot change the size of either type of control.
When placing a Label, you will be prompted to enter the label text, font color, and background color.
For any control that has already been placed on the canvas, you can click and drag that item to a different position. You can also right-click that control to change its settings.
When a sub-inspection with a Data Canvas is opened, the Data Canvas will automatically be displayed as the frontmost "tab" on the side panel.
During data entry, the inspector will still enter data values on the Numeric Input tests on the left-hand panel. (If the user clicks a Numeric Input control on the Data Canvas, their cursor will be moved to the first subgroup box of the corresponding Numeric Input test.)
Whenever a Numeric Input data value is entered or changed, the corresponding Numeric Input control on the Data Canvas will be updated to show that value, and any real-time failure colors for that individual Numeric Input data value will be displayed on the background of the corresponding control on the Data Canvas. For this reason, a typical deployment will place only one control on the Data Canvas for each Numeric Input test - even if that test is used for data with a subgroup size greater than one.
For automated data entry where the inspector needs to see that a group of measurement devices has stabilized, it can be convenient to use a Formula test with FormulaMode set to ClickToggle and a Python script that repeatedly fills the same subgroup fields with updated measurements until the inspector is satisfied that the equipment is stable and the value can be measured.
See Sub-inspections for general information about sub-inspections.