Setting up Expanded data fields


Contents  [Hide]


Data fields that can be Expanded

You can define a maximum field length of up to 240 characters for the following fields:

Fields

Default length

Part Number (for SPC and DMS)

SPC Standard Variable

DMS Defect Description

30

DMS Process

SPC Standard Description

14

Traceability* (for SPC and DMS)

*Traceability field 2 - typically used for 'Shift' - remains at 1 character

30

Legacy GainSeeker modules that can or cannot be used with Expanded data fields

Note: Most of the Legacy GainSeeker modules do not function correctly with the Expanded data fields. These include:

    • SPC Charts and Reports

    • SPC Database Monitor

    • DMS Charts and Reports

    • Enterprise Dashboard

    • Standalone versions of modules that are now built into the GainSeeker Utility module (such as Note Manager, Import/Export Manager, SPC Standard Utility, etc.)

If you rely on these legacy modules, you should not use Expanded data fields. However, the functionality in the modules listed above is built in to the newer GainSeeker Charts and GainSeeker Utility modules, which do support the Expanded data fields.

These "older" modules have been updated to support the Expanded data fields:

    • SPC Data Entry

    • SPC Designer

    • SPC Planner

    • DMS Data Entry

How to set up Expanded data fields for a Configuration

While setting up the GainSeeker database for the first time

If you know that you want to use Expanded data fields before you have even installed GainSeeker, you can use a variation of the initial database script to create tables with the expanded columns, and then use the window shown below to set the field lengths for the Initial Configuration. For full instructions, see Database setup.

While creating a new configuration that uses all new table names and file paths

    1. Create the new configuration and Submit the change.

    2. Go to the settings for Tables and File Paths for the new configuration.

      1. Use the Tables and File Paths window to set all new file paths as appropriate for the new configuration, but do not click Check for Tables or run the Table Creation Utility.

      2. Use the Tables and File Paths window to set all new table names, but do not click Check for Tables or run the Table Creation Utility.

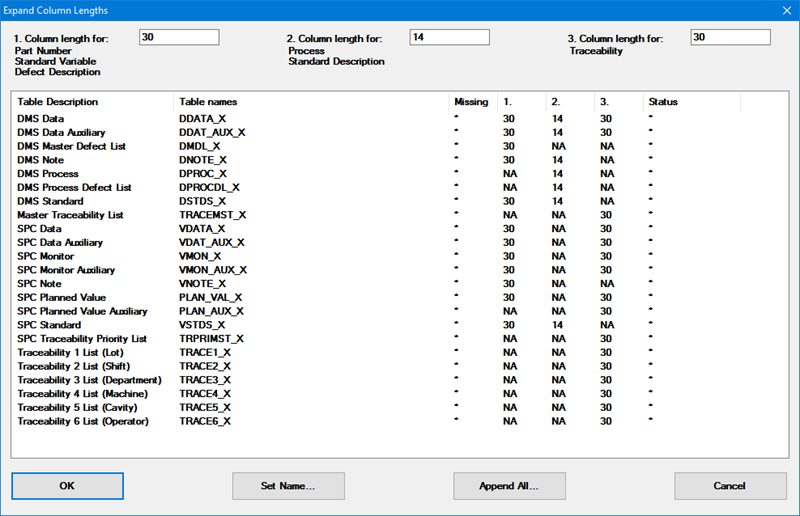
      3. On the Tables and File Paths window, click the Expand button. This will display the Expand Column Lengths window with default column lengths:

      4. For each group of data fields at the top of this window, enter a new field length - up to a maximum of 240 characters.


        Note: If you use Short Run, you must set Column 1 (for Part Number) and Column 3 (for Traceability) to the same length.

      5. This window compares the field lengths you specified to the table names listed below.

        • If the Missing column displays an asterisk, then GainSeeker will create the table with the new field lengths you specified.

        • If the Table Name already exists, GainSeeker compares its existing field lengths with the new field lengths you specified.
          If these do not match, you have four options:

          • Use the Set Name or Append All button to specify one or more existing tables with the new field lengths you specified

          • Use the Set Name or Append All button to specify one or more existing table names that do not yet exist, so that GainSeeker can create the new tables with the new field lengths you specified

          • Change the field length settings to match the tables listed

          • Click Cancel to exit this window without changing the field lengths

      6. On the Expand Column Lengths window, click OK to accept your changes and return to the Tables and File Paths window.

      7. On the Tables and File Paths window, click Check for Tables. If any tables or file paths are missing, choose the option to run the Table Creation Utility.

Converting an existing configuration to use Expanded field lengths

These steps will use GainSeeker to create new tables with the expanded field lengths and then use GainSeeker-generated (or other) scripts to copy your existing data records into these new tables.

    1. Select a current configuration whose tables you wish to convert. Anyone using the tables referenced in that configuration must log out of GainSeeker and remain logged out until this process is finished.

    2. Ensure that you have a good backup of the tables you want to re-create. GainSeeker will not automatically drop or alter these tables or the data they contain, but you will probably want to manually drop the tables with shorter fields after data has been copied into the tables with expanded fields.

    3. Use the GainSeeker System Administration module to copy the current configuration to a new configuration and Submit the change.
      The remaining steps instruct you to change the tables for your current GainSeeker configuration, using the new configuration in a purely temporary capacity. If you prefer instead to make all changes in the new configuration and "retire" the old configuration after the process is complete, you may reverse the configurations listed in the remaining steps.

    4. Go to the settings for Tables and File Paths for the current configuration.

      1. Use one of these options to set new table names to use Expanded field lengths:

        • Use the Tables and File Paths window to set all new table names, but do not click Check for Tables or run the Table Creation Utility. For tables that were created in versions 8.5.2 and below, this has the added benefit of recreating all tables to use variable-length character (varchar) fields which help to reduce your database size on Microsoft SQL Server and MySQL databases.

        • If you do not set the new table names on this window, then you must do so on the Expand Column Lengths window in the steps below. This option makes it easy to convert only the tables that are affected by the expanded field lengths you specify.

      2. On the Tables and File Paths window, click the Expand button. This will display the Expand Column Lengths window with default column lengths:

      3. For each group of data fields at the top of this window, enter a new field length - up to a maximum of 240 characters.

      4. This window compares the field lengths you specified to the table names listed below.

        • If the Missing column displays an asterisk, then GainSeeker will create the table with the new field lengths you specified.

        • If the Table Name already exists, GainSeeker compares its existing field lengths with the new field lengths you specified.

          If these do not match, you have four options:

          • Use the Set Name or Append All button to specify one or more existing tables with the new field lengths you specified

          • Use the Set Name or Append All button to specify one or more existing table names that do not yet exist, so that GainSeeker can create the new tables with the new field lengths you specified

          • Change the field length settings to match the tables listed

          • Click Cancel to exit this window without changing the field lengths

      5. On the Expand Column Lengths window, click OK to accept your changes and return to the Tables and File Paths window.

      6. On the Tables and File Paths window, click Check for Tables. If any tables or file paths are missing, choose the option to run the Table Creation Utility.

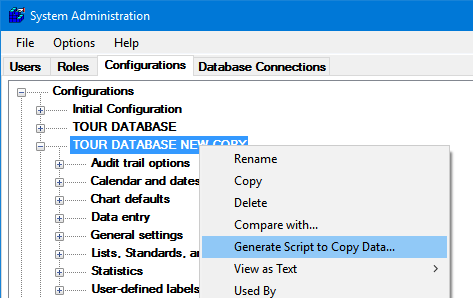
    5. On the Configurations tab, right-click the new temporary configuration and then choose Generate Script to Copy Data.


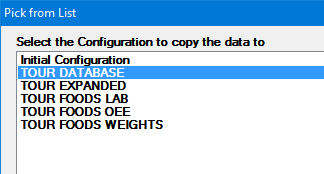
      When prompted to choose the Configuration to copy the data to, select the current configuration and then click OK.


      GainSeeker will generate a script to copy the data from the current table names to the new table names, and it prompts you to choose a file name and location for saving the generated script.

      The script is then automatically opened in NotePad.

    6. Review the entire script and make any desired changes.

      If you have previously removed unused columns from tables such as VDAT_AUX and DDAT_AUX, you will need to either update the script by specifying column names to copy from these modified tables (recommended) or else remove the same columns from the newer tables so that the script will function correctly as written.

    7. If your database server has enough free space to copy all of the data in the current tables to the new tables, you can execute the entire script on your GainSeeker database. After ensuring that all data was successfully copied, you can manually drop the tables with shorter fields.

      If there is not adequate free space to copy data from all the tables at once, you will need to manually execute some INSERT statements and then drop the tables with shorter fields before proceeding to the next group of INSERT statements.

      If you chose to reverse the older and newer configurations according to step 3 above, you will need to change any Users that use the old configuration to now use the new configuration instead. You can either perform this step manually for each user or un-comment and execute the line in the script that updates the HSICFG table to change all of these users at once.

      Note: Any Users that specify a configuration of "Default Settings Configuration" must be edited to specify one of the configurations listed.