The Inspection Editor in the GainSeeker Inspections module is used to create inspections that can be conducted on PCs and mobile devices such as iPads. GainSeeker inspections do not require template writing, making them easy to create.
After you create an inspection, PC Collect in GainSeeker Suite can be used to run it on PCs and the legacy GS Collect App can be used to run the inspection on mobile devices, such as iPads and tablets.
|
Contents [Hide] |
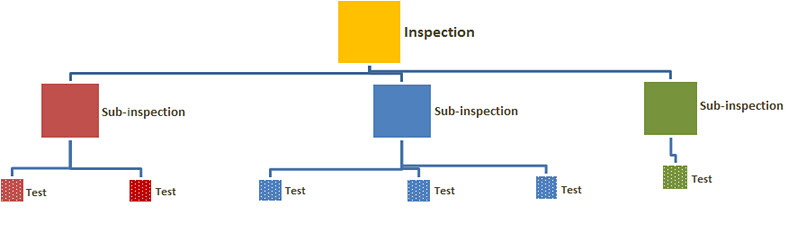
You can add as many sub-inspections to an overall inspection as you need. To each sub-inspection you can then add any number of applicable tests. The Inspection example in the following diagram contains three sub-inspections, each containing a different number of tests.
The Inspection Editor is used to create PC Collect inspections and GS Collect mobile device inspections
The first step in creating an inspection is to name the overall inspection. You can then set properties that determine how the overall inspection performs. For example, you may want to set the AutoAdvance property to require the inspector to perform the sub-inspections in sequence. You might also choose to set the StoreAll property so that only data that has defects is stored with the inspection. (Tip: The Inspection Editor allows you to save both data with defects and data without defects, which provides a record that a test was performed.)
See Inspection property settings for more information.
Now you can add sub-inspections to the overall inspection. The sub-inspections divide the overall inspection into logical inspection segments. If an inspection is for a boat, for example, you might add separate sub-inspections for the instrumentation panel, the electrical wiring, the upholstery, and the vessel hull.
Set properties for each sub-inspection you add
You can set properties for each sub-inspection that determine how each sub-inspection performs. For example, you may want to set the ForceNote property to require the inspector to enter a note if defects are found.
See Sub-inspection property settings for information
Next, you will add relevant tests to each sub-inspection. Using the boat example, if your sub-inspection pertains to the vessel hull, you might want to add a Checkbox to verify proper painting of the hull. You might also add a Defect List test that the inspector would use to record the number of common defects such as scratches to the hull, fiberglass irregularities, or surface bulging.
Set properties for each test you add
Like the overall inspection properties and the sub-inspection properties, each type of test features a separate set of properties that pertain just to it.
See Tests properties for more information.
When you are done creating the inspection, you can publish your inspection for use on mobile devices and PCs. This is easily done with just a few clicks.