This topic shows an example of a running GS Collect inspection on an iPad. For step-by-step instructions about how this inspection was made see Creating an inspection: Part 1
|
Contents [Hide] |
For instructions on opening the GS Collect application up to the Choose An Inspection page, see Running Inspections on a mobile device
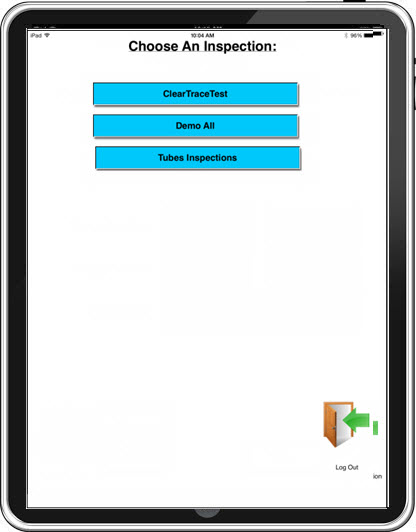
The inspector performs these actions on the Choose An Inspection page:
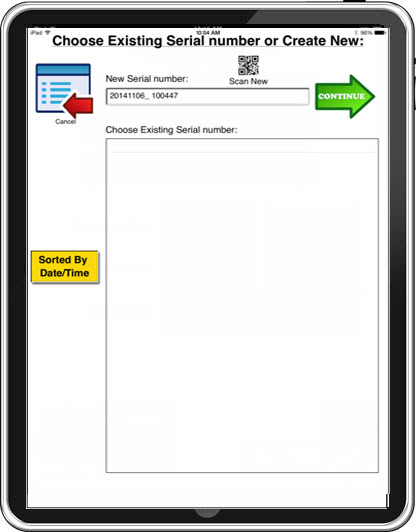
The Tubes Inspections is tapped. This action navigates the inspector to the page (Fig. 2) where a Unique ID (or Serial number for this example) can be selected for the current inspection.
See how this page was configured for this inspection
The inspector performs these actions on this page:
See how this sub-inspection was configured
The inspector performs these actions for the following tests:
Shift (Traceability test). The inspector taps the value field to display a list of available shifts, and clicks the 1 option.
Machine (Traceability test). The inspector enters the machine number 34 in the text field.
Date/Time (Date/Time test). The current date and time prefilled in the value field—the correct value the inspector is to use in this example. No action is required from the inspector. In this inspection, the inspector also has the option of choosing another date and time.
Part Number (DMS Standard test). In this example the part number is prefilled in the value field. No action is required from the inspector.
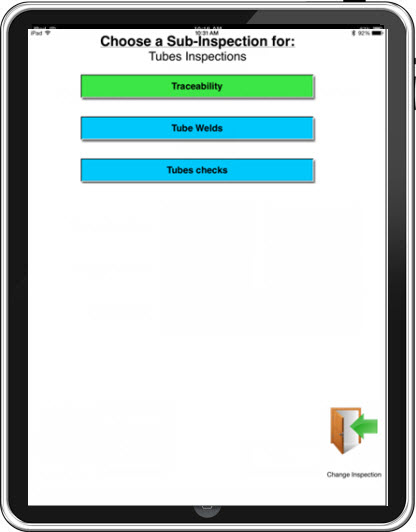
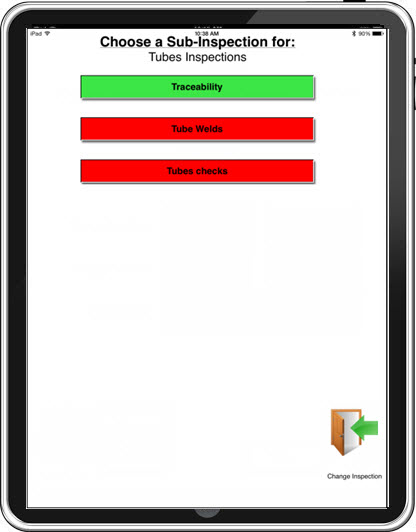
The inspector taps the Submit Data button to submit the sub-inspection data. This action navigates the inspector to the Choose a Sub-inspection page where the next sub-inspection to run can be selected (Fig 4). Note that the button for the Traceability sub-inspection is green, indicating that this sub-inspection is complete. Significance of sub-inspection button colors
For this example, the inspector taps the Tube Welds sub-inspection button. This action navigates the inspector the Tube Welds inspection page (Fig 5).
See how this sub-inspection was configured
The inspector performs these actions for the following tests:
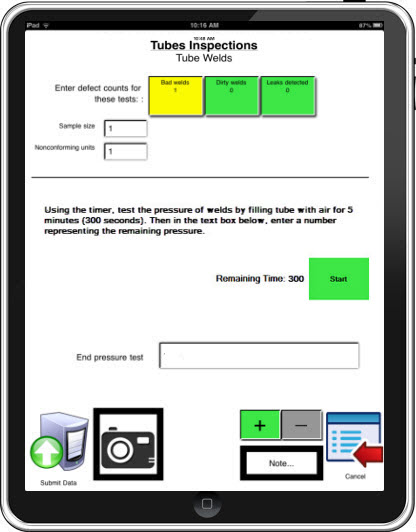
"Enter defect counts for these tests:" (Defect List test). The sample size is prefilled as 1 in the Sample size field. The NCU field can either match the number of defects (as in this example) or there may be multiple defects per unit allowed. In this example, the inspector entered 1 defect for Bad welds.
The inspector taps the start button (Timer test) to start the timer counting down from 300 (seconds) to 130 in this example.
The remaining time of 130 seconds is recorded in the End Pressure Test (SPC Part Number test).
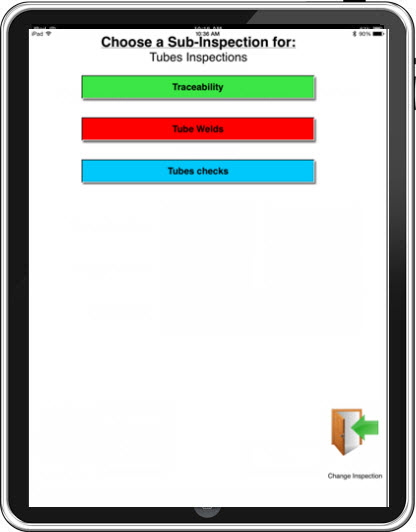
The inspector taps the Submit Data button to submit the inspection data. This action navigates the inspector back to the Choose a sub-inspection page (Fig. 6). Note that the Tube Welds sub-inspection button has changed from blue to red, indicating that this sub-inspection, though complete, contains defects or real-time failures.
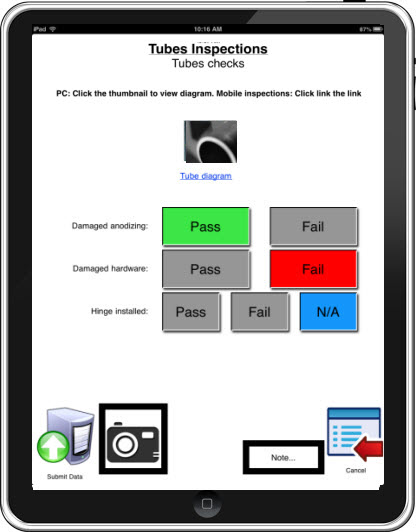
For this example, the inspector clicks the Tube Checks sub-inspection button. This action navigates the inspector to the Tube Checks inspection page (Fig. 7).
See how this sub-inspection was configured
The inspector performs these actions for the following tests:
The inspector clicks the link for the Tube diagram to display the item larger.
Damaged anodizing (Pass/Fail test). The inspector taps the Pass button when the test passes.
Damaged hardware (Pass/Fail test). The inspector taps the Fail button when the test fails.
Hinge installed (Pass/Fail test). The inspector taps the N/A button when the test is not applicable.
The inspector taps the Submit Data button to store the inspection data. This action navigates the inspector back to the Pick a Sub-inspection page (Fig. 8). Note that the Tube Checks sub-inspection button has changed from blue to red, indicating that this sub-inspection contains defects or real-time failures, but it is complete.
After all or some of the sub-inspections have been completed for an inspection, the inspector can (depending on how the inspection is designed and other factors):
Continue running other sub-inspections in the inspection. Note: If data is submitted for sub-inspection "A," for example, and sub-inspection "A" is run again using the same Unique ID, data records for both sessions are maintained. Sub-inspection data submitted for "A" the second time it is run, does not replace or overwrite the data submitted for sub-inspection "A" the first time it is was run.
Rerun the same inspection using the same Unique ID after hitting cancel. This can be helpful for inspections that are run or partially run and then continued later. For example, an assembly is inspected that fails a few important sub-inspection tests. The assembly parts with defects are repaired or replaced and the assembly undergoes those sub-inspections again to determine if the assembly will subsequently pass inspection.
Rerun the same inspection using a new Unique ID after hitting cancel. You would do this when you are ready to inspect the next item.
Click the Cancel button to return to the Pick an Inspection page (Fig. 1) to run a new inspection.
Only one video can be attached to a sub-inspection. If the inspector selects a second (or third or fourth and so forth) video to attach, that video replaces the originally attached video. The same is true for attaching images to a sub-inspection.