Which columns do I need?
You should set up a data entry column for each piece of information you want the operator to enter during data entry.
For example, if your operator must enter
part number and characteristic,
all traceability values (up to 48),
and data with a maximum subgroup size of 72,
then your template should contain
a Part Number column,
columns for the (up to 48) traceability fields
and data columns (up to 72).
However, if you will create a planned session to pre-fill the part number and characteristic and three of the 48 traceability fields, then your template may only need to contain
columns for the other traceability fields
and columns for necessary data fields (up to 72).
Adding a new column
To add columns to the template, select the column from the Available Columns list, and then click Add column. This inserts the new column to the right of the highlighted column in the column bar.
The template can contain a maximum of 286 columns (A through JZ). The Add column command is disabled if you have used the maximum number of columns.
Adding multiple columns
The Add multiple command is available when you highlight either a calculated column or a data column in the Available Columns list, alone or as part of a group of column types. When clicked, this button brings up the Add Multiple Columns dialog, which allows you to designate the number of data and/or calculated columns to add.
Changing the order of the columns
By default, the template will move from left to right across the columns in the template. If you want to control the order in which your data entry operators must enter the different kinds of information contained in the columns you selected, you should put the columns in order from left to right. A part number column should usually be placed to the left of the data columns.
To change the order of the columns in the template, highlight the name of the column you want to move in the column bar, and then click the ![]() or
or ![]() buttons to move the selected column to the right or to the left.
buttons to move the selected column to the right or to the left.
![]()
The column bar
How many Data columns do I need?
Select enough data columns to accommodate the maximum subgroup size for which you will use this template. You may select up to 72, if you have added that many. For example, if you will use this template to measure characteristics with subgroup sizes of 1, 3 and 5, then insert five data columns.
If you plan to use this template for several subgroup sizes, as in the example above, the Data Entry module will ignore the unnecessary data columns when you enter data for a characteristic with a smaller subgroup size. For example, if you build the template with five data columns for a maximum subgroup size of five, but you use the template to enter some data with a subgroup size of three, the Data Entry module will skip over the cells in the last two data columns.
New templates default to five data columns. When a data column is removed from the selected list, any data columns in the selected list with higher numbers are also removed.
Data column properties
Click on each of the Data columns in the column bar to set its properties:
Column label – This is used during data entry to tell the operator which measurement in the subgroup they are entering, such as “Enter Data for D-34KW LENGTH.” You may enter a different label for the data column, but try to limit the length of your label so that it will fit on the data entry screen.
Show column during data entry – When this check box is selected, the operator will be prompted with a box to enter the data point, as well as a message specifying which kind of data to enter. The data point will also be displayed in the “previous” box when the operator moves on to the next cell.
You should only clear this check box if your template will read data from a file, RS-232 device that sends many data points at once, or other application where an operator does not type in or trigger individual measurements. In these cases, clearing this check box may make the template run faster because it does not need to update the display for the cells in this data column.
Show keypad automatically – When this check box is cleared, a data entry operator may click the keypad button ![]() at the end of the input box, or press the F4 key, for data cells with keyboard input. Clicking the keypad button displays the keypad, so that the operator can use a touch screen or pointing device (such as a mouse or trackball) to enter the value, instead of typing the number on the keyboard.
at the end of the input box, or press the F4 key, for data cells with keyboard input. Clicking the keypad button displays the keypad, so that the operator can use a touch screen or pointing device (such as a mouse or trackball) to enter the value, instead of typing the number on the keyboard.
To automatically display the keypad as soon as the template reaches a data cell, check the Show keypad automatically check box.

The keypad button
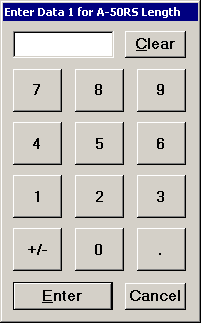
The data entry keypad
Your template should contain a part number column if your data entry operator will be selecting one or more part numbers and characteristics after opening the template. You may also insert a part number column if your template is reading data from a file or RS-232 device that can supply the part number and characteristic information for this column.
If this template will be used only with planned sessions, then you can remove the part number column from the template because the planned sessions will supply the part number and characteristic information.
Part number column properties
If a part number column is inserted in your template, click on the Part Number column in the column bar to set its properties:
Show column during data entry – When this check box is selected, the operator will be prompted with a box to enter the part number and characteristic, as well as a message specifying the current row. The part number and characteristic will also be displayed in the “previous” box when the operator moves on to the next cell.
You should only clear this check box if your template will read data from a file or RS-232 device that can supply the part number and characteristic information for this column. In these cases, clearing this check box may make the template run faster because it does not need to update the display for the cells in the part number column.
Show part number list automatically – When this check box is cleared, a data entry operator may click the drop-down arrow ![]() at the end of the part number input box, or press the F4 key, to select from a list of part numbers and characteristics.
at the end of the part number input box, or press the F4 key, to select from a list of part numbers and characteristics.
To automatically display the list of part numbers and characteristics as soon as the template reaches a part number cell, select the Show Part Number list automatically check box.
Part number accepted – You have two choices for how the part number column is filled during data entry:
If you select By column in the template, then the data entry operator will be prompted to enter the part number and characteristic when the template gets to this column. This is a good choice if the data entry operator may want to change part numbers and characteristics without closing the template. This setting is also recommended if your template will read data from a file or RS-232 device that can supply the part number and characteristic information for this column.
If you select By prompt at beginning of data entry, then the data entry operator will be prompted to enter the part number and characteristic only if the part number column is not already filled by a planned session or stored session. This is a good choice if this template will be used mostly with planned or stored sessions, but may occasionally be used without being prefilled by a planned or stored session.

The part number drop-down arrow
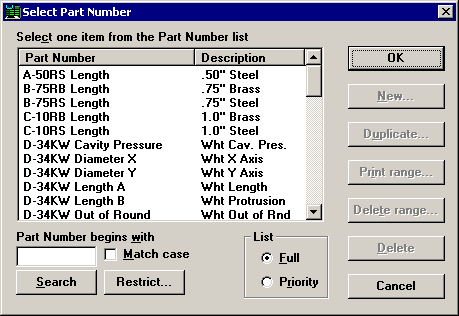
List of part numbers and characteristics
Your template should contain traceability columns if your data entry operator will be selecting one or more traceability values after opening the template. You may also insert traceability columns if your template is reading data from a file or RS-232 device that can supply the traceability values for these columns.
If this template will be used only with planned sessions, then you can remove the traceability columns from the template because the planned sessions will supply the traceability information.
Traceability column properties
If a traceability column is inserted in your template, click on the traceability column in the column bar to set its properties:
Show column during data entry – When this check box is selected, the operator will be prompted with a box to enter the traceability value, as well as a message specifying the current row. The traceability value will also be displayed in the “previous” box when the operator moves on to the next cell.
You should only clear this check box if your template will read data from a file or RS-232 device that can supply the traceability information for this column. In these cases, clearing this check box may make the template run faster because it does not need to update the display for the cells in the traceability column.
Show traceability list automatically – When this check box is cleared, a data entry operator may click the drop-down arrow ![]() at the end of the traceability input box, or press the F4 key, to select from a list of traceability values.
at the end of the traceability input box, or press the F4 key, to select from a list of traceability values.
To automatically display the list of traceability values as soon as the template reaches a traceability cell, select the Show traceability list automatically check box.
Require entry when using this template – When this check box is selected, the data entry operator will be forced to enter a value for this column before they can proceed to the next cell. When this check box is cleared, the data entry operator may leave this traceability value blank and proceed to the next cell.
Copy traceability value to all rows – When this check box is selected, a traceability value entered in this column (in any row) will be copied to all the rows of the template.
Clear traceability value after saving data – When this check box is selected, the selected traceability value will be cleared each time data is saved.
This can save time in situations where data is entered for several characteristics that share the same traceability value. In these situations, the data entry operator only has to enter the shared traceability value once, rather than entering the same traceability value on each row.
Traceability value – This option allows you to control what the data entry operator is able to enter for traceability values.
If you select Must come from a pre-defined list, then the data entry operator will only be able to select values from the pre-defined list of traceability values. However, if the priority list for this traceability field has been enabled by the TRACE_OPT template command, and if the user does not have rights to switch to the full traceability list, then the data entry operator will only be able to select values from the traceability priority list you set up in the Priority List editor module. This option standardizes how your traceability values are entered (e.g. spelling, abbreviation, etc.) and can make it easier to filter your data for specific traceability values.
If you select May be any value, then the data entry operator may either type a value or select a value from the pre-defined list of traceability values. This option is preferable for traceability values that change frequently, such as lot or batch numbers, where a traceability list could grow prohibitively long.

The traceability drop-down arrow
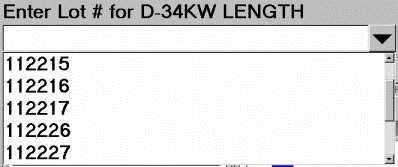
Traceability list
Your data entry operator can enter corrective action information – Event, Cause or Action Taken – on any row by clicking the Notes button or pressing the F7 key. The Note and Corrective Action screen will also be displayed if an individual measurement or a subgroup violates one of the real-time checks. However, you may also insert columns for Event, Cause and Action Taken in your template if you want to fill all the rows with the same corrective action information, or if your template will read data from a file or RS-232 device that can supply the corrective action information for one or more of these columns.
Event, Cause and Action Taken column properties
If a corrective action column is inserted in your template, click on the Event, Cause or Action Taken column in the column bar to set its properties:
Show column during data entry – When this check box is selected, the operator will be prompted with a box to enter the Event, Cause or Action Taken value, as well as a message specifying the current row. The corrective action value will also be displayed in the “previous” box when the operator moves on to the next cell.
You should only clear this check box if your template will read data from a file or RS-232 device that can supply the Event, Cause or Action Taken information for this column. In these cases, clearing this check box may make the template run faster because it does not need to update the display for the cells in the Event, Cause or Action Taken column.
Show list automatically – When this check box is cleared, a data entry operator may click the drop-down arrow ![]() at the end of the Event, Cause or Action Taken input box, or press the F4 key, to select from a list of Event, Cause or Action Taken values.
at the end of the Event, Cause or Action Taken input box, or press the F4 key, to select from a list of Event, Cause or Action Taken values.
To automatically display the list of Event, Cause or Action Taken values as soon as the template reaches a corrective action cell, select the Show list automatically check box.
Require entry when using this template – When this check box is selected, the data entry operator will be forced to enter a value for this column before they can proceed to the next cell. When this check box is cleared, the data entry operator may leave this corrective action value blank and proceed to the next cell.
Copy value to all rows – When this check box is selected, an Event, Cause or Action Taken value entered in this column (in any row) will be copied to all the rows of the template.
This can save time in situations where data is entered for several characteristics that share the same Event, Cause or Action Taken information. In these situations, the data entry operator only has to enter the shared corrective action information once, rather than entering the same corrective action information on each row.

The Event, Cause and Action Taken drop-down arrow
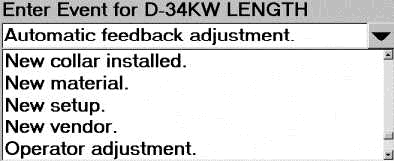
Event list
![]()
Notes button
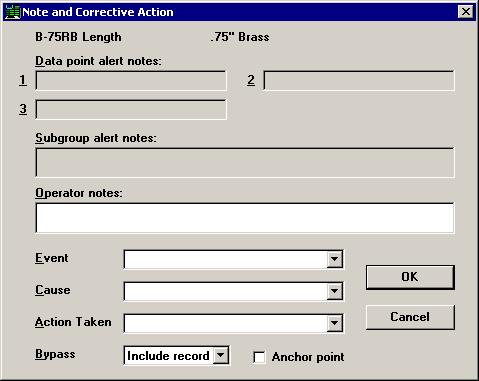
Note and Corrective Action screen
If this template will be used for real-time data entry, you should not insert a Date/Time column because the template will automatically time stamp data records with the computer clock date and time, as the records are being stored.
However, if this template may be used to enter data that was measured on a previous day (e.g. from paper data sheets or in data files from other data collection systems), then you should insert a Date/Time column in the template.
|
|
Date/Time column properties
If a Date/Time column is inserted in your template, click on the Date/Time column in the column bar to set its properties:
Show column during data entry – When this check box is selected, the operator will be prompted with a box to enter the date/time stamp, as well as a message specifying the current row. The date/time stamp will also be displayed in the “previous” box when the operator moves on to the next cell.
You should only clear this check box if your template will read data from a file or RS-232 device that can supply the date/time stamp for this column. In these cases, clearing this check box may make the template run faster because it does not need to update the display for the cells in the Date/Time column.
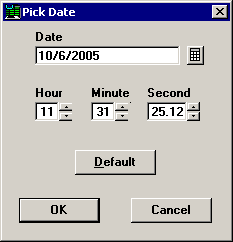
Show calendar automatically – When this check box is cleared, a data entry operator may click the calendar button ![]() at the end of the date/time stamp input box, or press the F4 key, to select the date/time stamp from a calendar screen. (Tip: click the
at the end of the date/time stamp input box, or press the F4 key, to select the date/time stamp from a calendar screen. (Tip: click the ![]() button to drop down the calendar.)
button to drop down the calendar.)
To automatically display the calendar screen as soon as the template reaches a date/time cell, select the Show calendar automatically check box.
Require entry when using this template – When this check box is selected, the data entry operator will be forced to enter a value for this column before they can proceed to the next cell.
When this check box is cleared, the data entry operator may leave this date/time stamp blank and proceed to the next cell.
Copy Date/Time value to all rows – When this check box is selected, a date/time stamp entered in this column (in any row) will be copied to all the rows of the template.
This can save time in situations where data is entered for several characteristics with the same date/time stamp. In these situations, the data entry operator only has to enter the shared date/time stamp once, rather than entering the same date/time stamp on each row.

The calendar button
The calendar screen
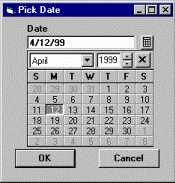
Drop down the calendar
Calculated columns are used to generate values or results that the program does not store in the database. These values can be either text strings or numeric values.
You may use calculated columns if you are very familiar with creating moderately complex templates – particularly using the advanced settings on step 5.
You may insert as many calculated columns as you need. When you insert a calculated column here in step 4, all the cells in the column default to formula input mode, rather than keyboard.
Calculated column properties
If one or more calculated columns are inserted in your template, click on each of the calculated columns in the column bar to set its properties:
Column label – There are two reasons why you may want to edit the column label.
One reason is that if you change any of the cells in this calculated column to use keyboard input on step 5 of the Template Wizard, this column label will be used during data entry to indicate to the operator which cell they are entering a value for, such as “Enter calculated for D-34KW LENGTH.” You may want to enter a more descriptive label for “Calculated”, to minimize any confusion during data entry.
The other reason you may want to edit the column label is that these column labels are displayed in the advanced settings of step 5 of the Template Wizard. Entering a more descriptive label on this step may help to minimize any confusion when editing the template commands and formulas in the advanced settings on step 5.
Show column during data entry – When this check box is selected, if you change any of the cells in this calculated column to use keyboard input on step 5 of the Template Wizard, the operator will be prompted with a box to enter the requested value.
In addition, when this check box is selected, the value entered in this cell will be displayed in the “previous” box when the template moves on to the next cell – regardless of the input mode (keyboard, formula, etc.)
You should clear this check box if the cells in this column do not require operator input. Clearing this check box may make the template run faster because it does not need to update the display for the cells in the calculated column.
Show keypad automatically – When this check box is cleared, a data entry operator may click the keypad button ![]() at the end of the input box, or press the F4 key, for cells with keyboard input. Clicking the keypad button displays the keypad, so that the operator can use a touch screen or pointing device (such as a mouse or trackball) to enter the value, instead of typing the number on the keyboard.
at the end of the input box, or press the F4 key, for cells with keyboard input. Clicking the keypad button displays the keypad, so that the operator can use a touch screen or pointing device (such as a mouse or trackball) to enter the value, instead of typing the number on the keyboard.
To automatically display the keypad as soon as the template reaches a calculated cell that uses keyboard input, check the Show keypad automatically check box.