Creating or deleting Users
Creating a new user
You can create a new user with default settings, or you can create a
new user based on the settings for an existing user.
Navigate
to the Users tab in the
Administration module.
To
create a new user with default settings: Right-click
GainSeeker Logins.
To create a new user based on the
settings for an existing user: Right-click on the user's
name and then click Copy.
When the New User prompt is displayed, enter
a name for this new user and then click OK.
 Some GainSeeker modules are only able to read the
first 20 characters of the user name. If you enter a long name for
the user, its first 20 characters must not be identical to the first
20 characters of any other user name.
If prompted, select a GainSeeker configuration
for this new user.
Click Submit
to finish adding this new user to the GainSeeker database.
(optional)
Change the settings for
this new user.
Importing new users from a file
Overview
Instead of manually creating each new GainSeeker user (above), you can
import users from a file. This saves time when you need to create multiple
users.
 Note:
GainSeeker cannot import a user that already exists in GainSeeker. Two
options for dealing with this include:
remove the user from the file and manually
edit the necessary settings.
rename
the existing GainSeeker user (for example, by prepending an abbreviation
like "old-") or delete
it before importing a fresh copy of the user from the file. Remember
to recreate the original user name's priority lists and assignments
(planned inspections, planned sessions, etc.) for the new copy of
the user name.
A. Download the CSV template
This step downloads a form for you to fill out and creates two lists
of information you can copy and paste into the form.
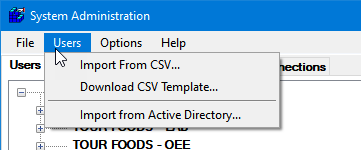
In the System Administration module, click the Users
menu and select Download CSV Template.
When prompted, choose a name and location for the .csv template
file and then click Save.
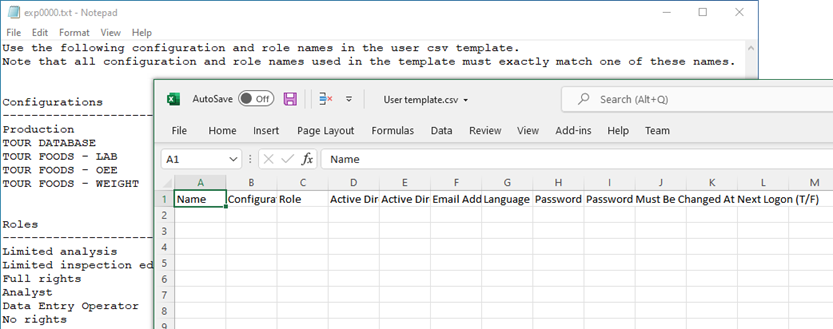
GainSeeker automatically opens this file in the Windows default app
for .csv files (typically Microsoft Excel or a text editor), and it
creates and opens a text file containing GainSeeker role names and
configuration names.
B. Add users to the .csv file
If you use Active
Directory integration, you should ask your Active Directory (AD) administrator
for a list of AD user names and group names that you can paste into the
.csv file.
Fill out one row in the .csv file for each new GainSeeker user
you want to import.
Blank rows are not allowed.
Do not enter a user name that already exists in GainSeeker.
 Some GainSeeker modules are only able to read
the first 20 characters of the user name. If you enter a long
name for the user, its first 20 characters must not be identical
to the first 20 characters of any other user name - either in
GainSeeker or in the .csv file.
If using a text editor to edit the .csv file, any value
containing a comma must be surrounded by quotation marks. (Excel
does this automatically.)
Do not delete the header row or any columns in the file.
Column |
required? |
Details |
Name |
required |
Cannot
match any existing GainSeeker user names. |
Configuration |
required |
Must
match an existing GainSeeker configuration. Copy this value from
the text file and paste it into the .csv file. |
Role |
required |
Must
match an existing GainSeeker role. Copy this value from the text
file and paste it into the .csv file. |
Active
Directory Groups |
optional |
AD
group names, separated by semicolons, that should be associated
with this GainSeeker user. |
Active
Directory Users |
optional |
AD
user names, separated by semicolons, that should be associated
with this GainSeeker user. |
Email
address |
optional |
|
Language |
optional |
Leave
this blank to use the Windows Display Language, or specify English, Spanish,
or French. |
Password |
optional |
|
Password
Must Be Changed At Next Logon |
optional |
To
force this user to change their GainSeeker password the next time
they log in to GainSeeker, enter T
or True.
If left blank, or if set to F or
False, the user is not forced
to change their password. |
Save your changes and close the .csv file.
C. Import the .csv file
In the System Administration module, click the Users
menu and select Import from CSV.

When prompted, browse to your .csv file and then click Open.
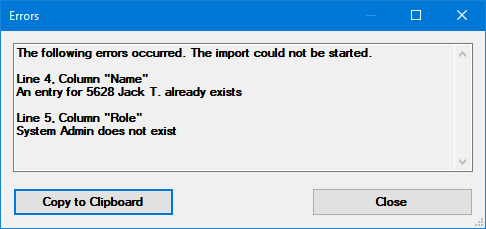
GainSeeker checks for errors before starting the import. You must edit
your .csv file and resolve these errors before the new users can be
imported.
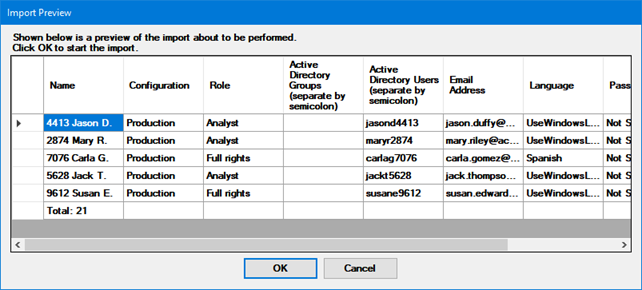
When no errors are detected, GainSeeker displays a preview of
the first five users in the file and reports the total number of users
that will be imported. If this looks correct, click OK
to begin the import.
Importing new users from Active Directory
 Note: Instead
of using this older feature, please consider importing
from file where you can enter more settings for each new user. Importing
from Active Directory (AD) only sets five user settings - the AD name,
AD user association, AD email address, role, and configuration -and sets
everything else to default values that you may need to manually
edit for each user.
Overview
This function is used for Active
Directory integration with GainSeeker. You can use it to:
automatically create new GainSeeker users with the same names
as the AD user or group names you select.
set each new GainSeeker user's Active
Directory association to the matching AD user or group name.
import each user's email
address from AD into the new GainSeeker user.
configure these new GainSeeker users with the role
and configuration you specify.
GainSeeker cannot import an AD user or group that matches the name of
an existing GainSeeker user. Two options for dealing with this include:
manually edit the
Active Directory association and email address for each existing user.
rename
the existing GainSeeker users (for example, by prepending an abbreviation
like "old-") or delete
them before importing fresh copies of these users from AD. Remember
to recreate the original user name's priority lists and assignments
(planned inspections, planned sessions, etc.) for the new copy of
the user name.
How to run the import
Decide which GainSeeker role and configuration should be assigned
to the users you are importing. (You can run this import process multiple
times for different combinations of roles and configurations.)
In the System Administration module, click the Users
menu and select Import from Active
Directory.

This displays the Active Directory
Setup Assistant window. (If this window does not look like
the example below, GainSeeker cannot access the Active
Directory domain you provided earlier. You need to specify an
AD domain that GainSeeker can access before continuing.)
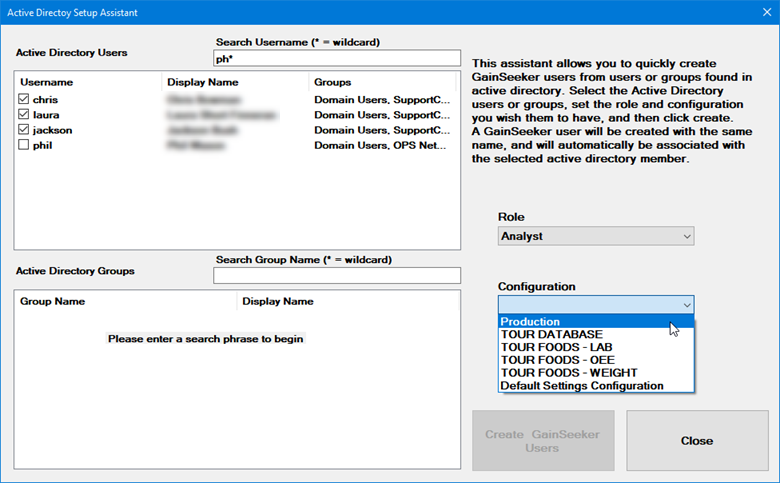
Select AD users and groups to import:
In the Search Username
or Search Group Name box,
type the AD user name or group name that you want to associate
with this GainSeeker user. You can also type part of the name
and use * as a wildcard for the remaining characters, like the
example above.
AD will return a list of user names or group names that match your
search criteria. (This can be slow.)
Check the box(es) for the desired AD user name(s) or group
name(s).
(optional) To associate more AD users or groups with this
GainSeeker user, repeat the search for the next AD user or group
and check the box for the desired name.
Repeat this step until all AD users or groups have been selected.
Select the GainSeeker Role
to assign to these users.
Select the GainSeeker Configuration
to assign to these users.
Click Create GainSeeker Users
to begin the import.
Deleting a user
When
you delete a user, its priority
lists and stored
session assignments will also be deleted.
Navigate
to the Users tab in the
Administration module.
Right-click on the user's name and
then click Delete.
When the Delete
user prompt is displayed, click Yes.
Click Submit
to finish deleting this user from the GainSeeker database.
 Some GainSeeker modules are only able to read the
first 20 characters of the user name. If you enter a long name for
the user, its first 20 characters must not be identical to the first
20 characters of any other user name.


