You can easily change the sequence of tests in a sub-inspection to better match the workflow of your inspection process.
You can also reorder the sub-inspections within the overall inspection
|
Contents [Hide] |
The order in which tests display during the sub-inspection is determined by the order in which the test buttons display from top to bottom in the Design panel
You can change the order of sub-inspections by simply repositioning the test buttons in the Design Panel
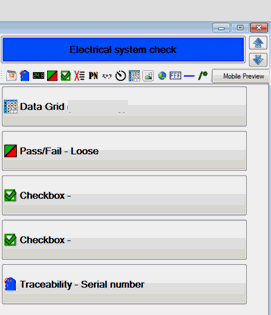
Example: In the following example for the Electrical system check sub-inspection, the Data Grid test is set to occur prior to the Pass/Fail, Checkbox, Checkbox, and Traceability tests—in that order.
In the Design panel (center panel) of the Inspection Editor, click the button for the sub-inspection that contains the tests you want to reorder. The tests for that sub-inspection then display.
You can also move multiple buttons at one time by multi-selecting them.
Then, click the test button you want to reposition in the Design panel.
Click the blue up-or-down arrow buttons  at the top of the Design panel to move the button to the correct position.
For convenience, you can multi-select two or more tests in the Inspection Editor, then select an action for the group such as Copy, Cut, Paste, or Delete.
You can also select multiple tests and reposition them within a sub-inspection to better match your workflow.
Select two or more tests. The text on the buttons for the tests you selected changes to Italic. (For information about how to multi-select items in a list, see Selecting multiple items)
Then, right-click and select an action for the group from the menu that displays
Or, to move the selected items as a group up or down on the list:
at the top of the Design panel until the group is correctly repositioned.