
This is the second of two topics that detail steps for creating an inspection that can be used on PCs or mobile devices. See Creating an inspection: Part 1 for initial steps for creating the inspection before the Inspection Editor opens.
For a more general overview about how inspections are created, see Overview: Creating Inspections
Launching the Inspection Editor
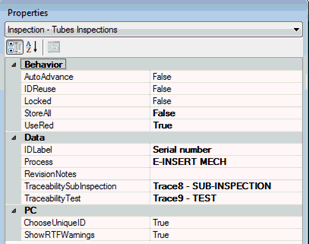
These properties include determining how the completed overall inspection displays and performs when it is run on a PC or mobile device. Notice that some properties are specific to PC or mobile devices. For a complete list of available properties for each inspection type, see the topic: Tests
![]()
The StoreAll property for this inspection is set to False. This only stores data that fails any of the tests. It does not store data without defects. (Hint: Storing data of both types can tell you whether a test is being performed.)
The UseRed property is set to True. This changes the color of the button for this sub-inspection to red when defects were present when data was last submitted for the sub-inspection. GainSeeker uses sub-inspection button color coding to help you quickly see the completion status of a sub-inspection.
The text "Serial number" is entered in the IDLabel property. This is the display label for the Unique ID field for individual inspections that are run.
![]()
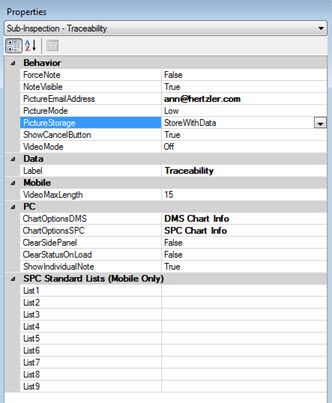
The PictureMode property is set to Off for the Traceability sub-inspection. For a mobile device inspection, this disallows the inspector from taking any photos on this sub-inspection page. For a PC inspection, this disallows the inspector from attaching photos to the data for this sub-inspection. (Taking photos while the operator is on the Traceability page is deemed irrelevant to the inspection process, at least for this example.)
![]() These
tests are added to the sub-inspection:
These
tests are added to the sub-inspection:
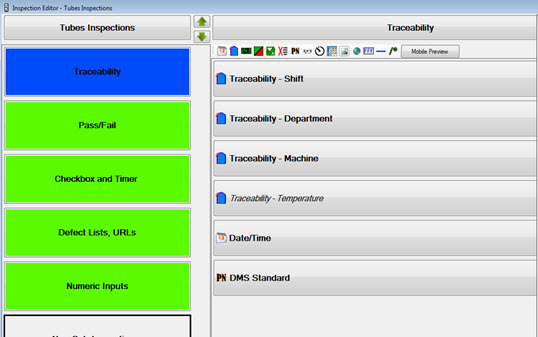
Four Traceability tests (one for each of these traceabilities: Shift, Department, Machine, and Temperature)
One Date/Time test
One DMS Standard test
Add
four Traceability
tests  to the Traceability
sub-inspection.
to the Traceability
sub-inspection.
Change any properties for the tests.
![]()
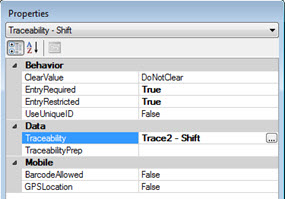
The first Traceability test (see image below), the Traceability property is set to Shift. This is the label for the field where the data for this test is stored.
The EntryRequired property is set to True. This requires the operator to submit a value.
The EntryRestricted property is also set to True. This requires the operator to select the information to submit from a defined list (Shift 1, Shift 2, . . . , for example).
For the second test, the Traceability property is set to Department. The EntryRequired property is set to True. The EntryRestricted property is also set to True. This requires the operator to select the information to submit from a defined list.
For the third test, the Traceability property is set to Machine. The EntryRequired property is set to True.
For the fourth test, the Traceability property is set to Temperature.
Add a Date/Time
test  to the Traceability
sub-inspection.
to the Traceability
sub-inspection.
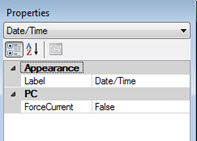
![]() No
property settings need to be changed since we want to use the default
setting Date/Time as the display
label.
No
property settings need to be changed since we want to use the default
setting Date/Time as the display
label.
 to the Traceability sub-inspection.
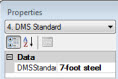
![]() The
part number 7-foot steel is selected
for the DMSStandard property.
This is the part number under which all data is stored for the TUBES
process.
The
part number 7-foot steel is selected
for the DMSStandard property.
This is the part number under which all data is stored for the TUBES
process.
Add a new sub-inspection to the inspection. Make any property changes to the sub-inspection properties as needed. No changes are made for this example.
![]() The
sub-inspection is named Tube welds.
The
sub-inspection is named Tube welds.
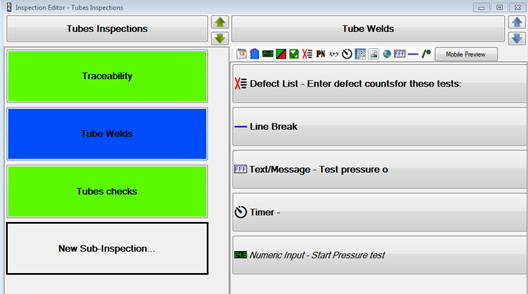
![]() The
following tests are added to the Tube
welds sub-inspection:
The
following tests are added to the Tube
welds sub-inspection:
Defect List
Line Break
Text/Message
Timer
Numeric Input test
Add the Defect List
test  to
the Tube welds sub-inspection.
to
the Tube welds sub-inspection.
Change any properties for the test.
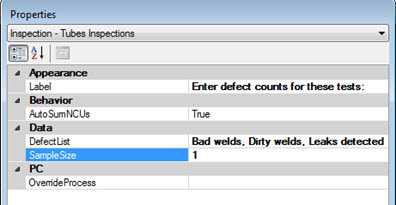
![]()
The text "Enter defect counts for these tests:" is entered in the Label property. This is the display label for the test.
Defects to associate with the test are selected for the Defect List property: Bad welds,Dirty welds,Leaks detected
The text 1 is entered for the SampleSize property.
Add a Line
Break  to the Tube
welds sub-inspection. The line break has no property settings.
It serves as a visual divider between tests on a mobile device page.
to the Tube
welds sub-inspection. The line break has no property settings.
It serves as a visual divider between tests on a mobile device page.
Add a Text
test  to the Tube
welds sub-inspection.
to the Tube
welds sub-inspection.
![]()
"Test pressure of welds by filling with air for 5 minutes using the Timer. Record the remaining time in the Part Number field below." is entered for the Label property.
Add
a Timer  test to the
Tube welds sub-inspection. Set
the properties for the test.
test to the
Tube welds sub-inspection. Set
the properties for the test.
![]()
Text for the Label property is entered: "Pressure Test".
The TimerSeconds property is set to 300 seconds.
 test
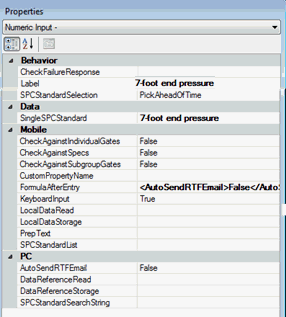
test![]()
"End pressure test" is entered for the Label property for the test.
The SPC standard 7-foot end pressure is selected for the SingleSPCStandard property.
![]() The
sub-inspection is named Tube checks.
The
sub-inspection is named Tube checks.
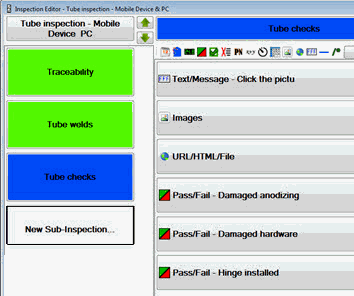
![]() The
following tests are added to the Tube
checks sub-inspection:
The
following tests are added to the Tube
checks sub-inspection:
Text/Message
Image
URL/HTML/File
Three Pass/Fail tests (one each for damaged anodizing, damaged hardware, and hinge installed)
to the Tube
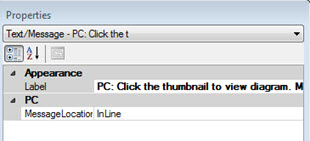
checks sub-inspection.![]()
The text "PC inspections: Click the thumbnail to view diagram. Mobile inspections: Clink the link." is entered in the Label property field.
 to the Tube
checks sub-inspection.
to the Tube
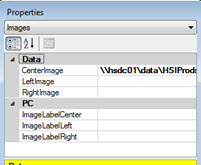
checks sub-inspection.![]() The
CenterImage
property is selected for the positioning of the image. The full file path
for the image is entered as the property.
The
CenterImage
property is selected for the positioning of the image. The full file path
for the image is entered as the property.
Add a URL/HTML/File
 to the Tube
checks sub-inspection.
to the Tube
checks sub-inspection.
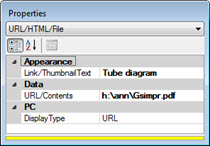
![]()
The text "Tube diagram" is entered for the Link/ThumbnailText property. This is the label for the link the inspector clicks to display the file in a mobile inspection, and the label for the thumbnail image in PC inspections.
The file path for the diagram is entered in the URL/contents property.
Add the first Pass/Fail
test  to the Tube
checks sub-inspection.
to the Tube
checks sub-inspection.
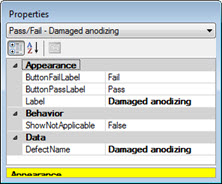
![]() :
:
For the first Pass/Fail test:
Damaged anodizing is selected for the DefectName property. This is the defect that is associated with this test.
For the second Pass/Fail test:
Damaged hardware is selected for the DefectName property. This is the defect that is associated with this test.
For the third Pass/Fail test:
Hinge installed is selected for the DefectName property. This is the defect that is associated with this test.
The ShowNA property is set to True. This displays an NA ("Not applicable") button on the sub-inspection page in addition to True and False buttons.
Before you can run your inspection, you must save and publish it.
If you create an inspection to run on a mobile device and at some point you want to create a similar inspection for use on a PC, you can copy your mobile device inspection and then make changes to tailor it to a PC. See using the Copy... button on the Manage Inspections dialog for more information.