Installing sample data
To help you understand how to use different features of GainSeeker, two sample data sets are included on the GainSeeker installation CD.
Installing the Manufacturing data set
The sample data set for manufacturing data is comprised of:
-
one set of database tables
-
one folder that contains supporting text files
-
one configuration that points to this set of tables and this folder
-
one user that logs in to this configuration
To install the sample data set for manufacturing data:
-
Install or upgrade GainSeeker on one or more workstations.
-
At any of these workstations, launch \TourData\AddTour.exe on the GainSeeker installation CD.
-
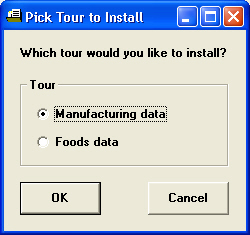
When prompted to choose which data set to install, click Manufacturing data and then click OK.
-
Log in as a user with module access to the Administration module (such as "SPC Manager").
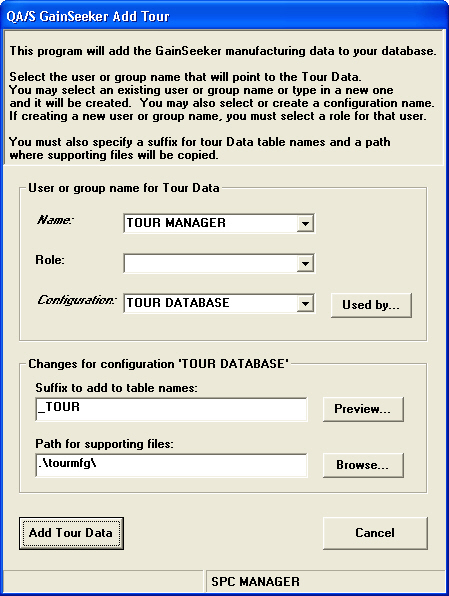
This will display the QA/S GainSeeker Add Tour screen for the manufacturing data set:
-
In the User or group name for Tour Data area:
-
Enter the GainSeeker user for whom you will install the manufacturing data set.
You can either choose an existing user or enter a name for a new user.
-
If you choose an existing user, this program will modify the configuration assigned to this user.
-
If you enter a name for a new user, you must also choose a Role for this new user. When you add the manufacturing data set, this program will create this new user for you.
-
Enter the GainSeeker configuration that will be assigned to the user you selected for the manufacturing data set.
You can either choose an existing configuration or enter a name for a new configuration.
-
If you choose an existing configuration, this program will modify the tables and file paths in this configuration.
To determine whether any other GainSeeker login names use this configuration, click Used by.
-
If you enter a name for a new configuration, this program will create this new configuration for you.
-
Specify a Suffix to add to table names, which will distinguish the tables containing sample manufacturing data from those containing your production data.
The number of characters you may enter depends on the longest tablename to which your text will be appended as well as the type of database you are using. The maximum length for a tablename is 20 characters for Pervasive, 30 characters for Oracle, and >60 characters for SQL Server and MySQL.
To view the table names to which the sample manufacturing data will be added, click Preview.
-
If these table names do not yet exist in your GainSeeker database, the Add Tour program will create them for you and fill them with all of the sample data records.
-
If your GainSeeker database already contains these table names, it is strongly recommended that you drop these tables or delete all records from these tables before using the Add Tour program to add data to them. There are two reasons for this:
-
-
If you install sample data into tables that already contain data records, the program will not replace any records that already exist in those tables – including any sample data that you may have edited. Thus, the end result of running the Add Tour program may not in fact be a "clean" copy of the sample data.
-
If you install sample data into tables that already contain data records, three of these tables (TRACEMST, TRPRIMST and DPROCDL) allow the Add Tour program to add a new copy of records that already exist. This results in duplicate records in these tables, which risks causing unexpected results.
-
Specify a Path for supporting files, where any flat files needed for the sample manufacturing data will be stored.
-
If the specified path does not yet exist, the Add Tour program will create it for you and fill it with all of the sample data files.
-
If the path already exists, it is strongly recommended that you delete all files in this path before using the Add Tour program to copy files into it.
The reason for this is that the Add Tour program will not replace any files that already exist in this path - including any files that you have modified. Thus, the end result of running the Add Tour program may not in fact be a "clean" copy of the sample data.
-
To install the sample data with the settings you have specified, click Add Tour Data.
Installing the Foods data set
The sample data set for foods data is comprised of:
-
one set of database tables
-
one folder that contains supporting text files
-
three configurations that point to this set of tables and this folder
-
one user that logs in to each configuration (for a total of three users)
To install the sample data set for foods data:
-
Install or upgrade GainSeeker on one or more workstations.
-
At any of these workstations, launch \TourData\AddTour.exe on the GainSeeker installation CD.
-
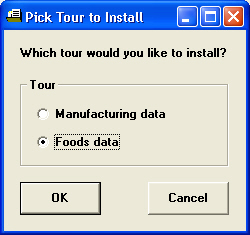
When prompted to choose which data set to install, click Foods data and then click OK.
-
Log in as a user with module access to the Administration module (such as "SPC Manager").
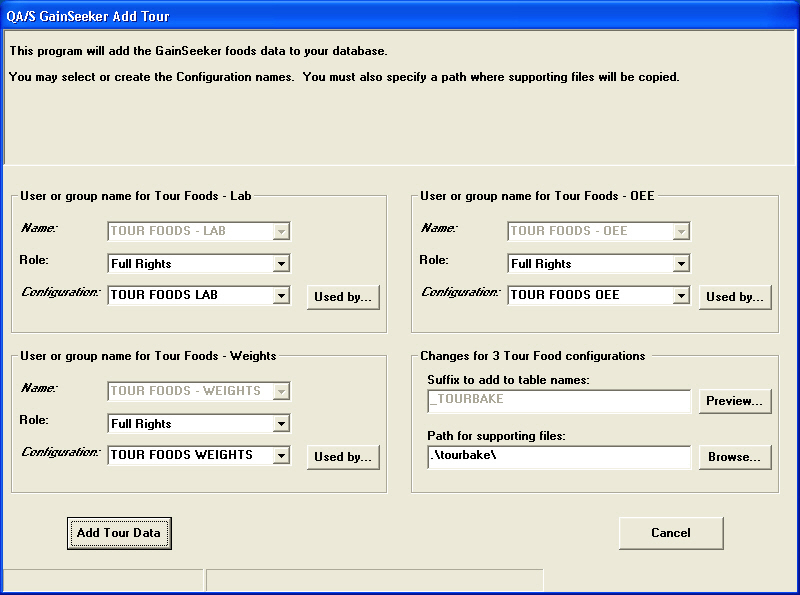
This will display the QA/S GainSeeker Add Tour screen for the foods data set:
-
This screen allows you to configure three users for the sample foods data.
In each User or group name for Tour Foods area:
-
The name for the user is predefined and cannot be changed.
If a user with this Name does not already exist, you must choose a Role for this new user. When you add the foods data set, this program will create this new user for you and assign it to this role.
-
Enter the GainSeeker configuration that will be assigned to this user.
You can either choose an existing configuration or enter a name for a new configuration.
-
If you choose an existing configuration, this program will modify the tables and file paths in this configuration.
To determine whether any other GainSeeker login names use this configuration, click Used by.
-
If you enter a name for a new configuration, this program will create this new configuration for you.
-
The Suffix to add to table names will distinguish the tables containing sample foods data from those containing your production data.
This suffix is predefined and cannot be changed.
To view the table names to which the sample foods data will be added, click Preview.
-
If these table names do not yet exist in your GainSeeker database, the Add Tour program will create them for you and fill them with all of the sample data records.
-
If your GainSeeker database already contains these table names, it is strongly recommended that you drop these tables or delete all records from these tables before using the Add Tour program to add data to them. There are two reasons for this:
-
-
If you install sample data into tables that already contain data records, the program will not replace any records that already exist in those tables – including any sample data that you may have edited. Thus, the end result of running the Add Tour program may not in fact be a "clean" copy of the sample data.
-
If you install sample data into tables that already contain data records, three of these tables (TRACEMST, TRPRIMST and DPROCDL) allow the Add Tour program to add a new copy of records that already exist. This results in duplicate records in these tables, which risks causing unexpected results.
-
Specify a Path for supporting files, where any flat files needed for the sample foods data will be stored.
-
If the specified path does not yet exist, the Add Tour program will create it for you and fill it with all of the sample data files.
-
If the path already exists, it is strongly recommended that you delete all files in this path before using the Add Tour program to copy files into it.
The reason for this is that the Add Tour program will not replace any files that already exist in this path - including any files that you have modified. Thus, the end result of running the Add Tour program may not in fact be a "clean" copy of the sample data.
-
To install the sample data with the settings you have specified, click Add Tour Data.
-
One of the .Launch settings that you have imported is an "ROI Calculator". To make this work correctly on your system, you must:
-
Launch the .Launch module and log in as the TOUR FOODS - LAB user.
-
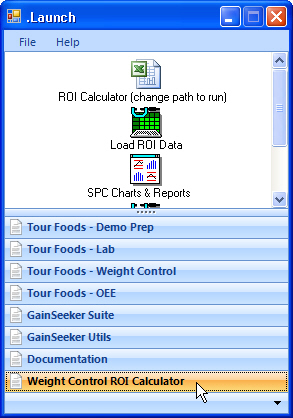
Click the Weight Control ROI Calculator group:
-
Right-click the ROI Calculator shortcut and then click Settings.
-
Update the Target box to include a file path for the .xls file. (This file will exist in the Path for supporting files that you specified when installing the sample foods data.) If you use the Browse button to find the .xls file, you should make sure to replace "excel.exe /r" at the beginning of the Target – this ensures that the file will be opened in read-only mode.
You may also want to remove the text "(change path to run)" from the Label.
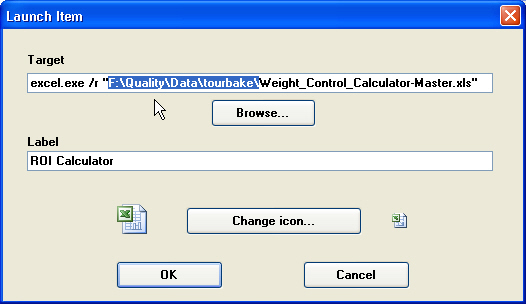
When finished changing the settings, click OK.
-
To test the modified shortcut and ensure that it correctly opens the .xls file, double-click the ROI Calculator shortcut.


