You can define default calendar and date options for each GainSeeker configuration. On the Configurations tab of the GainSeeker System Administration module,
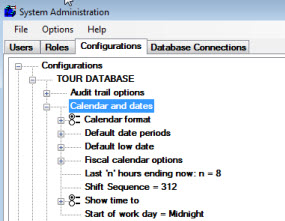
Navigate to the Calendar and dates settings on the Configurations tab of the System Administration module following this path:
Configurations | (configuration name) | Calendar and dates

This setting affects all of the predefined date periods that relate to weeks, months, quarters, and years.
If your analysis and reporting must adhere strictly to a fiscal calendar used by your organization, you should choose the one of the Fiscal calendar formats:
|
Setting: |
Explanation: |
|
4, 4, 5 |
Each quarter in the fiscal year begins with a four-week month, followed by another four-week month and then a five-week month |
|
5, 4, 4 |
Each quarter in the fiscal year begins with a five-week month, followed by a four-week month and then another four-week month |
If you choose one of the Fiscal calendar formats, you should also set the Fiscal calendar options.
Most GainSeeker users choose the Gregorian calendar. With this setting, pre-defined date periods are defined according to the following rules:
|
Date period: |
Rule: |
|
Current Week, Previous Week, etc. |
The week begins on Sunday. |
|
Current Month, Previous Month, January from Current year, etc. |
The month begins on the first day of the calendar month (e.g., January 1, February 1, etc.). |
|
Current Quarter, Previous Quarter, Quarter 3 from Current year, etc. |
Quarters begin on January 1, April 1, July 1 and October 1. |
|
Current year, Previous year, etc. |
The year begins on January 1. |
If the Start of work day setting is 12:01 p.m. or later, these start dates will be modified to begin at this time on the previous day (e.g., week begins on Saturday evening instead of Sunday).
The settings in this tree determine the default date periods you can set that will be used to retrieve and analyze data in different areas of GainSeeker:
|
Setting: |
determines default date periods for: |
|
DMS Charts & Reports |
● creating new chart windows in the DMS Charts & Reports module ● creating new Attribute dashboards in the Enterprise Dashboard module ● creating new DMS Reports in the Dynamic Reports module |
|
SPC Charts & Reports |
● creating new chart windows in the SPC Charts & Reports module ● creating new Variable dashboards in the Enterprise Dashboard module ● creating new SPC Reports in the Dynamic Reports module |
|
SPC Data Entry |
retrieving SPC data in the SPC Data Entry module |
If you choose the date periods that will be used most frequently for these tasks, you will save time because you can avoid manually setting the period when you generate charts, reports and dashboards.
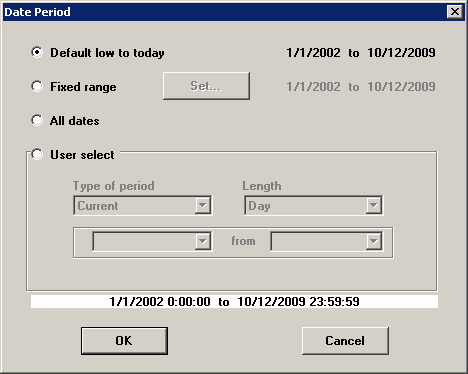
To set any of these default date periods, right-click on the date period in question. This will display the Date Period screen.

In most cases, it is preferable to choose a relative date range such as Default low to today, All dates or one of the User select options. Most of these options will adjust the actual dates used to retrieve data, based on the date when the user is retrieving data for the chart, report or dashboard. By contrast, if you set a Fixed range as the default date period, the exact dates you specify will be applied to the data being retrieved, regardless of the date when the user is retrieving the data.
Two of the options on this screen actually reflect other configuration settings:
The default low date used by Default low to today
In the User select area, if you choose the Type of period called Ending now, then you can choose a Length of 24 hours or another number of hours. This second number of hours is configured by the Last 'n' hours ending now setting.
When setting the default date period for SPC Data Entry, the Fixed range option and some of the User select options are not available.
You may notice that many of the User select options have a different name than their equivalent date periods in most GainSeeker modules, and a few have no equivalent. When you choose a User select option for the default date period, GainSeeker modules such as Enterprise Dashboard, SPC Charts & Reports and DMS Charts & Reports will apply this date period in one of two ways:
If you choose a User select date period that has an equivalent date period in modules such as Enterprise Dashboard, then this date period will be applied to the retrieved data as a relative date.
For example, if you choose a default date period of Current Day, modules such as Enterprise Dashboard will display a default date period of Today. Similarly, a default date period of Previous Week will be displayed as Last week.
If you choose a User select date period that does not have an equivalent date period in modules such as Enterprise Dashboard, then this date period will be applied to the retrieved data as a fixed date.
For example, if you choose the User select date period of Specific Week 1 from Current year, modules such as Enterprise Dashboard will display a default date period of Custom by date for the first week of the current year.
Note: You can change both of these settings as detailed in this topic.
GainSeeker default low date
The low date setting that GainSeeker uses by default changes every year on January 1. It is the year of the current January 1 year minus a year.
Example: If today's date is October 5, 2013, the default low date GainSeeker would use is January 1, 2012. On January 1, 2014, the default low date GainSeeker would use is January 1, 2013.
GainSeeker default high date
The high date setting that GainSeeker uses by default is always today—the current date and current time.
The Default low date will be used when users analyze data for the date period named Default low to today.
One option is to set the default low date to a fixed date and time – such as January 1 of the current year.
Each time a user analyzes data for the date period named Default low to today, that default low date will be the exact date you specify here:
Right-click the Fixed date node and enter the wanted low date and time.
Expand the Default low date method tree and then click the Fixed date/time node on this tree.
The other option is to set the default low date to subtract a specific amount of time – such as three months – from the current date at the time of data retrieval.
Each time a user retrieves data for the date period named Default low to today, that default low date will automatically be updated relative to the current date/time.
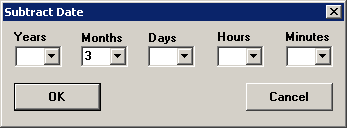
For example, if you set the default low date to subtract three months from the current date/time, then the default low date will always be three months before the date of analysis.
Right-click the Subtract amount node and enter the number of Years, Months, Days, etc. to subtract from the current date/time each time data is analyzed with the date period named Default low to today.

Expand the Default low date method tree and then click the Subtract from current date/time node on this tree.
If you create a new configuration and do not set a default low date, GainSeeker will assume a default low date of January 1 of the previous year instead of storing an actual date for this configuration. This means that at the start of each new year, the GainSeeker will assume a new default low date of January 1 of the previous year.
If you set the Calendar format to Fiscal 4,4,5 or Fiscal 5,4,4, then you should expand the Fiscal Calendar options tree and configure the following options:
Start date for fiscal year
This will be the starting date of your fiscal calendar. For most fiscal calendars, this will be a date other than January 1.
To change this date, right-click this node and enter the correct date.
Number of days in first week
For some fiscal calendars, the first "week" may be shorter or longer than seven days, so that the remaining weeks on the fiscal calendar can start on a more typical day (such as Sunday or Monday).
You should use this setting to specify the number of days in the first week of the fiscal year.
To change this number, right-click this node and enter the correct number of days in the first week of the fiscal year.
One of the predefined date periods is Last n hours ending now. You can use this setting to configure the number of hours to include in that date period.
For example, if you frequently analyze data that was generated in the last 12 hours, you can set this number to 12. Then one of the Date period options available will be 12 hours ending now.
To change this setting, right-click this node and enter the number of hours you want to use for this date period.
You can group data by shift sequence on DPU (Defects Per Unit) charts and OEE (Overall Equipment Effectiveness) charts.
To set the precision for displaying time stamps, expand this tree and then click Minutes, Seconds or Hundredths of seconds.
|
If you enter more than one data record per minute, you should display Seconds or Hundredths of seconds. If you may enter more than one data record per second, you should display Hundredths of seconds. Displaying less precision may significantly slow down your system during data entry because of date/time stamp conflicts. |
If you typically retrieve data from the start of the first shift of the day to the end of the last shift of the day, you can use this setting to determine the Hour and Minute when one work day ends and the next begins. This will affect the starting and ending dates and times of most pre-defined date periods, as in the following examples: