Create a shortcut you can click to have GainSeeker automatically open a Desktop. This can also include changing part numbers, filters, and date ranges. GainSeeker can additionally execute tasks such as printing, exporting, and closing the desktop.
This topic applies to desktops in the GainSeeker Charts module. For information on opening Desktops in Legacy charting modules, see Parameters to open a desktop.
|
Contents [Hide] |
Include only parameters in the command line that you want GainSeeker to automatically execute.
For example, if you want to a create a shortcut in which GainSeeker opens a desktop and leaves it open on the GainSeeker Charts window, you would not include the ExportType= or the Close parameter. If you do not want GainSeeker to open a dialog where you can make changes to the desktop before it opens, do not include the Prompt command.
Replace words and characters shown in italics with the name of the item you want to open and enclose the name with quotation marks as shown in the table.
For example, standard P-123 Length would be written like this with the Keys= parameter: Keys="P-123 Length"
Insert a blank space between parameters in the command line, similar to this example:
OpenType=0 OpenList="Desktop123" ExportType=Printer Close
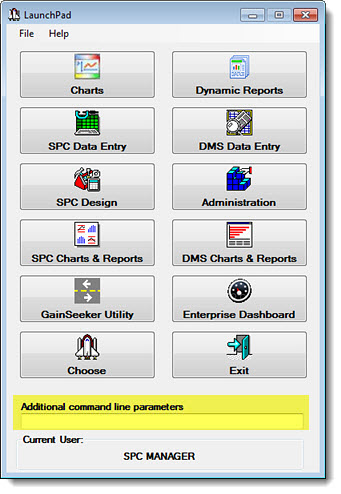
The Additional command line parameters field on LaunchPad is highlighted in the following example. Also see Setting up shortcuts to perform automatic functions

The parameters for command lines shown in the following table are suggestions for ways you might use parameters to formulate your commands. There are other combinations you can use that are not featured here.
Note: To have GainSeeker prompt you for a standard, date range, filter, statistics filter, or a combination of these, add the Prompt parameter to the command. See Prompt
|
To have GainSeeker automatically: |
Add to target line: |
Notes |
|
OpenType=0 |
The 0 character in the command line OpenType= 0 is the number zero |
|
|
Open="Desktop Name" |
|
|
keys=spc:"partno"
keys=dmsmult:"partno||process~partno||process~process" |
You can also combine different retrieval types in a single argument. See Desktop with charts below for more examples and information on picking part numbers and/or processes for charts on desktops. |
|
filter=dms:"filtername",spc:"filtername" |
You can also choose to have a command for either an SPC or DMS retrieval. For example, filter=dms:"filtername" Separate DMS and SPC filters with a comma |
|
daterange=1,"1/2/2013 13:45:00-1/5/2013 15:50:00" |
For examples and codes see Setting a date range for charts on a desktop below. |
|
ExportType=Printer or HTML or Email or EmailHTML |
See Export= and ExportType= below for information about differences between these parameters |
|
OR |
||
See ExportList= for information about |
Export="filename" or Export="emailaddress" |
|
|
View |
See View below |
|
Silent |
|
|
Close | |
|
To have GainSeeker automatically: |
||
 Note: If you do not have the Server Edition of GainSeeker, GainSeeker will ignore the file path and file name you specify, and a file of the specified type will automatically be created for you in your Windows TEMP path. Also, if you if you do not have the Server Edition and you specify an email address, it will not send it as an email. You can contact the Hertzler Sales Team for information about purchasing the Server Edition of GainSeeker.
Using the Export= or ExportType = parameters, you can opt to have GainSeeker automatically export the item specified in the Open= and OpenType= parameters to a:
Destination path and file name that you specify, or
Windows TEMP path
If you use ExportType=Email or EmailHTML or HTML or Printer, GainSeeker creates the export file in your Windows TEMP path. This parameter is used to tell GainSeeker only the type of export to execute. If you select Printer, you do not need to additionally use the Export = parameter.
ExportType=Email or ExportType=EmailHTML does not tell GainSeeker to direct the email to a specific recipient. See the Export= parameter below for information about sending the item to a specific email recipient or HTML file. See ExportList= for information about sending the item to a saved file listing multiple email recipients.
When emailing charts, the email subject line will be the chart window caption for the last chart drawn.
The difference between Email and EmailHTML is that EmailHTML does not include attachments. Both formats include charts in the body of the email message.
If you use Export="filename",GainSeeker exports the item (such as a chart) to a file you specify (for example: Export="PN422.charts.htm" [or .rtf or .jpg or .txt]).
If your export type is email, enter a valid email address for a single recipient after Export = . For example: Export="gainseeker@yahoo.com" .
For information about sending an email to multiple recipients, see ExportList= below.
To send the item specified in the Open= and OpenType= parameters to multiple email recipients:
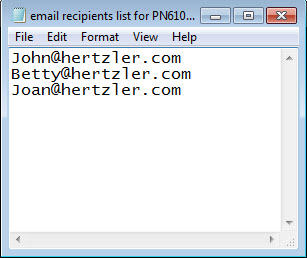
Fig. 1

Use the ExportType=Email parameter followed by the ExportList="filename" parameter. Include the name of the file you created that lists your email recipients, and include the path to that file.
Example: The parameters for emailing an item to a list of email names saved in a file as in Figure 1 above, would read similar to this (the location of the file name in this example is "c:\Users\bob\desktop\" and the file name is "email recipients list for PN61011.txt"):
ExportType=Email ExportList="c:\Users\bob\desktop\email recipients list for PN61011.txt"
(This would send emails to John, Betty, and Joan using the above example.)
Add the View parameter to your command line to have GainSeeker use Windows to launch the file executed by the ExportType= or the Export= parameter using the program that is associated with that file type.
If you want GainSeeker to open a dialog where you can make changes to the desktop (part numbers or processes, filters, and date periods, a retrieval) before it opens each time, include the Prompt parameter.
Including the Prompt command in your command line opens the Edit Desktop Settings dialog before the desktop opens.
Example:
The following example would prompt GainSeeker to first open the Edit Desktop Settings dialog before opening the specified desktop. Opening the dialog allows you to make changes to the specified desktop before it opens.
OpenType=0 Prompt Open="desktop1"
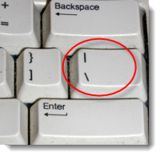
Between your "Part Number" name and your "Process" name, you need to insert double pipe symbols like this: ||
Hold the SHIFT key and press the Pipe/backslash key (shown below) twice to create double pipes:

All single-retrieval and/or multiple-retrieval charts on a desktop display the part numbers specified in command line arguments for the desktop. When a key is specified for a chart category (SPC or DMS multiple or single charts), that key is applied to all charts in that category for the desktop.
 Note about DMS Retrievals: When using keys for DMS charts in a desktop, any DMS chart that originally retrieved a list of processes is blank when both a part number and a process is specified in the keys. Additionally, any DMS chart that originally retrieved a list of part numbers and processes is blank when only a process is specified by the keys.
Format for a desktop with single-retrieval DMS and/or SPC charts
keys=dms:"partno||process" or keys=dms:"process"
Example: keys=dms:"K-GLOVE||T-SEWING" or keys=dms:"T-SEWING"
keys=spc:"partno"
Example: keys=spc:"1250 TEMP"
Format for a desktop with multiple-retrieval DMS and/or SPC charts
keys=dmsmult:"partno||process~process~partno||process"
Example: keys=dmsmult:"D-34KW CONNECTOR||P-MOLDING~E-34KB COVER||P-PRINTING"
(Note: In the above example, a tilde (~) symbol is used a separator between part numbers and processes.)
keys=spcmult:"partno~partno"
Example: keys=spcmult:"1250 TEMP~1400 TEMP"
(Note: In the above example, a tilde (~) symbol is used a separator between part numbers.)
Format for specifying more than one retrieval type in a single command
keys=spc:"partno",dmsmult:"partno||process~partno||process"
Example: keys=spc:"1250 TEMP",dmsmult:"K-GLOVE||T-SEWING~E34KB COVER||P-PRINTING"
 Note: The maximum end time for a date range is 23:59:59. If you set it 24:00:00 or higher, GainSeeker retrieves data through the current date and time, regardless of the year set for the date period.
For more information on filtering by a date period, see Calendar and Dates
Use the Daterange parameter to filter all charts on a desktop by a specific date period you select.
The values for Daterange= consist of a series of up to three individual code numbers as shown in the three tables below.
Format:
daterange=x,x,x
or
daterange=x,x
or
daterange=x
daterange=3,0,2 (specifies all data for the current month):
Code 3 (from Table 1) denotes that you always want to view data for a specific time increment for the following code: 0
Code 0 (from Table 2) denotes that you want to use the current data for the following code: 2
Code 2 (from Table 3) denotes that you want to use Month
|
Use this code to |
To: |
|
0 |
Filter all desktop charts by default low date to today using this format: daterange=0 |
|
1 |
Filter all desktop charts by a fixed date range using this format: daterange=1,"mm/dd/yyyy HH:nn:ss-mm/dd/yyyy HH:nn:ss"Example: daterange=1,"03/22/2012 11:46:00-03/22/2012 22:46:00" Note: GainSeeker orders the date range by your workstation's regional settings. For example, If your workstation is set to the date format: yyyy-MM-dd, for the above example you would use this date format: daterange=1,"2012/03/22 11:46:00-2012/03/22 21:46:00" |
|
2 |
Filter all desktop charts by all dates using this format for the first value: daterange=2 |
|
3 |
This code is used with a code from tables 2 and 3 below. Filter all desktop charts by a specific type of time period. For example, this could be the data for today or for the year or month. For example, to get data for the previous 8-hour period you would use this: daterange=3,1,7 |
|
Use this |
To specify: |
|
0 |
"Current" |
|
1 |
"Previous" |
|
2 |
"Ending today" |
|
3 |
"Ending now" |
|
Use this |
To specify: |
Can only be used if preceded by one of these codes from Table 2 above |
|
0 |
"Day" | 0, 1 |
|
1 |
"Week" | 0, 1, 2 |
|
2 |
"Month" | 0, 1, 2 |
|
3 |
"Quarter" |
0, 1, 2 |
|
4 |
"Year" |
0, 1, 2 |
|
5 |
"3 months" |
1 |
|
6 |
"6 months" |
1 |
|
7 |
"8 hours" |
3 |
|
8 |
"24 hours" |
3 |
daterange=3,3,8 (specifies all data for the previous 24-hour period, ending now):
Code 3 (from Table 1) denotes that you always want to view data for a specific time increment for the following code: 3
Code 3 (from Table 2) denotes that you want to data ending now for the following code: 8
Code 8 (from Table 3) denotes that you want for the previous 24-hour period
|
Use this |
To: |
|
0 |
Open Desktop |
|
0 |
Open Multiple Desktops |
|
1 |
Draw SPC Chart |
|
2 |
Draw DMS Chart |
|
3 |
Open Dashboard |