A sub-inspection contains tests you want to perform on a specific segment of the inspection. For example, if your inspection is for a boat, you might include sub-inspections to cover each major area such as the electrical, upholstery, hull, steering, and engine. Within each of these sub-inspection categories, you would then add applicable tests for the inspector to perform.
|
Contents [Hide] |
For information about the Inspection Editor functions, see Using the Inspection Editor
Add a sub-inspection to your inspection using this method:
Click the white New Sub-Inspection button on the Inspection panel of the Inspection Editor.
Enter a name for the sub-inspection in the Edit Label window that opens. You might use this name to describe a particular area of testing or a particular process, such as "Electrical" or "Labeling," for example.
The button for the sub-inspection you added highlights blue, indicating that the sub-inspection is selected.
The property settings for this sub-inspection are displayed on the Properties window when a sub-inspection is selected. You can set properties that are specific to each sub-inspection:
See Sub-inspection property settings for property descriptions.
To add a test to a sub-inspection:
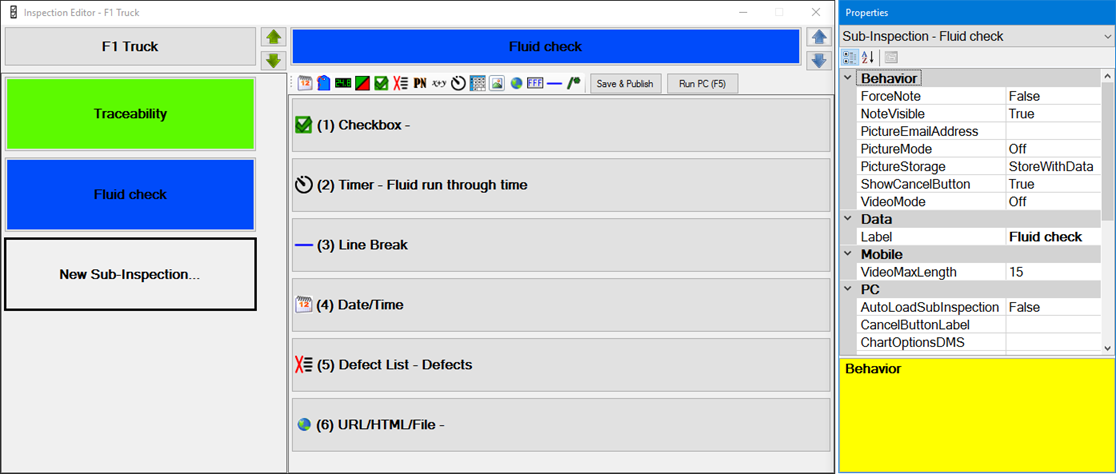
Click the sub-inspection button in the Inspection panel to which you want to add the test. The sub-inspection button highlights blue when it is selected (see the Fluid check sub-inspection in the above diagram).
Then, click a button for a test on the sub-inspection test toolbar in the Design panel:

Depending on which type of test you add, you may be asked to provide some information up front (a display label for the test, for example). The test button displays in the Design panel after you have provided all the requested information (if applicable). The Properties panel displays the properties for that test, which you can change.
See Tests for information about individual tests you can add to the sub-inspection.
You can set properties that are specific to each test you add to the sub-inspection. To change properties:
Click the button for that test in the design panel to select it. The button will display a highlighted border when it is selected and the Properties panel will display properties specific to that test.
See Changing Property Settings for more information.
For properties specific to each test, see test properties
You can change the progression of sub-inspections and test within an inspection to more closely match your inspection workflow.
See Inspection properties for information about setting properties for the inspection