Sending information to MINITAB via COM
|
 Note: This topic pertains to the GainSeeker Charts and PC Collect modules. Note: This topic pertains to the GainSeeker Charts and PC Collect modules.
For information on the SPC Data Entry module and legacy GainSeeker modules such as SPC Charts and Reports, DMS Charts and Reports, and Enterprise Dashboard, see Exporting data to MINITAB and MINITAB Charts.
|
Requirements to send information to MINITAB via COM
-
GainSeeker must detect that a compatible MINITAB version is installed on your workstation
-
Your workstation must be configured for GainSeeker to use the correct version of MINITAB
-
Your GainSeeker login name must have rights to Send to Printer or Editor
Steps to send information to MINITAB via COM
-
Right-click on the chart you want to send to MINITAB, and then point to Send to.
-
Depending on the type of chart you began with, one of the following will be displayed on the right-click menu. Select the option available:
-
Minitab
-
Send data to Minitab
-
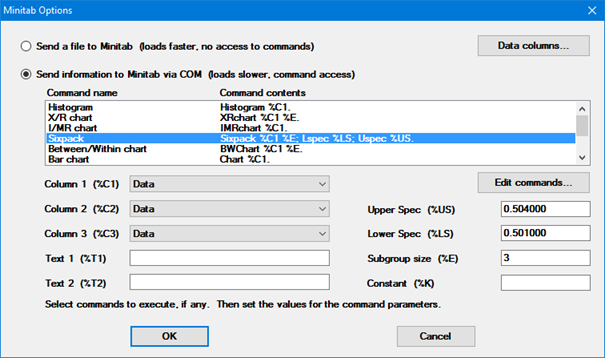
On the Minitab Options window, choose Send information to Minitab via COM.
-
In the Command name box, click the name of the command you would like to execute in MINITAB, or hold down CTRL and click several commands. It is also possible to enter additional MINITAB commands.
-
For the command(s) you have selected, review the information listed under Command contents. For each %NN parameter in your selected command, make sure that each corresponding option below the Command name box is set correctly.
-
In the example above, the contents of the selected command, Sixpack, contain four %NN parameters - %C1, %E, %LS, and %US. Thus, we should review the settings for Column 1 (%C1), Subgroup size (%E), Lower Spec (%LS) and Upper Spec (%US) and modify these if necessary.
-
By default, the program fills the Upper Spec, Lower Spec, and Subgroup size fields from information stored in the standard.
-
None of the default commands uses the %C3 (Column 3), %T1 (Text 1), %T2 (Text 2), or %K (Constant) parameters. If you use only the default commands, then you will never need to modify the values in these fields. However, if you enter additional commands, those commands might reference one or more of these parameters.
Entering additional MINITAB commands
To enter additional MINITAB commands, click Edit commands.
You can use the syntax of existing commands as a model for inserting new command names and contents. Here is a simple way to determine the MINITAB commands for new charts:
-
Send some GainSeeker data to MINITAB.
-
In MINITAB, generate the new charts you desire from the GainSeeker data.
-
In MINITAB, go to the Project Manager and click the History folder. This folder displays the MINITAB commands used to generate those charts.
When copying new commands from the MINITAB History folder and pasting them into the text file used by GainSeeker, you should replace the following portions of the MINITAB command with these GainSeeker placeholders:
|
portion of command:
|
use these placeholders instead:
|
|
column names
|
%C1 , %C2 and %C3
For information on defining these parameters, see the last step above.
|
|
text values
|
%T1 and %T2
For information on defining these parameters, see the last step above.
|
|
upper specification limit
|
%US
|
|
lower specification limit
|
%LS
|
|
subgroup size (SPC) / sample size (DMS)
|
%E
|
|
constant
|
%K
For information on defining this parameter, see the last step above.
|
|
other constants and statistical values
|
%SOn where n is one of the Statistics identification code numbers for SPC or for DMS
Example: To reference the Target X from the standard, which is SPC statistic number 252, use the placeholder %SO252.
|
For example, if you copy the command string
CuSum 'Data' 'Row'; Target 0.5.
from MINITAB to GainSeeker, you should replace the following portions of this command:
|
portion of command:
|
use these placeholders instead:
|
|
'Data'
|
This value specifies which column contains data values.
If you define Column 1 (%C1) as Data, then you should specify %C1 for this value.
|
|
'Row'
|
This value specifies which column contains subgroup size information.
If you define Column 2 (%C2) as Row, then you should specify %C2 for this value.
|
|
0.5
|
This number represents the Target X for this measurement.
The SPC statistic number for Target X is 252, you should specify %SO252 for this value.
|
The resulting command string for GainSeeker to use when creating this MINITAB chart is
CuSum %C1 %C2; Target %SO252.
 Note: This topic pertains to the GainSeeker Charts and PC Collect modules.
