Add a Pass/Fail/NA test to a sub-inspection when you want the inspector to indicate whether set criteria is met for the inspected item.

Circumstances in which you may want to add a Pass/Fail test to a sub-inspection:
The Pass/Fail test is best used for testing procedures that need a yes (passes) or no (fails) answer to an explicit testing question such as "Does the bolt have threading?" It is not used for testing procedures that require recording specific variables, such as the number of missing or superfluous bolt threads.
You may want to use the N/A ("not applicable") option along with Pass/Fail if you use the same inspection for similar parts that have distinct traits. For example, the inspection is used for a bolt that has threading in its specification and for a nail that does not have threading included in its specification. N/A would be the option the inspector would select for this test when the nail is inspected.
Note: If you have multiple defects associated with a test, consider using the Defect List test instead of Pass/Fail/NA tests.
|
Contents [Hide] |
Click the Pass/Fail test toolbar button  to add this test to the sub-inspection.
Select a defect to include in the analysis for the test from the Selects Defects window that opens.
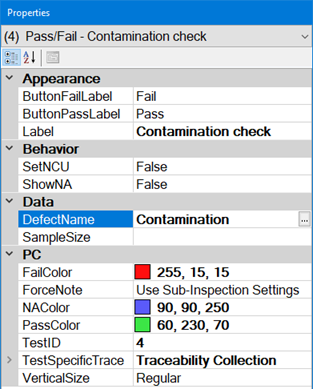
Set any properties for this test on the Properties panel that displays after the test is added.
For information about using the Properties panel, see Changing property settings

Property |
Default setting or default display |
Allows |
APPEARANCE |
||
Fail |
Enter text to display on the fail button. [For example, you may want to display "No" or "Reject" on the button.] |
|
Pass |
Enter text to display label on the pass button. [For example, you may want to display "Yes" or "Accept" on the button.] |
|
Label |
[blank] |
Enter text for a display label for this test. |
BEHAVIOR |
||
False. The NCU (nonconforming units) field is always set to 0 and the Number Good field is always set to 1. Note: When the configuration setting Set nonconforming units = number of defects is enabled, the data looks as if this property were set to True. |
True. When the inspector fails the test, the NCU field is set to 1 and the Number Good field is set to 0. [PC]: When the inspector clicks the N/A button, a data record is stored with Sample Size = 0, NCU = 0, and Defects = 0 - regardless of this property. |
|
False. Does not display the N/A ("not applicable") option along with Pass and Fail options for this test. |
True displays all three options (Pass, Fail, and N/A) for this test. [PC]: If the inspector selects the N/A button, the data record has Sample Size = 0, NCU = 0, and Number Good = 0 - regardless of the SetNCU (above) and SampleSize (below) properties. [Mobile]: If the inspector selects the N/A button, no data is stored for this test - even if the Inspection property StoreAll is set to True. |
|
DATA |
||
[blank] |
Select a defect for the test. You can double-click on the Pass/Fail test to edit this property. |
|
[blank] - The Sample Size for the data record will be 1. |
Enter a different sample size for the data record. Typical values are 0 or 1. If the inspector clicks Fail, the defect count will be 1 - regardless of this property. [PC]: When the inspector clicks the N/A button, a data record is stored with Sample Size = 0, NCU = 0, and Defects = 0 - regardless of this property. |
|
PC |
||
|
[PC only] |
The default color for the Fail button is color number 255, 15, 15 . |
To set a different color for the Fail button, you can use one of these methods:
|
|
[PC only] |
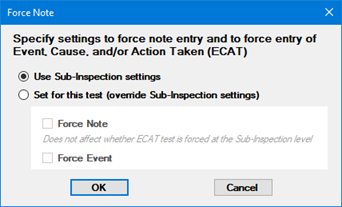
Use Sub-Inspection Settings. Apply the settings from the sub-inspection ForceNote property to this test. |
Click the ForceNote
property and then click the |
NAColor [PC only] |
The default color for the N/A button is color number 90, 90, 250 . |
To set a different color for the N/A button, you can use one of these methods:
|
PassColor [PC only] |
The default color for the Pass button is color number 60, 230, 70 . |
To set a different color for the Pass button, you can use one of these methods:
|
|
[PC only] |
A unique TestID number is automatically assigned to each test in the inspection, but you can change this number to a more meaningful name. The TestID property is only used in Python scripts for PC Collect inspections. For more information, see About the TestID property |
Enter a name for the TestID. |
|
[PC only] |
[blank] |
You can specify one or more traceability values that will be applied only to this Pass/Fail test on this sub-inspection. These values will not be displayed to the inspector during data entry. If you want to store this test's TestID property as a traceability value, enter [testid] . Any traceability values you set here will override values set by Traceability tests, Inspection properties, Planned Inspection traceability values, etc. |
|
[PC only] |
Regular. Test is full-sized. |
Short. Helps you to fit more tests on the screen. Test may be shorter, and white space above and below this test may be reduced. |

Use Sub-Inspection Settings
Apply the settings from the sub-inspection ForceNote property to this test.
Set for this test (override Sub-Inspection settings)
Force Note
If this setting is checked:
The inspector is required to enter a note when this test has a defect. Required notes can be entered from either the Sub-inspection Note (bottom of the page) or the test's Individual Note (next to the test).
When the sub-inspection properties NoteVisible and ShowIndividualNote are set to False, the inspector is prompted to enter a note when the Submit (sub-inspection data) button is pressed.
If this setting is cleared:
The presence of a defect does not require the inspector to enter a note.
 The
sub-inspection
ForceNote property and the presence of a Traceability
test for DMS Event
determine whether the presence of a defect will require the inspector
to enter a value for this test.
Force Event
If this setting is checked, the presence of a defect requires the inspector to use the test's Individual Note (next to the test) to enter a DMS Event. Or, if the sub-inspection properties ShowIndividualNote and NoteVisible are both set to False, then the inspector is prompted to enter the Event after the Submit (sub-inspection data) button is pressed.
 If this setting
is checked, the sub-inspection properties NoteVisible
and ShowIndividualNote
must obey the following:
If NoteVisible is True, then ShowIndividualNote must also be True.
If ShowIndividualNote is False, then NoteVisible must also be False.
You can optionally choose to execute a formula for a Pass/Fail/NA test when certain conditions are met during a running inspection.
For PC Collect inspections, they are added to inspections using the PythonScript property for the Formula test in the Inspection Editor
For GS Collect inspections, they are added using the FormulaMobile property for the Formula test in the Inspection Editor
See the OnChange topic for specifics about conditions that trigger the execution when a Pass/Fail/NA test is used in a sub-inspection with a formula.