 Note:
The workstation from which you import the file must also have the same
regional settings (DateTime format) as the workstation from which you
exported the file.
Note:
The workstation from which you import the file must also have the same
regional settings (DateTime format) as the workstation from which you
exported the file.The Import Data Utility is used to import a saved file of data for part numbers/processes. You can import all of the data in the file or only the data for part numbers in the file that you choose. You can also limit the data in the file that you import by setting a date range.
Note:
The workstation from which you import the file must also have the same
regional settings (DateTime format) as the workstation from which you
exported the file.
|
Contents [Hide] |
The Import Data Utility can be accessed from the Import/Export Data function in the GainSeeker Utility module.
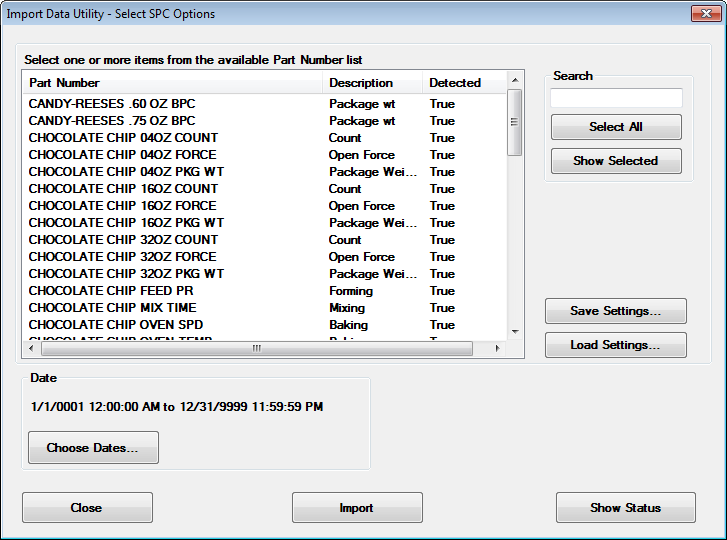
You can either select the standards or processes and the date range for which you want to import data, or you can load settings that you previously saved.
To load settings that you previously saved, click Load Settings. Then choose the desired Settings report and click OK.
This will pre-fill settings for selected standards and date range.
Select the standards or processes for data you want to import.
The Import Data Utility displays all of the standards or processes for which data exists in the file you are importing.
To select all part numbers that display in the list at any time, click the Select All button.
To limit the number of part numbers to those that contain some characters of the part numbers you want to display, enter a few characters of the part numbers you want in the Search field.
To select specific part numbers, that are not listed in succession, press the CTRL key while clicking each part number.
To select a succession of part numbers, hold the SHIFT key while clicking each part number.
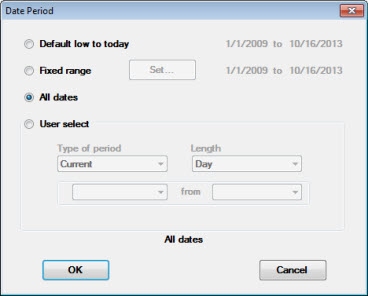
You can also use a date period to restrict the data records that will be imported. To change the date range:
Click the Choose Dates... button on the Import Data Utility.
The Date Period dialog opens. See Setting the Date Period for usage information
When you click the Show Status button on the Import Data Utility, the Import/Export Status dialog opens.
The dialog first lets you view counts for the total number of data records that are associated with the part numbers you have selected for the import. It also displays counts for the individual part numbers you have selected.
This can help you decide if you want to import all of the data associated with a particular part number or whether you want to further limit the data you import to a certain date range. Or, you may choose to limit the number of part numbers you import from the file.
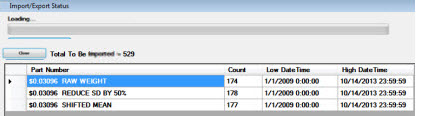
Click Done on the Import/Export Status dialog when you are finished viewing details about your selections.
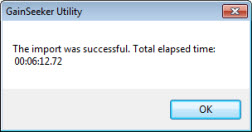
After you have made all of your selections on the Import Data Utility:
The Import/Export Status dialog displays the count for the number of imported records. A dialog displays, confirming whether the import was successful and the total time elapsed to import the data.
To save your settings for later use, click Save Settings and enter a name for this combination of settings (selected standards and date range).
These Settings can also be used by the Export Data Utility and the Delete Data Utility.