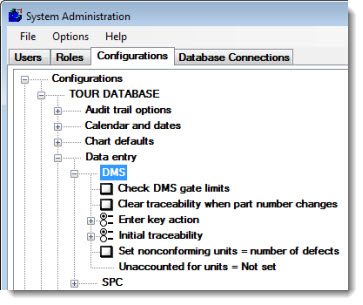
You can specify several default options for collecting defect data.
All of these settings apply to the DMS Data Entry module, and most also apply to the DMS Data Entry tab in the SPC Data Entry module (if available). Some of these settings may also apply when using template commands to enter defect data on the Data Entry tab in the SPC Data Entry module.
To configure these default settings for defect data entry, expand the DMS tree.
|
Contents [Hide] |
Navigate to these settings on the Configurations tab of the System Administration module following this path:
Configurations | (configuration name here) | Data entry | DMS

To perform real-time checks against gate limits during DMS data entry, select this checkbox.
When this option is enabled, GainSeeker checks the data against the gate limit when the data is saved. If the data violates one of the gate limits, GainSeeker displays the Note and Event Entry screen which prompts the data entry operator to enter a note and select an event from the drop-down list of events (optional).
When the data entry operator changes from one DMS standard to another, you can automatically clear any traceability that had been entered for the previous standards during this data entry session.
To configure DMS to function like this:
To avoid clearing the traceability fields when changing to another DMS standard within the same data entry session:
The Enter key action option lets you customize the behavior of the Enter key in the DMS Data Entry module to make keyboard data entry faster and more convenient.
To configure this option, expand the Enter key action tree. Then choose from the following options:
Save/Change – When this option is selected, pressing the Enter key will have the same effect as clicking the Save/Change button to save the data record for the current sample and then to prompt the user to choose a different standard for the next sample. To navigate around the data entry screen, the user can press the Tab key.
Save/Same – When this option is selected, pressing the Enter key will have the same effect as clicking the Save/Same button to save the data record for the current sample and then allow the user to enter the next sample for the same standard. To navigate around the data entry screen, the user can press the Tab key.
Tab to next item – When this option is selected, pressing the Enter key will move the user to the next item (such as the next traceability field or defect) on the data entry screen. This is convenient people who use the numeric keypad to enter defect counts, because after entering the count for the first defect you can press Enter key on the numeric keypad to move to the count field for the next defect.
This setting determines which traceability values will automatically be entered when the user launches the DMS Data Entry module.
To configure this option, expand the Initial traceability tree. Then choose from the following options:
Clear all traceability – When the DMS Data Entry module is launched, all traceability fields will be blank.
Most recent for current standard – When the DMS Data Entry module is launched, it will perform the following steps:
find the standard that was most recently selected for DMS data entry by the user on that computer
retrieve the most recent data record for this standard
automatically enter the traceability values from the retrieved record on the DMS data entry screen
Most recent for current user – When the DMS Data Entry module is launched, it will automatically enter the most recent traceability values that were entered by the user on that computer.
To track the number of nonconforming units separately from the number of defects, clear this checkbox.
Using this method, the data entry operator must accurately enter the sample size, the defect counts, and the number of nonconforming units before storing each data record.
To automatically set the number of nonconforming units equal to the number of defects, select this checkbox.
Using this method, the data entry operator must only enter the sample size and the defect counts before storing each data record. GainSeeker will automatically set the number of nonconforming units equal to the total number of defects.
This method also affects the analysis of DMS data records that are stored with a number of Nonconforming Units that is different from the number of Defects (for example, when this method is not selected in the configuration).
This feature allows the data entry operator to enter the actual number of good pieces inspected. If the number good—plus the number of nonconforming units—does not add up to the expected sample size, GainSeeker can automatically calculate the number of missing pieces and flag them with the defect you specify here.
To enable this feature, the list of all defects must include one defect that is suitable for missing pieces.
Right-click the Unaccounted for units node on this tree.
Choose the defect to automatically apply when the number good plus the number of nonconforming units does not add up to the expected sample size, and then click OK.
To disable this feature, right-click the Unaccounted for units node on this tree. Then choose Not set and click OK.