Installing GainSeeker client version 9.4
Before installing
Where to install
When installing GainSeeker on a traditional client/server
network, you should install GainSeeker at all client workstations,
not at the server itself.
When installing GainSeeker on a terminal server with Citrix
or Terminal Services, you must run the GainSeeker installation
at the terminal server.
When installing GainSeeker on a web server or intranet server
for use with GS Analyze or GainSeeker Mobile Web Service, you
must run the GainSeeker installation at the web server or intranet
server.
Permissions required
System
Requirements
Client must meet the System
Requirements, including:
Copy the GainSeeker
Installation CD and configure Setup.ini (optional)
Recommended practice is to copy the installation
CD (or the \SPC\DISK1\ folder) to a local
drive on the client before running the installation. Alternately, a network
drive can be used.
 Note:
If you run the client installation from a network folder, it may be necessary
to run it as a Domain Administrator or log in to the client operating
system as a Domain Administrator (depending on the security settings for
your network). If you run the client installation from a local drive,
Local Administrator permissions are usually sufficient.
Note:
If you run the client installation from a network folder, it may be necessary
to run it as a Domain Administrator or log in to the client operating
system as a Domain Administrator (depending on the security settings for
your network). If you run the client installation from a local drive,
Local Administrator permissions are usually sufficient.
Configure Setup.ini (optional)
You can edit \SPC\DISK1\Setup.ini
to specify the shared data folder for step
3 below.
If GainSeeker is not already installed on
the client, but the Setup.ini is configured with a config_path,
the installer will automatically detect this information and will not
display that step. (If GainSeeker is already installed on the client,
the local Cms.ini
file will already contain a config_path
and this Setup.ini file will not be used.)
Review
command line parameters
To view available command line parameters
for the installation program, run \SPC\DISK1\SETUP.EXE
/? .
Current parameters for the installation include
/LOG:"filepath\filename" for minimal logging (including Msi error codes), /LOGMSI:"filepath\filename" for verbose logging, and /Q
to run the installation silently. You can specify any combination of these
parameters, if desired.
If the installation does not detect all of
the settings shown in the steps below, it will display a prompt for the
user to enter the missing information - even in silent mode.
Close all GainSeeker modules (if upgrading)
If GainSeeker data already exists on your network,
you may need to have some or all network users exit all GainSeeker modules
before you can successfully install this version of GainSeeker:
When installing this version of GainSeeker on a workstation,
you must close all GainSeeker modules before launching the
installation.
When using GainSeeker on terminal server with Citrix
or Terminal Services, all GainSeeker users must close all
GainSeeker modules before you install this version of GainSeeker.
If any of the shared files on the terminal server are locked
when you try to install GainSeeker, the installation cannot
be successfully completed.
Update shared Cms.ini on Terminal server
(if upgrading)
If upgrading from GainSeeker version 8.7
or previous, on a Citrix or Terminal Services implementation where users
are assigned their own Home directories, it is recommended that you edit
the Cms.ini file in the shared Windows folder and remove the physid= setting
(if present).
Do not Uninstall previous versions
Do not uninstall previous versions of GainSeeker
before installing GainSeeker v9.4.
Performing
the full client installation
Launching the installation
From the GainSeeker installation CD
- or from a local or network copy of the CD - run
\SPC\DISK1\SETUP.EXE
, with or without command line parameters.
(Do not
try to run the .msi file to install GainSeeker.
The SETUP.EXE must perform several tasks
before it launches the .msi.)
Windows that may appear during the installation
Step 1
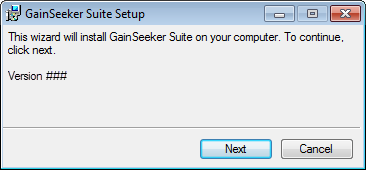
In silent mode,
this step will not be displayed.
Step 2
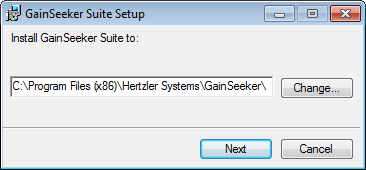
Choose a folder for the GainSeeker program
files.
In silent mode,
the default folder will be used, and this step will not be displayed.
Step
3
If GainSeeker is already installed on this
client, the installer will automatically detect this information and will
not display this step.
If GainSeeker is not already installed on
this client, but the Setup.ini is configured with
a config_path, the installer will automatically
detect this information and will not display this step.
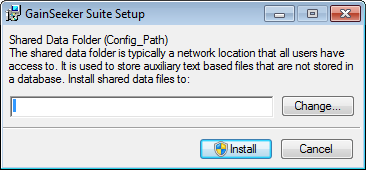
Specify a network file path where shared
data files exist (or should be placed).
It is strongly recommended that you specify
a UNC path rather than a mapped network drive.
If you need to use a mapped network drive and have
problems during the installation, you may need to follow
the instructions in this Microsoft
support article or use the Client
update with mapped network drive described below.
If you use a UNC path but receive erroneous error
messages (that the specified folder is not a valid short
file name, or that there is no disk space in the specified
folder), ensure that the current user has "read attributes"
permission on the share base folder and is able to check
volume information. (This is a known
issue with the Windows MSI installer.)

If the folder you specify does not exist,
the installation program will attempt to create it for you.
The path you specify will become the config_path=
setting in Cms.ini
on this workstation.
Step 4
In silent mode,
this step will not be displayed.
Set
up Database Connection
If GainSeeker is already installed on your
network, the installer will automatically detect this information from
the file path on step 3 and will not display this step.
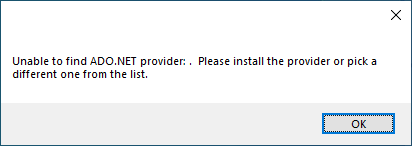
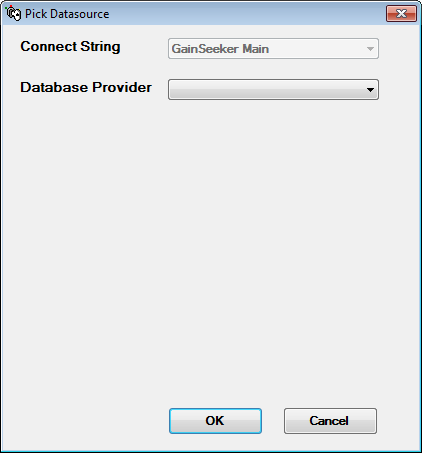
Click the Database
Provider list and select the provider that is appropriate for your
GainSeeker database:
GainSeeker database: |
Data
Provider: |
SQL Server |
SQLClient |
MySQL |
MySQL |
Oracle |
OracleClient |
Pervasive (database
mode) |
Pervasive
PSQL |
Enter the other information on this window
that is needed to connect to your GainSeeker database.
The fields provided on this window will
vary with the type of Data Provider
you selected. For some fields, you can click the  button to fill the list of options and then the drop-down arrow to show
the list again. For an Oracle database, the Database
server you specify will actually be the Oracle
Net Service Name you have
set up on the workstation.
button to fill the list of options and then the drop-down arrow to show
the list again. For an Oracle database, the Database
server you specify will actually be the Oracle
Net Service Name you have
set up on the workstation.
You can also use the Options
box to enter any additional connection string parameters that do not match
any of the other fields provided on this window. More information can
be found at the web addresses listed below:
Click Test
to test the database connection.
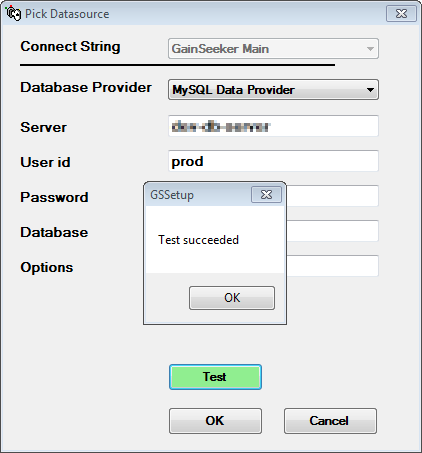
If the test was not successful, you will
need to change one or more settings before saving the database connection.
After the database connection has been successfully
tested, click OK.
Install License and Serial Number
If GainSeeker is already installed on your
network, the installer will automatically detect this information from
the file path on step 3 and from the database connection above, and will
not display this step.
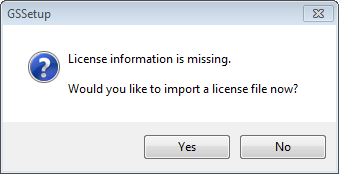
Click Yes,
then navigate to the license file that was provided to you (typically
named GS_Suite.lic). (If you do not have a license file, you will be prompted
again to import it when you try to run a GainSeeker module such as LaunchPad
or System Administration.)
After the license file is imported, GainSeeker
will display the details of your license and serial number:

Automatically running Table Creation Utility
The first GainSeeker client installation
on your network will automatically run the Table
Creation Utility to scan all GainSeeker configurations and create
any new or missing tables or file paths. If file paths are missing, it
may prompt the user about creating them - even in silent
mode.
All other GainSeeker client installations
for this version of GainSeeker will skip this step.
If you are upgrading from a GainSeeker version
prior to 8.4, the following changes may be automatically applied to your
GainSeeker database:
After the installation
Additional tasks for Citrix and Terminal
Services (if upgrading)
If upgrading from GainSeeker version 8.7
or previous, on a Citrix or Terminal Services implementation where users
are assigned their own Home directories, you may need to reset the PhysID=
and User_Name=
settings for those Terminal Services users. This is because GainSeeker
versions 8.8 and later now set and read these three settings in a new
user-specific Usershared.settings
file and may not be able to read the previous settings from their former
location.
Additional tasks for Citrix and Terminal
Services (new installation)
In a multisession
application hosting environment such as Citrix and Windows Terminal Services,
it is not necessary to install GainSeeker on additional workstations.
However, you may need to perform one or more
of the following steps after installing GainSeeker on your terminal server:
During installation on Windows Vista (or
later), changes may be made to the Cms.ini in the Virtual Store folder
instead of the Windows
Folder. It is a best practice to copy the Cms.ini file from the Virtual
Store folder to the Windows folder. When other Windows users log
into that workstation to run GainSeeker, it uses the Cms.ini file in the
Windows Folder as a base file, which copies to that user's Virtual Store
folder.
Ensuring backups
After installing GainSeeker, ensure that your
GainSeeker database and your shared data folder will be backed
up regularly.
Do not Uninstall previous versions
Do not uninstall previous versions of GainSeeker
after installing GainSeeker v9.4.
Other steps
Client update with mapped network
drive
If you are updating a workstation or server
where GainSeeker is already installed, use a mapped network drive, and
have problems accessing mapped network drives during the client installation,
you can use the following instructions to perform a local version of the
client update that does not require network access:
Copy the installation CD (or the
\SPC\DISK1\ folder) to a local
drive on the client.
In the local copy of the installation
CD, edit \SPC\DISK1\Setup.ini
and set the local= parameter to
True .
From the local copy of the installation
CD, run \SPC\DISK1\SETUP.EXE (with
or without command line parameters).
Because this local client update does not
perform any steps that require network access, best practice is to perform
the full client installation from at least one workstation or server on
your network. If this is not possible, you may need to import
a License File, and you should run the Table
Creation Utility - once for each configuration - from one GainSeeker
client on your network (after running this local client update).