![]() See
an example of a running inspection on a mobile device and how
the inspection was created
See
an example of a running inspection on a mobile device and how
the inspection was created
Steps 1 through 6 below show you the progression of pages you are likely to encounter when running an inspection in the legacy GS Collect app on a mobile device, such as an iPad.
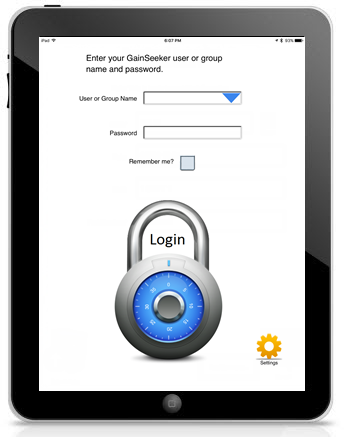
Tap the GS (GainSeeker) Collect icon on your mobile device to open the installed application.
Next, enter your User or Group Name
and Password in the corresponding
field. Then, tap the Login icon.
Alternately, you can tap the ![]() Settings
icon on the page to change some settings before logging in.
Settings
icon on the page to change some settings before logging in.
Each device will remember the User and Group Names that have been used on that device. Tap the blue arrow to select a previously logged in User or Group Name. This list can be cleared by purging data on the Settings page.
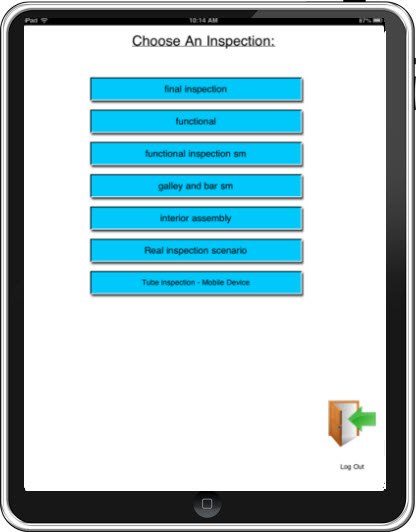
Next, tap an inspection button to run an inspection.
Next, you will choose or enter a unique ID for the inspection. This might be a specific serial number for a product, for example. On this page you can:
Enter a New Inspection ID or use the inspection ID that may be prefilled in the field (depending on your inspection property settings)
To continue to the next page after making your selection, tap the CONTINUE arrow.

The New Inspection ID field is where the unique ID for the current inspection displays (prefills) or where the operator is required to enter a new ID for each inspection. An Inspection ID is used to uniquely identify each inspection that is conducted. By default, GainSeeker prefills the New Inspection ID field with the current date and time of the inspection (using the device clock).
However, the unique ID for the inspection may be set to something else, such as a serial or lot number, for example, if that makes more sense. This type of ID may also be set to prefill the most recently used ID in the New Inspection ID field, which might be useful for a product that has multiple inspections over a shift or over time. Then, when you are ready to conduct an inspection for the next item, you can enter text for the new ID or use the barcode scanner on the device to scan the ID and enter into the field. Alternately, the operator may have to enter a new unique ID for each inspection that is conducted.
Choose Existing Inspection ID:
The Choose Existing Inspection ID: field displays a list of existing inspection IDs (if there are any) that have been conducted in part or in full. If you select an Inspection ID in this list and then tap Continue, you must choose one of the options that display for that ID: Resume, Restart Inspection, or Cancel.
Resume
The Resume option opens the Choose a Sub-Inspection for: ["inspection name"] page, the menu page that has a button for every sub-inspection in the inspection. GainSeeker opens to the list of sub-inspections, even if the AutoAdvance property is set to True. This allows you to resume a previous inspection, view which sub-inspections are complete, and complete any remaining sub-inspections. It recalls the traceability information for that inspection. Additionally, if the UseRed property for the inspection has been set to True, buttons for completed sub-inspections containing defects display red, buttons for sub-inspections for which no data has been submitted display blue, and buttons for completed sub-inspections containing no defects display green.
More information about sub-inspection button color coding
*Alternately, if the AutoAdvance property has been changed to True, the resumed inspection will not open on the Choose a Sub-Inspection for: ["inspection name"] page. Instead, it will open on the page for the first sub-inspection, usually the TRACEABILITY sub-inspection. From there, the operator will automatically advance through all the sub-inspections in order.
However, by using the following method, you can still return to the Choose a Sub-Inspection for: ["inspection name"] page and see which sub-inspections still need to be conducted for the inspection:
After submitting data for the TRACEABILITY sub-inspection, tap Cancel on the page. This will return you to the Choose a Sub-Inspection for: ["inspection name"] page. From there, you will automatically advance through the inspection (but only if the AutoAdvance property has been set to True).
Data for a resumed sub-inspection is stored as separate data in addition to any original data. None of the original data is changed.
Restart
The Restart Inspection option allows you to repeat the entire inspection for the Inspection ID, but it does not overwrite previously submitted data. Data for a repeated sub-inspection is stored as separate data in addition to any original data. If the AutoAdvance property is set to True, you will automatically advance through the sub-inspection pages on the device. If it is set to False, you will return to the Choose a Sub-Inspection for: page where you can choose which sub-inspection to perform next. (Sub-inspection buttons on the Choose a Sub-Inspection for: page revert to blue.
Cancel
The Cancel option cancels opening the selected inspection and keeps the Choose a Sub-Inspection for: ["inspection name"] page open.
![]() For a mobile device-enabled inspection,
this first sub-inspection should have been labeled "Traceability"
when the inspection was created using the Inspection Editor. See the topic
Sub-inspections for information
about performing this important step.
For a mobile device-enabled inspection,
this first sub-inspection should have been labeled "Traceability"
when the inspection was created using the Inspection Editor. See the topic
Sub-inspections for information
about performing this important step.
This page contains basic traceability information for the inspection, such as the date, shift, and part number, for example. Information for all fields on this page should be provided before you run an inspection. This helps to ensure proper data storage for the ensuing inspection. GainSeeker uses color-coding to help signal you about whether the required information has been submitted for the TRACEABILITY page.
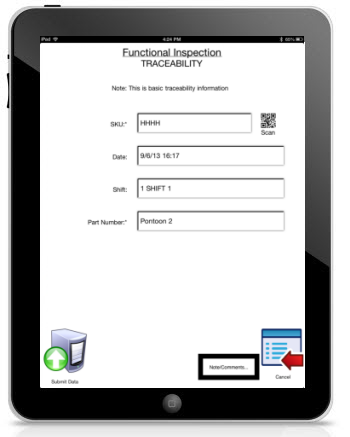
You must submit the data for a sub-inspection before proceeding to another sub-inspection. See Submitting sub-inspection data below in this topic.
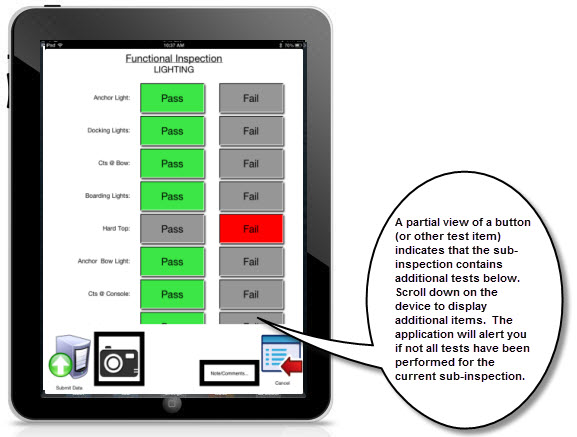
Each sub-inspection page following the Traceability sub-inspection page contains selected tests. Each sub-inspection comprises a single page on the mobile device. However, not all tests on a sub-inspection page may be fully in view on the mobile device, such as on this example of a sub-inspection containing Pass/Fail tests:
You must submit the data for a sub-inspection before proceeding to another sub-inspection. See Submitting sub-inspection data below in this topic.
When you are finished conducting all tests for a sub-inspection, tap
![]() Submit Data.
Depending on the settings that were set for the inspection, you will either:
Submit Data.
Depending on the settings that were set for the inspection, you will either:
be returned to the Choose a Sub-Inspection page where you can select the next sub-inspection to perform, or
you will automatically advance to the next sub-inspection.
The Settings page can be accessed from the GS Collect Login page on the mobile device.
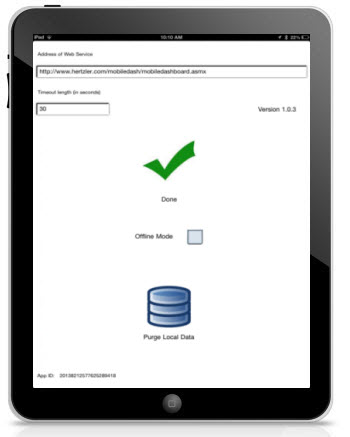
Address of Web Service
Field displays the URL for the GainSeeker Collect Web Service
Timeout length (in seconds)
Use this field to change the screen timeout length using seconds as the time increment.
GS Collection Version
Displays the version of the GS Collect app you are currently using.
Done
Tap the green arrow or the word Done to return to the GS Collect Login page.
Purge Local Data
![]() Only use the Purge
Local Data button if:
Only use the Purge
Local Data button if:
–and–
When you tap the Purge Local Data button on the Settings page, the application will ask you to confirm that you want to delete this information.
(See Deleting an inspection for information about permanently deleting an inspection from your GainSeeker system.)
Photos and videos for mobile inspection are stored and linked to any notes for that sub-inspection and all of its tests it contains, but not to a specific test. For example, if a sub-inspection has six tests, any photos, videos, and notes are stored with each of the six tests for that sub-inspection.
If you set the StoreAll property for the inspection to False, data that passes the Pass/Fail/NA test and/or the Defect List test is not stored. The default setting, True for the StoreAll property, stores defect and passing data. Storing both types of data tells you that a test was performed.
Example:
You choose to only store data with defects and you have six Pass/Fail/NA tests in a sub-inspection. If the sample passes all six tests, then no data for these six tests would be stored for this sub-inspection.
You choose to store data with defects and data without defects and you have six Pass/Fail/NA tests in a sub-inspection. If the sample passes 3 of those tests and fails the other 3, then there would be data stored for six tests for this sub-inspection.