 Tip:
Before you begin creating Planned Inspections:
Publish Inspections for PC, Mobile, or Both.
Create all of the SPC standards, DMS processes, and DMS standards that you expect to use. You can do this from the Setup menu.
Planned Inspections shorten your setup time when you have many similar parts and/or processes. They also make it simpler to deploy changes in one Inspection across similar parts and processes.
A Planned Inspection lets you choose an existing Inspection but specify different standards, processes, traceability values, and documents. So instead of creating and publishing multiple Inspections that are almost identical, you create one Inspection for the first part and process – and then use it as the basis for creating and publishing multiple Planned Inspections.
When changing the Inspection for these parts and/or processes, you only need to change and publish the single Inspection underlying the Planned Inspections. This is much simpler than editing many Inspections that are almost identical.
Your users will run Planned Inspections in the same PC Collect module and/or GS Collect mobile app that is used for Inspection data entry. To run Planned Inspections on the GS Collect mobile app, you must use GS Collect version 1.0.19 or higher and GainSeeker Mobile Web Service version 8.5.0 or higher.
|
If the Manage Inspections window is automatically** displayed, close that window and then click the Manage Planned Inspections button to display a list of Planned Inspections like the picture below.
If the main window is displayed and you can access the buttons and menus, click the Manage Planned Inspections button to display a list of Planned Inspections like the picture below.
It is also possible that the list of Planned Inspections is automatically** displayed.
** You can change this default behavior from the Startup menu.
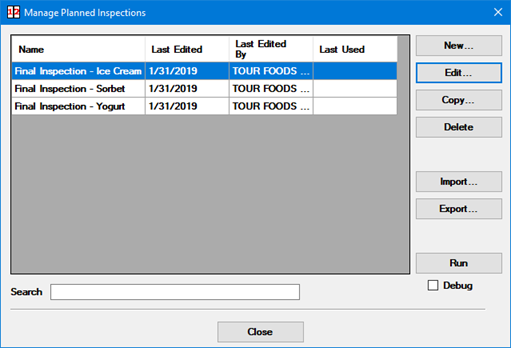
This will take you to Step 1 of the Planned Inspection editor.
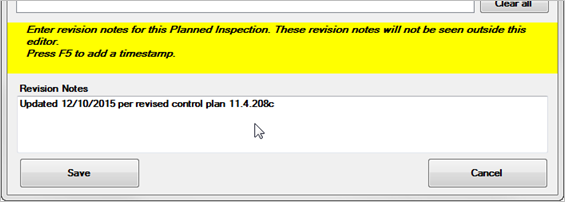
Revision Notes will not be displayed to data entry users. You can use this area to maintain internal notes on how this Planned Inspection was designed or modified, its intended use, setup needs, etc.
To view on-screen Help for any field on these steps, hover your mouse over the field. The Planned Inspection editor will use the yellow area to display information about using that field.
In the example shown above, hovering the mouse over the Revision Notes field displays information in the yellow area about revision notes.
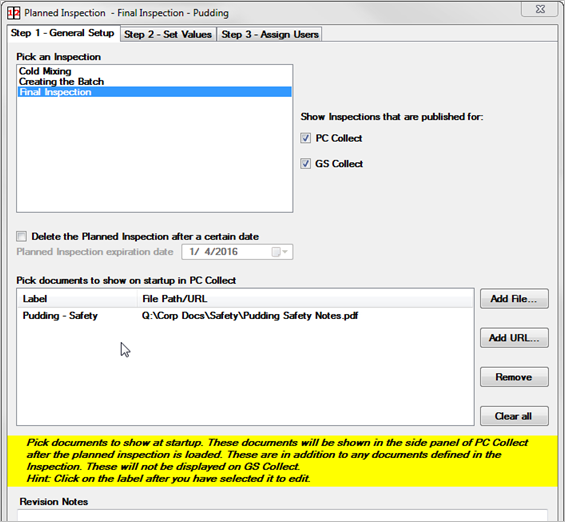
Choose the platform for this Planned Inspection – PC Collect, GS Collect, or both platforms.
Pick an Inspection on which to base this Planned Inspection. Each inspection listed has been published for the platforms you specified – PC Collect, GS Collect, or both.
In the example shown above, each inspection in the list was published for both PC Collect and GS Collect.
|
In addition to any documents, URLs, and images configured in the Inspection, you can display additional documents when the Planned Inspection opens.
Files and URLs follow the same rules as the URL/HTML/File test and the Image test for Inspections, except that you cannot enter raw HTML code.
After choosing a file or URL, you can click in the Label column to change the text displayed on this item's side panel tab.

Additional documents are not displayed on the GS Collect mobile app. They are only displayed in the PC Collect module.
If desired, set a date after which GainSeeker will automatically delete the Planned Inspection.
On this step, you can set standards, process, and traceability values that are different from the Inspection:
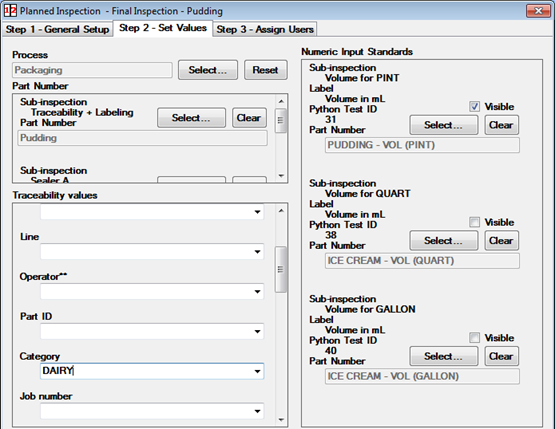
The DMS Process you select will be used to enter and store data instead of the Process configured in the Inspection.
If you change the Process and then want to go back to the Process configured in the Inspection, click Reset.
Any DMS Part Numbers you select will be used to enter and store data instead of the Part Numbers configured in the Inspection.
You can select DMS Part Numbers that have standards for the selected Process (above).
If a DMS Part Number is blank, the data entry user will need to choose a DMS Part Number during data entry.
In the example shown above, the Process "Packaging" was selected, and the DMS Part Number was changed from "Ice Cream" to "Pudding" in all cases.
Any SPC Standards you select will be used to enter and store data instead of the SPC Standards configured for Numeric Input tests in the Inspection.
In the example shown above, the SPC Standard for the first Numeric Input test was changed from "ICE CREAM - VOL (PINT)" to "PUDDING - VOL (PINT)", and the other two Numeric Input tests were turned off.
Any Traceability values you enter will be entered when running the Planned Inspection and will override the values configured in the Inspection.
If a Traceability field is left blank, the Planned Inspection will use the value configured in the Inspection.
You can enter values for Traceability tests in the Inspection (marked with **) and values that do not have Traceability tests in the inspection. Both types of information will be stored.
If a Traceability test in the Inspection is configured to Restrict the user to values on the pre-defined list, you should also choose a value for that test from the pre-defined list. If you enter a value that is not found in the pre-defined list, it will be ignored during data entry.
If the Inspection is configured to use a Unique ID, any Planned Inspections based on it will also run with the Unique ID. When the data entry user first launches the Planned Inspection, the traceability values from the Planned Inspection will be used. When resuming the data entry session for that Unique ID, the traceability values remembered from that Unique ID will be used.
In the example shown above, the value "DAIRY" will be entered and stored for the traceability field "Category" – even though the Inspection does not include a Traceability test for "Category".
When a Planned Inspection is based on an Inspection that uses Unique ID, resuming that Unique ID during data entry can remember values pre-filled by Step 2 of the Planned Inspection editor and user-selected values (traceability, process, and standards).
However, PC Collect and the GS Collect mobile app show different results in cases where the Planned Inspection pre-fills a value and then the user selects a different value for that test:
In PC Collect – the user-selected value will be applied when resuming that Unique ID.
In the GS Collect mobile app – the value in the Planned Inspection will be applied when resuming that Unique ID.
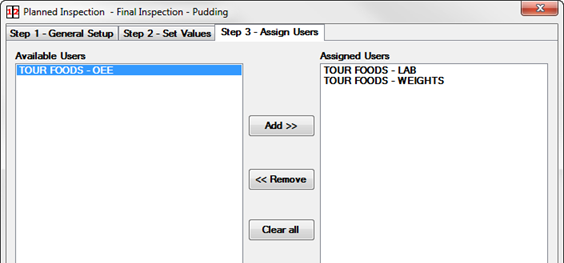
To allow all Available Users to access this Planned Inspection, do not assign any users. To remove any users that have been assigned, click Clear all.
To allow only specific Users to enter data with this Planned Inspection, Add those users to the list of Assigned Users. This prevents the Available Users from accessing this Planned Inspection.
|
You can use the Run button on the Manage Planned Inspections window to run a Planned Inspection directly from the GainSeeker Inspections module. This can be useful for testing how a Planned Inspection that you are designing will perform during the actual inspection process. Optionally - if your inspection includes Python formulas, you can use the Debug check box to run those formulas in the Python Debugger.
To run a Planned Inspection from the Mange Planned Inspections window, select that inspection and then click Run.
Entering data in a Planned Inspection looks just like entering data in an Inspection, except that users will choose from a list of Planned Inspections instead of choosing from a list of Inspections.
If the Pick an Inspection window is automatically** displayed, close that window and then click the Start Planned Inspection button to display a list of Planned Inspections like the picture below.
If the main window is displayed and you can access the buttons and menus, click the Start Planned Inspection button to display a list of Planned Inspections like the picture below.
It is also possible that the list of Planned Inspections is automatically** displayed.
** You can change this default behavior from the Startup menu.
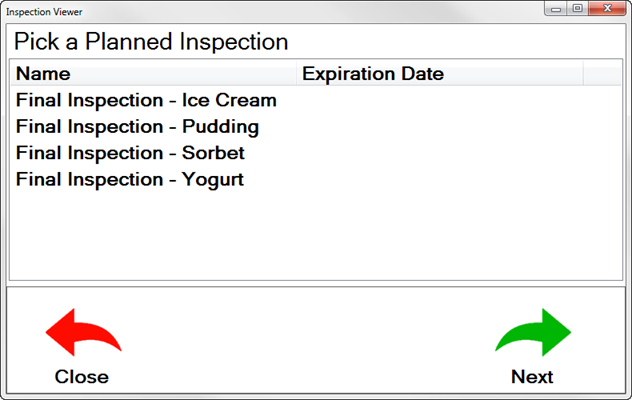
Select a Planned Inspection and begin entering data just as you would enter data in an Inspection.
You can configure this computer to automatically launch the list of Planned Inspections when the PC Collect module is launched.
To do so, click the Startup menu on the main window, and then click Start Planned Inspection.
If you want to prevent data entry users from accessing the list of Inspections, you can modify the Role for these users and deny them access to Data Entry | File Open | Template and Inspection.
You can create a shortcut to launch a specific Planned Inspection.
To display the list of Planned Inspections in GS Collect:
Log out of GS Collect
Touch the Settings
button ![]() on the login
page
on the login
page
Select the Use Planned Inspections check box and then touch Done.
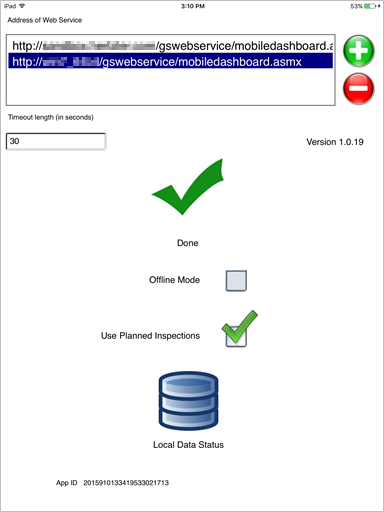
Log in to GS Collect. The list of Planned Inspections is now displayed.
If the Manage Inspections window is automatically** displayed, close that window and then click the Manage Planned Inspections button to display a list of Planned Inspections like the picture below.
If the main window is displayed and you can access the buttons and menus, click the Manage Planned Inspections button to display a list of Planned Inspections like the picture below.
It is also possible that the list of Planned Inspections is automatically** displayed.
** You can change this default behavior from the Startup menu.

To import a Planned Inspection from a file with the extension *.pix, click the Import button.